关于独立制造电池(18650等)的接触焊接设备的小文章。 借助这种设备,无论是在家中
还是使用即用型材料 ,都可以焊接和维修电池和组件。 便宜,开朗且人人负担得起。
问候大家!
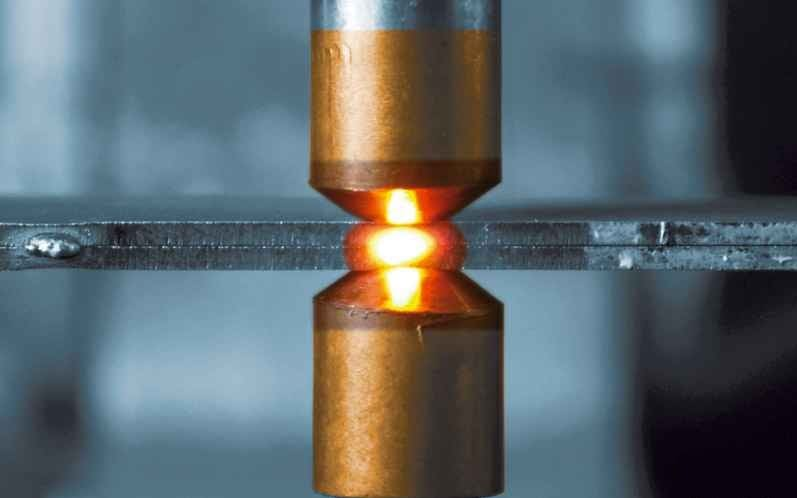
点焊是一种接触焊(
源 )。
有购买的选件,与SUNKKO相同,但几乎所有选件都需要对其材料进行改进,并且需要-增加电流,更换计时器等。 自行选择“适合自己”选项会更容易。
优势-您将获得具有固有特性的知名功能选项。 您需要的-并提供此类服务。
基本且成熟的DIY选项是基于功能强大的变压器(降压)和带继电器的计时器构建的。 有机会使其变得更简单-仅由汽车电池供电的电极,但这不是最方便的选择。
特别要求:
- 高焊接电流(高达600 ... 900A);
- 双脉冲焊接;
- 调整脉冲持续时间(几分之一秒);
- 不带辅助变压器的板载电源;
- 打开固件(Arduino)并具有调整代码的能力。
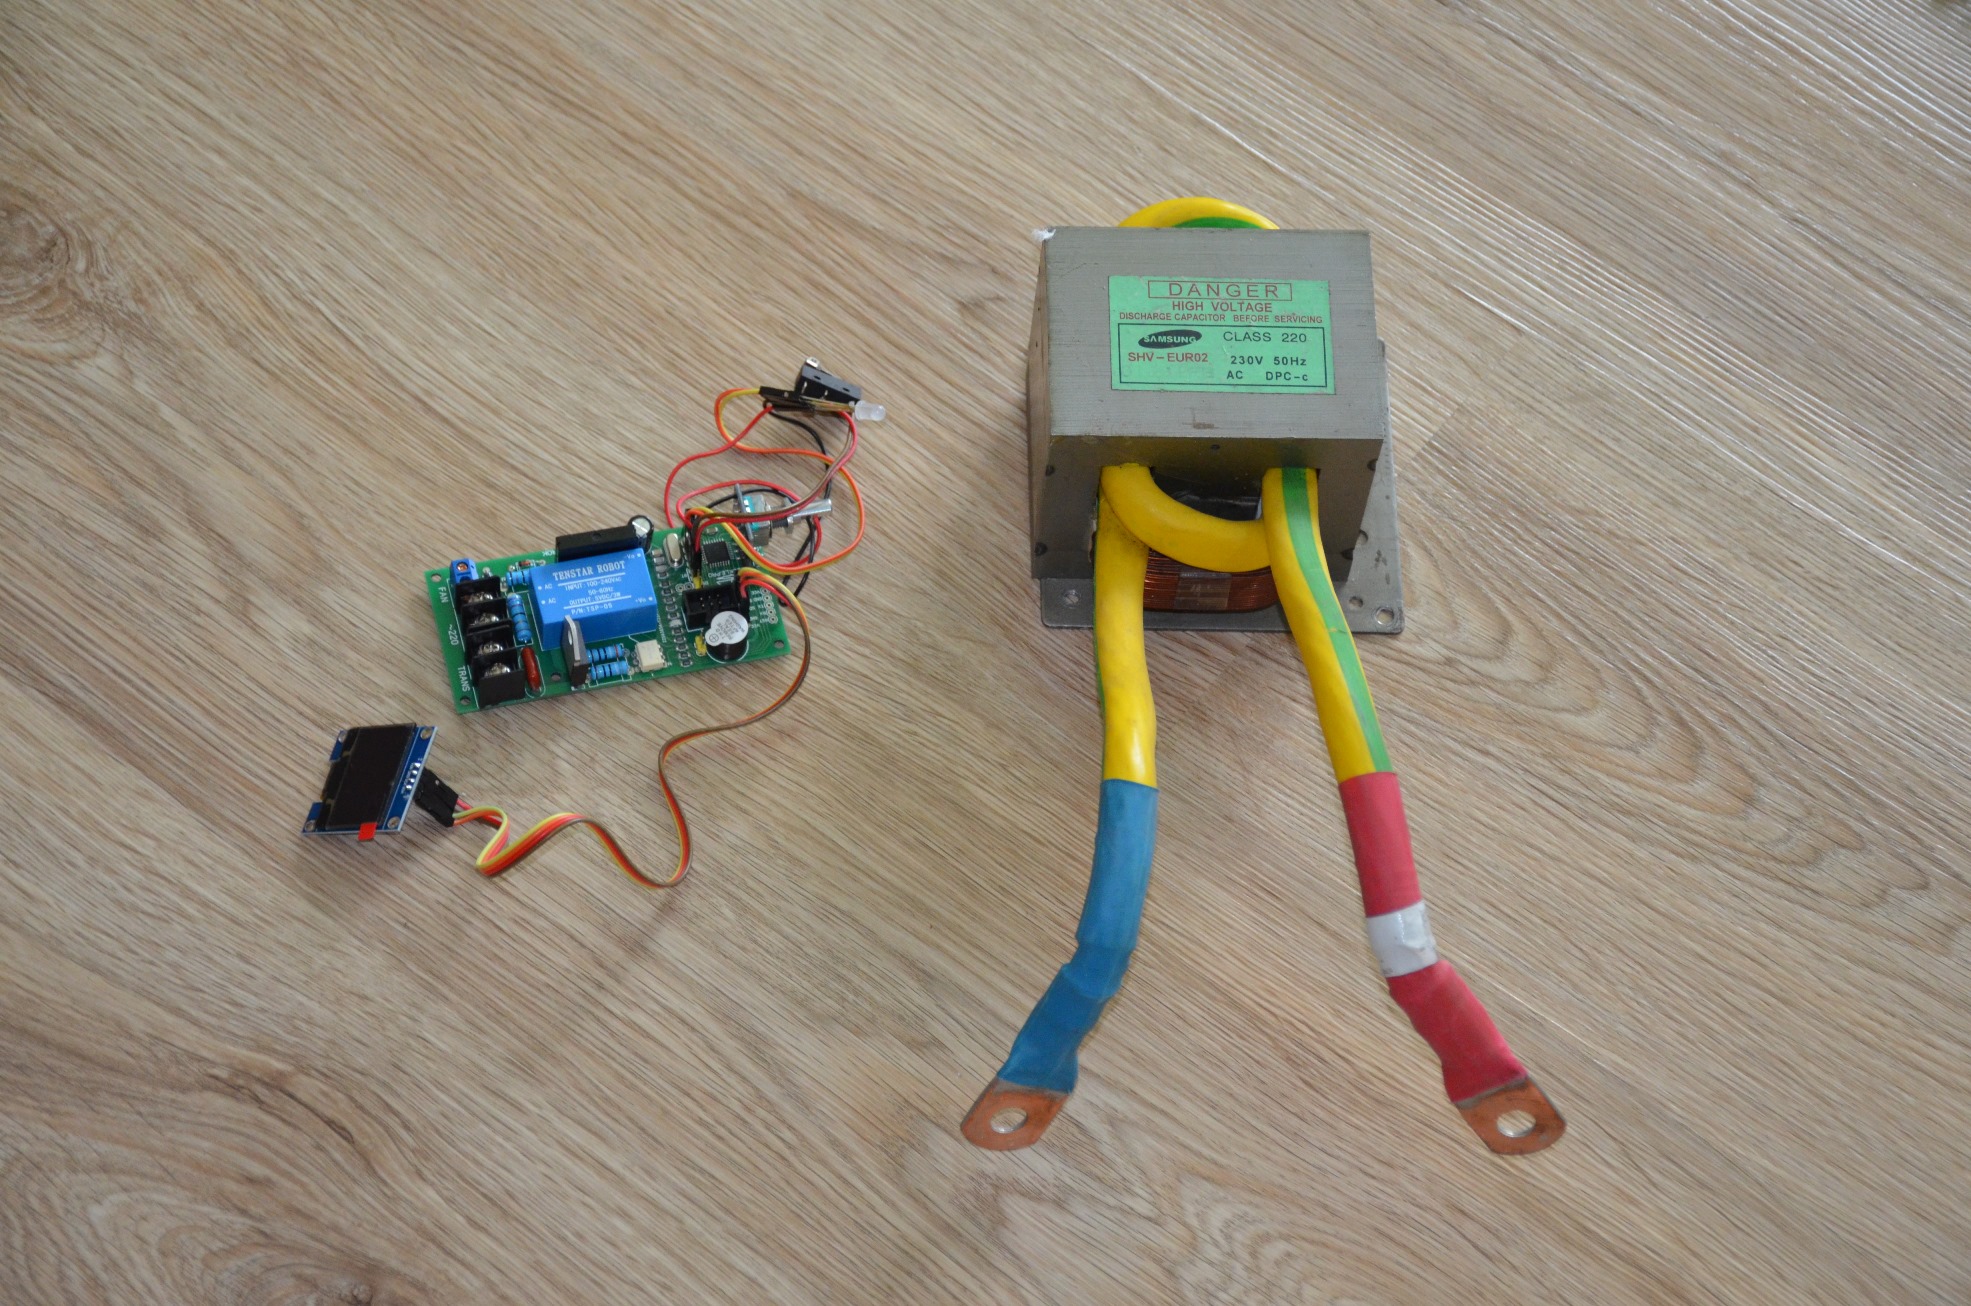
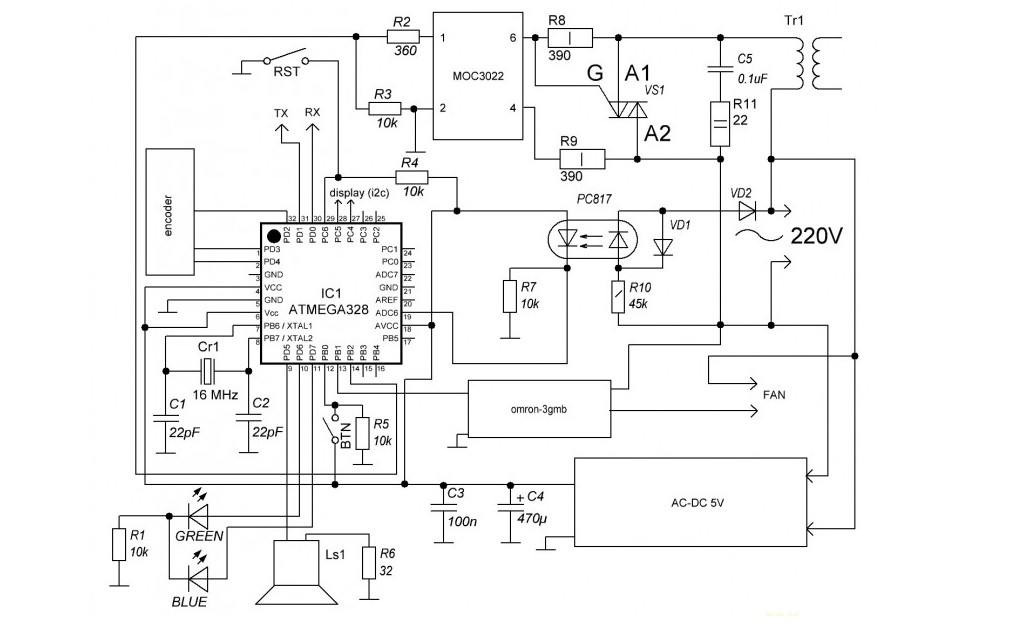
选择的控制板版本基于ATmega微控制器。 此外,还包括电源转换器(Hi-Link)和电路低压部分的电流隔离。

可以找到已组装或单独安装的
控制板 (
印刷电路板 )。 为了自行生产印刷电路板(LUT),我附加文件
dot_svarka.lay6 。

此外,还购买了
KY-040编码器来控制菜单和进行调整。

为了方便起见,选择了带有I2C总线(4针)的0.96英寸
OLED显示器 ,该选项可与Arduino库一起正常使用,外观还不错。

为了提供焊接信号,使用了按钮或微动开关(限位开关)。
一个简单的踏板也很适合,这里适合谁,什么都方便。 这是简单的两线连接。

此外,您将需要电线,保险丝,插头,连接器,风扇等。...手边或附近的无线电商店中都可以找到的小物件。 而且应该有一个节俭的自制男人。

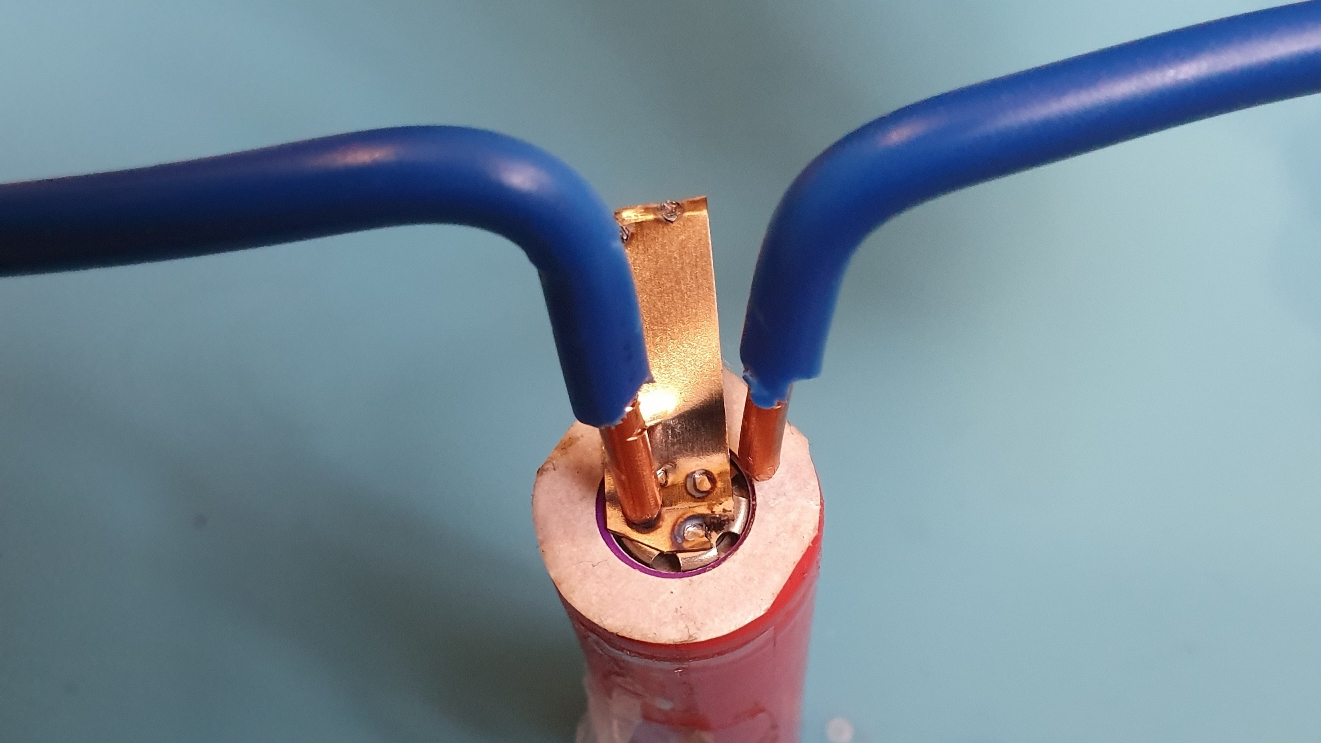
将需要消耗材料,例如用于焊接元件的
镍带 。

有一个很好的模型,用于接触焊接的3D打印手柄(
点焊机手柄ZBU-4.2 w /按钮 )。

链接到草图
焊接__dot.ino 。
编码器处理代码的一部分// encoder pin and interrupt const byte encoder_A_Pin = 3; const byte encoder_B_Pin = 2; const byte encoderButtonPin = 4; const byte interruptA = 1; const byte interruptB = 0; boolean encoder_rotate = false; // last state encoder A pin boolean currentA = false; // last state encoder B pin boolean currentB = false; // Timeout for different long and short button on const unsigned long timoutHoldButton = 9000; // 9 sec // Timeout for bounce protect encoder button const unsigned long debounceEncButton = 20; // 20 ms // Time on encoder button unsigned long timeOnEncButton = 0; // Time off encoder button unsigned long timeOffEncButton = 0; unsigned int buttonEncCurrentVal = HIGH; unsigned int buttonEncLastVal = HIGH; boolean ignoreEncOff = false; void setup() { // encoder init pinMode(encoder_A_Pin, INPUT); digitalWrite(encoder_A_Pin, HIGH); pinMode(encoder_B_Pin, INPUT); digitalWrite(encoder_B_Pin, HIGH); pinMode(encoderButtonPin, INPUT); digitalWrite(encoderButtonPin, HIGH); // enable encoder change interrupt attachInterrupt(interruptA, onA, CHANGE); attachInterrupt(interruptB, onB, CHANGE); } //////////////////////////////////////////////////////////////////////////////////////////////////////////////////// // increment rotate //////////////////////////////////////////////////////////////////////////////////////////////////////////////////// void onA(){ if (encoder_rotate) delay (1); if (digitalRead(encoder_A_Pin) != currentA ) { currentA = !currentA; if ( currentA && !currentB ) { Serial.println("+ encoder"); } encoder_rotate = false; } } //////////////////////////////////////////////////////////////////////////////////////////////////////////////////// // decrement rotate //////////////////////////////////////////////////////////////////////////////////////////////////////////////////// void onB(){ if ( encoder_rotate ) delay (1); if( digitalRead(encoder_B_Pin) != currentB ) { currentB = !currentB; if( currentB && !currentA ){ Serial.println("- encoder"); } encoder_rotate = false; } } //////////////////////////////////////////////////////////////////////////////////////////////////////////////////// // main loop //////////////////////////////////////////////////////////////////////////////////////////////////////////////////// void loop() { CurrentTime = millis(); //////////////////////////////////////////////////////////////////////////////////////////////////////////////////// // ENCODER BUTTON encoder_rotate = true; buttonEncCurrentVal = digitalRead(encoderButtonPin); // Test for button pressed and store the down time if (buttonEncCurrentVal == LOW && buttonEncLastVal == HIGH && (CurrentTime - timeOffEncButton) > long(debounceEncButton)){ timeOnEncButton = CurrentTime; } // Test for button release and store the up time if (buttonEncCurrentVal == HIGH && buttonEncLastVal == LOW && (CurrentTime - timeOnEncButton) > long(debounceEncButton)){ if (ignoreEncOff == false){ Serial.println(F("short enc")); }else{ ignoreEncOff = false; } timeOffEncButton = CurrentTime; } // Test for button held down for longer than the hold time if (buttonEncCurrentVal == LOW && (CurrentTime - timeOnEncButton) > long(timoutHoldButton)){ Serial.println(F("long enc")); ignoreEncOff = true; timeOnEncButton = CurrentTime; } buttonEncLastVal = buttonEncCurrentVal; }
组装设备并不困难。 对我来说,最昂贵的事情是找到一个功能强大的降压变压器。 最实惠的选择之一是用微波炉制造的变压器,而不是用次级提升绕组缠绕1.5到2匝粗铜线(横截面50到70平方米)。
我不会在无意间写关于设备外壳的信息-没有特殊要求。 通常用于CEA或旧设备的用例。 就我自己而言,我可以建议将外壳从内部屏蔽掉以免受到脉冲干扰,还可以为变压器提供冷却风扇,该风扇在长时间运行时会发热。
电路板的焊接如下。
组装后,最好进行测试并确定脉冲持续时间的最佳值。 在我的情况下,使用的是6平方英寸的铜线。 毫米作为电极。

双脉冲沸腾良好,根据磁带的厚度选择持续时间。 保持间隙不比工厂焊接差。
现在,您可以轻松地为电动自行车组装大电池,修理陀螺踏板车的电池并升级螺丝刀。

测试自制触点焊接的视频。
在电池中焊接元件18650的过程。
对我来说,这种选择的价格几乎是出厂价的一半。 仍然需要完善。 结果使自制的接触焊接性能极好。