现代企业应用程序的用户界面非常复杂。 作为开发人员,您通常需要实现应用内导航,验证用户输入,根据用户偏好显示或隐藏屏幕。 为了获得更好的用户体验,您的应用程序应能够在应用程序挂起时将状态保存到磁盘,并在应用程序恢复时恢复状态。
ReactiveUI提供的功能允许您在应用关闭或挂起时通过序列化视图模型树来保持应用状态。 暂停事件因平台而异。 ReactiveUI对WPF使用Exit事件,对Xamarin.Android使用ActivityPaused对于DidEnterBackground使用DidEnterBackground,对于UWP使用OnLaunched 。
在本教程中,我们将构建一个示例应用程序,该应用程序演示ReactiveUI Suspension功能与Avalonia (基于跨平台.NET Core XAML的GUI框架)的结合使用。 在阅读本说明之前,您应该先熟悉MVVM模式和响应式扩展 。 如果您使用的是Windows 10或Ubuntu 18并且安装了.NET Core SDK,则本教程中描述的步骤应该可以使用。 让我们开始吧!
引导项目
若要查看实际的ReactiveUI路由,我们基于Avalonia应用程序模板创建一个新的.NET Core项目。 然后,我们安装Avalonia.ReactiveUI软件包。 该软件包提供了特定于平台的Avalonia生命周期挂钩, 路由和激活基础结构。 执行以下命令之前,请记住安装.NET Core和git 。
git clone https://github.com/AvaloniaUI/avalonia-dotnet-templates git --git-dir ./avalonia-dotnet-templates/.git checkout 9263c6b dotnet new --install ./avalonia-dotnet-templates dotnet new avalonia.app -o ReactiveUI.Samples.Suspension cd ./ReactiveUI.Samples.Suspension dotnet add package Avalonia.ReactiveUI dotnet add package Avalonia.Desktop dotnet add package Avalonia
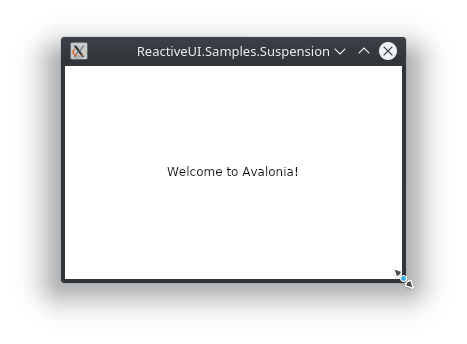
让我们运行该应用程序,并确保它显示一个显示“欢迎使用Avalonia!”的窗口。
# Use .NET Core version which you have installed. # It can be netcoreapp2.0, netcoreapp2.1 and so on. dotnet run --framework netcoreapp3.0
从MyGet安装Avalonia预览版
每次将新提交提交到GitHub上Avalonia存储库的master分支时,最新的Avalonia软件包就会发布到MyGet 。 要在我们的应用程序中使用MyGet的最新软件包,我们将创建一个nuget.config文件。 但是在执行此操作之前,我们使用.NET Core CLI为先前创建的项目生成一个sln文件:
dotnet new sln # Ctrl+C dotnet sln ReactiveUI.Samples.Suspension.sln add ReactiveUI.Samples.Suspension.csproj
现在,我们创建具有以下内容的nuget.config文件:
<?xml version="1.0" encoding="utf-8"?> <configuration> <packageSources> <add key="AvaloniaCI" value="https://www.myget.org/F/avalonia-ci/api/v2" /> </packageSources> </configuration>
通常,需要重新启动以强制我们的IDE从新添加的MyGet feed中检测包,但是重新加载解决方案也应该有所帮助。 然后,我们使用NuGet包管理器GUI或.NET Core CLI将Avalonia包升级到最新版本(或至少升级到0.9.1 ):
dotnet add package Avalonia.ReactiveUI --version 0.9.1 dotnet add package Avalonia.Desktop --version 0.9.1 dotnet add package Avalonia --version 0.9.1 cat ReactiveUI.Samples.Suspension.csproj
ReactiveUI.Samples.Suspension.csproj文件现在应如下所示:
<Project Sdk="Microsoft.NET.Sdk"> <PropertyGroup> <OutputType>WinExe</OutputType> <TargetFramework>netcoreapp3.0</TargetFramework> </PropertyGroup> <ItemGroup> <Compile Update="**\*.xaml.cs"> <DependentUpon>%(Filename)</DependentUpon> </Compile> <AvaloniaResource Include="**\*.xaml"> <SubType>Designer</SubType> </AvaloniaResource> </ItemGroup> <ItemGroup> <PackageReference Include="Avalonia" Version="0.9.1" /> <PackageReference Include="Avalonia.Desktop" Version="0.9.1" /> <PackageReference Include="Avalonia.ReactiveUI" Version="0.9.1" /> </ItemGroup> </Project>
我们在项目根目录中创建了两个新文件夹,分别名为Views/和ViewModels/ 。 接下来,我们将MainWindow类重命名为MainView并将其移动到Views/文件夹。 请记住在相应的XAML文件中重命名对已编辑类的引用,否则,该项目将无法编译。 另外,请记住将MainView的命名空间更改为ReactiveUI.Samples.Suspension.Views以保持一致性。 然后,我们编辑另外两个文件Program.cs和App.xaml.cs 我们向UseReactiveUI应用构建器添加了对UseReactiveUI的调用,将应用初始化代码移至OnFrameworkInitializationCompleted方法以符合OnFrameworkInitializationCompleted 应用生命周期管理准则:
Program.cs
class Program {
App.xaml.cs
public class App : Application { public override void Initialize() => AvaloniaXamlLoader.Load(this);
在尝试构建项目之前,我们确保using Avalonia.ReactiveUI指令已添加到Program.cs文件的顶部。 我们的IDE很可能已经导入了该名称空间,但是如果没有导入,我们将收到编译时错误。 最后,是时候确保应用程序可以编译,运行并显示新窗口:
dotnet run --framework netcoreapp2.1
在跨平台的.NET应用程序中组织应用内导航的一般方法有两种:视图优先和视图模型优先。 前一种方法假定View层管理导航堆栈-例如,使用平台特定的Frame和Page类。 使用后一种方法,视图模型层将通过与平台无关的抽象来处理导航。 建立ReactiveUI工具时要牢记视图模型优先的方法。 ReactiveUI路由包含一个IScreen实现,该实现包含当前路由状态,几个IRoutableViewModel实现以及一个称为RoutedViewHost的特定于平台的XAML控件。
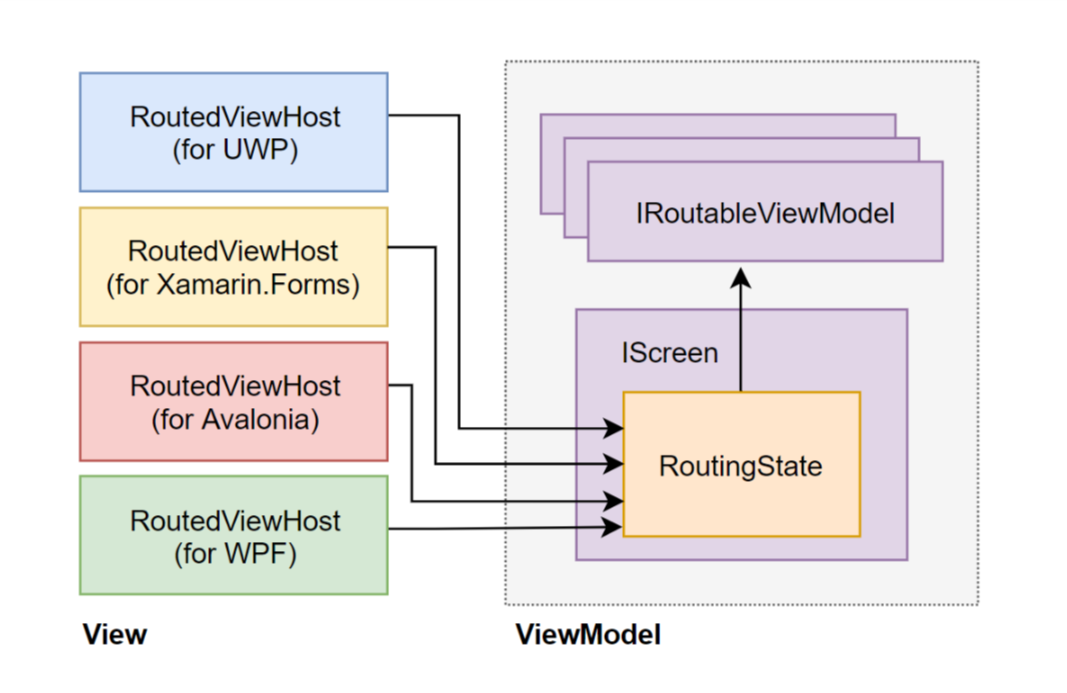
RoutingState对象封装了导航堆栈管理。 IScreen是导航的根目录,但是尽管有名称,它也不必占据整个屏幕。 RoutedViewHost对绑定的RoutingState中的更改做出反应,并为当前选择的IRoutableViewModel嵌入适当的视图。 稍后将通过更全面的示例来说明所描述的功能。
持久化视图模型状态
以搜索屏幕视图模型为例。

我们将决定在应用程序关闭时保存哪些视图模型属性,以及重新创建哪些属性。 无需保存实现ICommand接口的反应式命令的状态。 ReactiveCommand<TIn, TOut>类通常在构造函数中初始化,其CanExecute指示符通常完全取决于视图模型属性,并且每当这些属性中的任何一个更改时都会重新计算。 是否保留搜索结果是有争议的,但是保存搜索查询是个好主意。
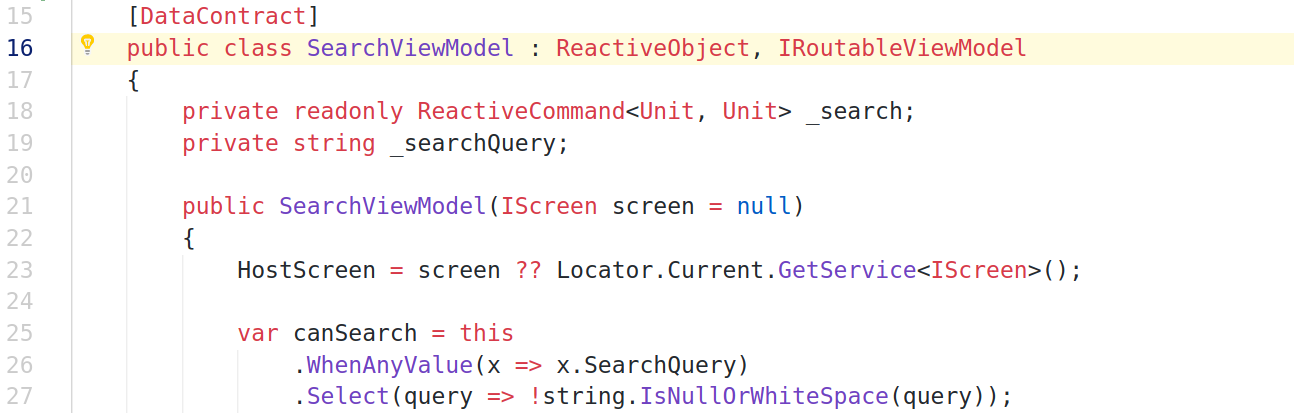
ViewModels / SearchViewModel.cs
[DataContract] public class SearchViewModel : ReactiveObject, IRoutableViewModel { private readonly ReactiveCommand<Unit, Unit> _search; private string _searchQuery;
我们使用[DataContract]属性标记整个视图模型类,并使用[DataMember]属性注释要序列化的属性。 如果我们要使用选择启用序列化模式,这就足够了。 考虑到序列化模式,选择退出意味着将对所有公共字段和属性进行序列化,除非您通过使用[IgnoreDataMember]属性进行注释来显式忽略它们,否则选择退出则相反。 另外,我们在视图模型类中实现IRoutableViewModel接口。 在将视图模型用作导航堆栈的一部分时,这是必需的。
登录视图模型的实现细节ViewModels / LoginViewModel.cs
[DataContract] public class LoginViewModel : ReactiveObject, IRoutableViewModel { private readonly ReactiveCommand<Unit, Unit> _login; private string _password; private string _username;
这两个视图模型实现了IRoutableViewModel接口,并准备嵌入到导航屏幕中。 现在是时候实现IScreen接口了。 同样,我们使用[DataContract]属性来指示要序列化的部分和要忽略的部分。 在下面的示例中, RoutingState属性设置器被故意声明为RoutingState这允许我们的序列化程序在反序列化时修改属性。
ViewModels / MainViewModel.cs
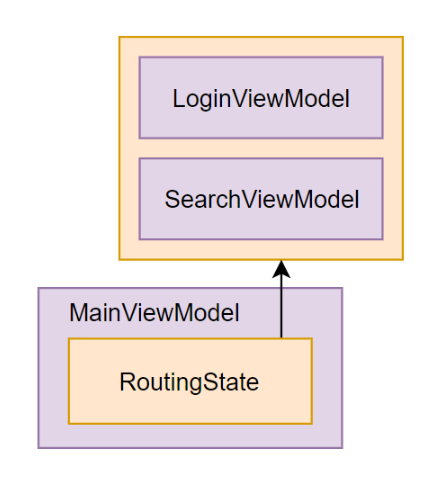
[DataContract] public class MainViewModel : ReactiveObject, IScreen { private readonly ReactiveCommand<Unit, Unit> _search; private readonly ReactiveCommand<Unit, Unit> _login; private RoutingState _router = new RoutingState(); public MainViewModel() {
在我们的主视图模型中,我们仅将一个字段保存到磁盘上,即一个类型为RoutingState字段。 我们不必保存反应式命令的状态,因为它们的可用性完全取决于路由器的当前状态并进行反应式更改。 为了能够将路由器还原到它所处的确切状态,在对路由器进行序列化时,我们包括IRoutableViewModel实现的扩展类型信息。 稍后我们将使用Newtonsoft.Json的 TypenameHandling.All设置来实现。 我们将MainViewModel放入ViewModels/文件夹中,将命名空间调整为ReactiveUI.Samples.Suspension.ViewModels 。
在Avalonia应用中路由
目前,我们已经实现了应用程序的表示模型。 后来,视图模型类可以提取到针对.NET Standard的单独程序集中,因此我们应用程序的核心部分可以在多个.NET GUI框架中重用。 现在是时候实现我们应用程序中特定于Avalonia的GUI了。 我们在Views/文件夹中创建两个文件,分别名为SearchView.xaml和SearchView.xaml.cs 。 这是单个搜索视图的两个部分-前一个是XAML中声明式描述的UI,后一个包含C#代码隐藏。 本质上,这是先前创建的搜索视图模型的视图。
来自WPF,UWP或XF的开发人员应该立即熟悉Avalonia中使用的XAML方言。 在上面的示例中,我们创建了一个简单的布局,其中包含一个文本框和一个触发搜索的按钮。 我们将来自SearchViewModel属性和命令绑定到SearchViewModel中声明的控件。
视图/ SearchView.xaml
<UserControl xmlns="https://github.com/avaloniaui" xmlns:d="http://schemas.microsoft.com/expression/blend/2008" xmlns:mc="http://schemas.openxmlformats.org/markup-compatibility/2006" d:DataContext="{d:DesignInstance viewModels:SearchViewModel}" xmlns:viewModels="clr-namespace:ReactiveUI.Samples.Suspension.ViewModels" xmlns:x="http://schemas.microsoft.com/winfx/2006/xaml" x:Class="ReactiveUI.Samples.Suspension.Views.SearchView" xmlns:reactiveUi="http://reactiveui.net" mc:Ignorable="d"> <Grid> <Grid.RowDefinitions> <RowDefinition Height="48" /> <RowDefinition Height="48" /> <RowDefinition Height="48" /> <RowDefinition Height="*" /> </Grid.RowDefinitions> <TextBlock Grid.Row="0" Text="Search view" Margin="5" /> <TextBox Grid.Row="1" Text="{Binding SearchQuery, Mode=TwoWay}" /> <Button Grid.Row="2" Content="Search" Command="{Binding Search}" /> </Grid> </UserControl>
视图/ SearchView.xaml.cs
public sealed class SearchView : ReactiveUserControl<SearchViewModel> { public SearchView() {
WPF和UWP开发人员可能还会发现SearchView.xaml文件的代码隐藏。 添加了对WhenActivated的调用以执行视图激活逻辑。 当取消激活视图时,将丢弃用作WhenActivated的第一个参数的一次性变量。 如果您的应用程序使用的是热的可观察对象 (例如定位服务,计时器,事件聚合器),则明智的决定是通过添加DisposeWith调用将订阅附加到WhenActivated复合一次性DisposeWith ,这样视图将退订那些热的可观察对象并内存泄漏不会发生。
登录视图的实现细节视图/ LoginView.xaml
<UserControl xmlns="https://github.com/avaloniaui" xmlns:d="http://schemas.microsoft.com/expression/blend/2008" xmlns:mc="http://schemas.openxmlformats.org/markup-compatibility/2006" d:DataContext="{d:DesignInstance viewModels:LoginViewModel, IsDesignTimeCreatable=True}" xmlns:viewModels="clr-namespace:ReactiveUI.Samples.Suspension.ViewModels" xmlns:x="http://schemas.microsoft.com/winfx/2006/xaml" x:Class="ReactiveUI.Samples.Suspension.Views.LoginView" xmlns:reactiveUi="http://reactiveui.net" mc:Ignorable="d"> <Grid> <Grid.RowDefinitions> <RowDefinition Height="48" /> <RowDefinition Height="48" /> <RowDefinition Height="48" /> <RowDefinition Height="48" /> <RowDefinition Height="*" /> </Grid.RowDefinitions> <TextBlock Grid.Row="0" Text="Login view" Margin="5" /> <TextBox Grid.Row="1" Text="{Binding Username, Mode=TwoWay}" /> <TextBox Grid.Row="2" PasswordChar="*" Text="{Binding Password, Mode=TwoWay}" /> <Button Grid.Row="3" Content="Login" Command="{Binding Login}" /> </Grid> </UserControl>
视图/ LoginView.xaml.cs
public sealed class LoginView : ReactiveUserControl<LoginViewModel> { public LoginView() { this.WhenActivated(disposables => { }); AvaloniaXamlLoader.Load(this); } }
我们编辑Views/MainView.xaml和Views/MainView.xaml.cs文件。 我们将RoutedViewHost命名空间中的RoutedViewHost控件添加到主窗口XAML布局中,并将MainViewModel的Router属性绑定到RoutedViewHost.Router属性。 我们添加了两个按钮,一个打开搜索页面,另一个打开授权页面。
视图/ MainView.xaml
<Window xmlns="https://github.com/avaloniaui" xmlns:x="http://schemas.microsoft.com/winfx/2006/xaml" xmlns:d="http://schemas.microsoft.com/expression/blend/2008" xmlns:mc="http://schemas.openxmlformats.org/markup-compatibility/2006" mc:Ignorable="d" d:DesignWidth="800" d:DesignHeight="450" x:Class="ReactiveUI.Samples.Suspension.Views.MainView" xmlns:reactiveUi="http://reactiveui.net" Title="ReactiveUI.Samples.Suspension"> <Grid> <Grid.RowDefinitions> <RowDefinition Height="*" /> <RowDefinition Height="48" /> </Grid.RowDefinitions> <reactiveUi:RoutedViewHost Grid.Row="0" Router="{Binding Router}"> <reactiveUi:RoutedViewHost.DefaultContent> <TextBlock Text="Default Content" /> </reactiveUi:RoutedViewHost.DefaultContent> </reactiveUi:RoutedViewHost> <Grid Grid.Row="1"> <Grid.ColumnDefinitions> <ColumnDefinition Width="*" /> <ColumnDefinition Width="*" /> <ColumnDefinition Width="*" /> </Grid.ColumnDefinitions> <Button Grid.Column="0" Command="{Binding Search}" Content="Search" /> <Button Grid.Column="1" Command="{Binding Login}" Content="Login" /> <Button Grid.Column="2" Command="{Binding Router.NavigateBack}" Content="Back" /> </Grid> </Grid> </Window>
视图/ MainView.xaml.cs
public sealed class MainView : ReactiveWindow<MainViewModel> { public MainView() { this.WhenActivated(disposables => { }); AvaloniaXamlLoader.Load(this); } }
一个简单的Avalonia和ReactiveUI路由演示应用程序现已准备就绪。 当用户按下搜索或登录按钮时,将触发触发导航的命令,并更新RoutingState 。 RoutedViewHost XAML控件观察路由状态,尝试从Locator.Current解析适当的IViewFor<TViewModel>实现。 如果注册了IViewFor<TViewModel>实现,则将创建控件的新实例并将其嵌入到Avalonia窗口中。

我们使用Locator.CurrentMutable在App.OnFrameworkInitializationCompleted方法中注册IViewFor和IScreen实现。 要运行RoutedViewHost控件,需要注册IViewFor实现。 注册IScreen可以使我们的SearchViewModel和LoginViewModel在反序列化期间使用无参数构造函数进行属性初始化。
App.xaml.cs
public override void OnFrameworkInitializationCompleted() {
让我们启动我们的应用程序,并确保路由能够正常执行。 如果XAML UI标记出了问题, Avalonia XamlII编译器将在编译时通知我们任何错误。 此外,XamlIl支持调试XAML !
dotnet run --framework netcoreapp3.0

保存和还原应用程序状态
现在是时候实施挂起驱动程序,负责在应用程序挂起和恢复时负责保存和还原应用程序状态。 特定于平台的AutoSuspendHelper类负责初始化事物,作为开发人员,您只需在应用程序组合根目录中创建其实例。 另外,您需要初始化RxApp.SuspensionHost.CreateNewAppState工厂。 如果应用程序没有保存的数据,或者保存的数据已损坏,则ReactiveUI会调用该工厂方法来创建应用程序状态对象的默认实例。
然后,我们调用RxApp.SuspensionHost.SetupDefaultSuspendResume方法,并将新的ISuspensionDriver实例ISuspensionDriver给它。 让我们使用Newtonsoft.Json和System.IO命名空间中的类来实现ISuspensionDriver接口。
dotnet add package Newtonsoft.Json
驱动程序/ NewtonsoftJsonSuspensionDriver.cs
public class NewtonsoftJsonSuspensionDriver : ISuspensionDriver { private readonly string _file; private readonly JsonSerializerSettings _settings = new JsonSerializerSettings { TypeNameHandling = TypeNameHandling.All }; public NewtonsoftJsonSuspensionDriver(string file) => _file = file; public IObservable<Unit> InvalidateState() { if (File.Exists(_file)) File.Delete(_file); return Observable.Return(Unit.Default); } public IObservable<object> LoadState() { var lines = File.ReadAllText(_file); var state = JsonConvert.DeserializeObject<object>(lines, _settings); return Observable.Return(state); } public IObservable<Unit> SaveState(object state) { var lines = JsonConvert.SerializeObject(state, _settings); File.WriteAllText(_file, lines); return Observable.Return(Unit.Default); } }
所描述的方法有一个缺点-某些System.IO类不适用于UWP框架,UWP应用程序在沙盒中运行,并且功能不同。 这很容易解决-您要做的就是在针对UWP时使用StorageFile和StorageFolder类而不是File和Directory 。 要从磁盘读取导航堆栈,悬挂驱动程序应支持将JSON对象反序列化为具体的IRoutableViewModel实现,这就是为什么我们使用TypeNameHandling.All Newtonsoft.Json序列化程序设置。 我们通过App.OnFrameworkInitializationCompleted方法在应用程序组合根目录中注册悬浮驱动程序:
public override void OnFrameworkInitializationCompleted() {
Avalonia.ReactiveUI程序包中的AutoSuspendHelper类为您的应用程序设置了生命周期挂钩,因此ReactiveUI框架将知道何时使用提供的ISuspensionDriver实现将应用程序状态写入磁盘。 启动应用程序后,悬挂驱动程序将创建一个名为appstate.json的新JSON文件。 在用户界面中进行更改(例如,在文本字段中键入一些内容或单击任何按钮)然后关闭应用程序后, appstate.json文件将类似于以下内容:
appstate.json请注意,文件中的每个JSON对象都包含一个$type键,该键具有完全限定的类型名,包括名称空间。
{ "$type": "ReactiveUI.Samples.Suspension.ViewModels.MainViewModel, ReactiveUI.Samples.Suspension", "Router": { "$type": "ReactiveUI.RoutingState, ReactiveUI", "_navigationStack": { "$type": "System.Collections.ObjectModel.ObservableCollection`1[[ReactiveUI.IRoutableViewModel, ReactiveUI]], System.ObjectModel", "$values": [ { "$type": "ReactiveUI.Samples.Suspension.ViewModels.SearchViewModel, ReactiveUI.Samples.Suspension", "SearchQuery": "funny cats" }, { "$type": "ReactiveUI.Samples.Suspension.ViewModels.LoginViewModel, ReactiveUI.Samples.Suspension", "Username": "worldbeater" } ] } } }
如果您关闭该应用程序然后再次启动它,您将在屏幕上看到与以前相同的内容! 所描述的功能可在ReactiveUI支持的每个平台上使用,包括UWP,WPF,Xamarin Forms或Xamarin Native。

奖励:可以使用Akavache (异步,持久性键值存储)来实现ISuspensionDriver接口。 如果您将数据存储在UserAccount部分或Secure部分中,则在iOS和UWP上,您的数据将自动备份到云中,并且可以在安装了该应用程序的所有设备上使用。 另外, ReactiveUI.AndroidSupport包中还存在BundleSuspensionDriver 。 Xamarin.Essentials SecureStorage API也可以用于存储数据。 您还可以将应用程序状态存储在远程服务器或独立于平台的云服务中。
有用的链接