进入航空网第3集:找到球

今天,我们将研究如何使用Raspberry PI摄像机检测红球,以及如何开始将无人机对准它。
搜索气球


在之前的文章中,我们详细研究了自主虚拟真实无人机的发射。 现在是时候让我们的无人机找到真正的目标了。
正如我们提到的,目标将是一个红球。


覆盆子准备


我们将在桌面版Raspbian上为过滤器编写一个程序。 由于配置了过滤器,因此我们同时扭曲设置并查看作弊的结果。
在单独的闪存驱动器上,我们将安装Raspbian Desktop
要使用Raspbian桌面,您需要一个单独的显示器+键盘+鼠标连接到Raspberry,这不是很方便。 但是您可以通过VNC在无头的Raspberry桌面和网络上工作。
为此,您需要:


  1. 在raspi-config中启用VNC
  2. 在树莓派上配置Wifi热点。 桌面版本上的wpa_supplicant焦点没有通过,在Raspberry上设置wifi点的说明位于此处
  3. 作为客户端,您可以使用realvnc

要在Python中开发过滤器-将OpenCV放入:


sudo apt-get install python-opencv 

用于视频流的HSV过滤器


在图片中突出显示彩色对象的一种简单方法是,将图片转移到HSV色彩空间 ,然后使用cv2.inRange按所需的色相,饱和度和值范围进行过滤。 我以这个例子为基础。


我们的任务的特殊之处在于我们的球是红色的,如果我们仔细看一下音阶(HUE),我们将看到红色在其边缘:
HSV量表


因此,如果只过滤一个范围,则当光线变化时,球可能会从过滤器中“消失”,这会对无人机的有目的性产生负面影响。 因此,除了H,S和V参数外,我们还将在过滤器中添加反转反转标志-为了能够过滤除球以外的所有内容,然后简单地反转过滤器。


过滤器程序的代码如下所示:
 #coding=utf-8 import cv2 import numpy as np def nothing(*arg): pass cv2.namedWindow( "result" ) #    cv2.namedWindow( "img" ) #   cv2.namedWindow( "settings" ) #    cap = cv2.VideoCapture(0)#video.create_capture(0) #  6         cv2.createTrackbar('invert', 'settings', 0, 1, nothing) cv2.createTrackbar('h1', 'settings', 0, 255, nothing) cv2.createTrackbar('s1', 'settings', 0, 255, nothing) cv2.createTrackbar('v1', 'settings', 0, 255, nothing) cv2.createTrackbar('h2', 'settings', 255, 255, nothing) cv2.createTrackbar('s2', 'settings', 255, 255, nothing) cv2.createTrackbar('v2', 'settings', 255, 255, nothing) while True: flag, img = cap.read() hsv = cv2.cvtColor(img, cv2.COLOR_BGR2HSV ) #    invert = cv2.getTrackbarPos('invert', 'settings') h1 = cv2.getTrackbarPos('h1', 'settings') s1 = cv2.getTrackbarPos('s1', 'settings') v1 = cv2.getTrackbarPos('v1', 'settings') h2 = cv2.getTrackbarPos('h2', 'settings') s2 = cv2.getTrackbarPos('s2', 'settings') v2 = cv2.getTrackbarPos('v2', 'settings') #       h_min = np.array((h1, s1, v1), np.uint8) h_max = np.array((h2, s2, v2), np.uint8) #       HSV thresh = cv2.inRange(hsv, h_min, h_max) if invert>0: cv2.bitwise_not(thresh,thresh) cv2.imshow('result', thresh) cv2.imshow('img', img) ch = cv2.waitKey(5) if ch == 27: break cap.release() cv2.destroyAllWindows() 

将过滤器放在球上看起来像这样:


球在空间中的位置的计算


收到滤镜后,我们可以使用cv2.findContours轮廓高亮功能在滤镜图像中找到球。


在我们的程序中,我们将迭代找到的所有轮廓,选择大于10x10点的轮廓,然后选择最大的轮廓-这将是所需的球。 如果有几个物体撞到相机上-为了进行指导,我们使用最接近的物体,即 最大的一个。


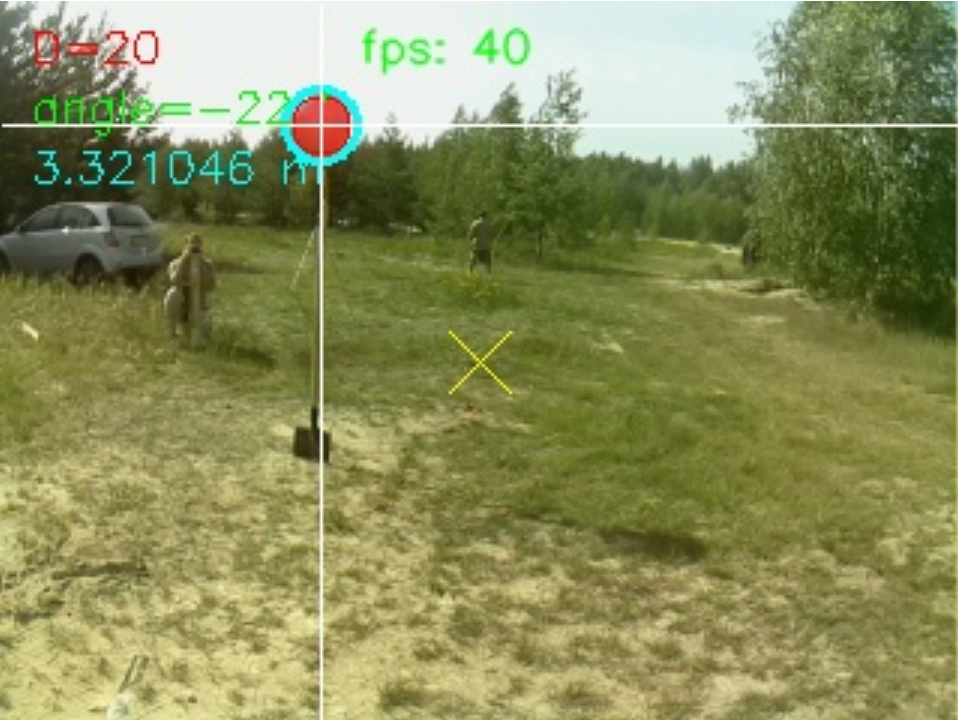
我们将滤镜的有用信息绘制到生成的图像中:绘制找到的轮廓并圈出最大的轮廓,用这些线选择线的中心(在何处飞行),得出球在这些点的直径并计算与球的距离,偏航角。 另外,在屏幕中央,我添加了一个“范围” +计数并显示了帧速率,以控制滤镜的速度。


过滤程序的全文如下:
 #coding=utf-8 import cv2 import numpy as np import math if __name__ == '__main__': def nothing(*arg): pass cv2.namedWindow( "result" ) #    cv2.namedWindow( "source" ) # source video cv2.namedWindow( "settings" ) #    cap = cv2.VideoCapture(0) cap.set(cv2.CAP_PROP_FRAME_WIDTH, 320) cap.set(cv2.CAP_PROP_FRAME_HEIGHT, 240) cap.set(cv2.CAP_PROP_FPS,40) #  6         cv2.createTrackbar('invert', 'settings', 0, 1, nothing) cv2.createTrackbar('h1', 'settings', 0, 255, nothing) cv2.createTrackbar('s1', 'settings', 0, 255, nothing) cv2.createTrackbar('v1', 'settings', 0, 255, nothing) cv2.createTrackbar('h2', 'settings', 255, 255, nothing) cv2.createTrackbar('s2', 'settings', 255, 255, nothing) cv2.createTrackbar('v2', 'settings', 255, 255, nothing) crange = [0,0,0, 0,0,0] #set up initial values cv2.setTrackbarPos('invert','settings',1) cv2.setTrackbarPos('h1','settings',7) cv2.setTrackbarPos('h2','settings',158) cv2.setTrackbarPos('s1','settings',0) cv2.setTrackbarPos('s2','settings',255) cv2.setTrackbarPos('v1','settings',0) cv2.setTrackbarPos('v2','settings',255) color_blue = (255,255,0) color_red = (0,0,255) color_green = (0,255,0) color_white = (255,255,255) color_yellow = (0,255,255) color_black = (0,0,0) real_ballon_r = 0.145 #baloon real radius in meters while True: flag, img = cap.read() hsv = cv2.cvtColor(img, cv2.COLOR_BGR2HSV ) #    invert = cv2.getTrackbarPos('invert', 'settings') h1 = cv2.getTrackbarPos('h1', 'settings') s1 = cv2.getTrackbarPos('s1', 'settings') v1 = cv2.getTrackbarPos('v1', 'settings') h2 = cv2.getTrackbarPos('h2', 'settings') s2 = cv2.getTrackbarPos('s2', 'settings') v2 = cv2.getTrackbarPos('v2', 'settings') #       h_min = np.array((h1, s1, v1), np.uint8) h_max = np.array((h2, s2, v2), np.uint8) #       HSV thresh = cv2.inRange(hsv, h_min, h_max) if invert>0: cv2.bitwise_not(thresh,thresh) #find contours _, contours0, hierarchy = cv2.findContours( thresh.copy(), cv2.RETR_EXTERNAL, cv2.CHAIN_APPROX_NONE) max_area = 0 max_center_x=None max_center_y=None max_baloon_r=None max_yaw_shift=None for cnt in contours0: rect = cv2.minAreaRect(cnt) box = cv2.boxPoints(rect) box = np.int0(box) center = (int(rect[0][0]),int(rect[0][1])) area = int(rect[1][0]*rect[1][1]) if area > 100: baloon_r = int(math.sqrt(area)/2) yaw_shift = int( (center[0] - 320/2) * 130 / 320) # 130 degree camera for 320 pics image cv2.circle(img, center, baloon_r , color_red, 1) if area>max_area: max_area=area max_center_x = center[0] max_center_y = center[1] max_baloon_r = baloon_r max_yaw_shift = yaw_shift #draw main baloon if max_area>0: cv2.circle(img, (max_center_x,max_center_y), max_baloon_r+2 , color_blue, 2) cv2.putText(img, "D=%d" % int(max_baloon_r*2), (10, 20), cv2.FONT_HERSHEY_SIMPLEX, 0.5, color_red, 1) cv2.putText(img, "angle=%d '" % max_yaw_shift, (10, 40), cv2.FONT_HERSHEY_SIMPLEX, 0.5, color_green, 1) max_distance = real_ballon_r/math.tan(max_baloon_r/320.0*(math.pi*160.0/360.0)) #distance to baloon #print max_distance cv2.putText(img, "%fm" % max_distance, (10, 60), cv2.FONT_HERSHEY_SIMPLEX, 0.5, color_blue, 1) cv2.line(img, (max_center_x, 1), (max_center_x, 239) , color_white, 1) cv2.line(img, (1,max_center_y), (319, max_center_y) , color_white, 1) #draw target cv2.line(img, (320/2-10, 240/2-10), (320/2+10, 240/2+10) , color_yellow, 1) cv2.line(img, (320/2+10, 240/2-10), (320/2-10, 240/2+10) , color_yellow, 1) # show results cv2.imshow('source', img) cv2.imshow('result', thresh) ch = cv2.waitKey(5) if ch == 27: break cap.release() cv2.destroyAllWindows() 

来自摄像机图像的程序会考虑到球的距离以及球偏离摄像机图像中心的偏航角和俯仰角。 这些信息足以让我们将无人机对准球。 此外,我们将参与指导计划。


球检测ROS包


开发的功能可以转移到安装了ROS的无头Raspberry系统中。 我们将创建一个baloon ROS程序包,该程序包将执行以下功能:


  1. 发射mavros,为我们提供飞行控制器
  2. 运行我们的球检测程序。 在程序中,我们将在相应的ROS主题中添加球坐标的发布并调试图像。
  3. 运行web_video_server-一个ROS组件,使我们可以使用浏览器从外部监视过滤器

在创建ROS软件包之前,请将以下功能添加到我们的ROS过滤器程序中,以便在ROS环境中工作:


  1. 读取相机设置。 ROS中的参数以yaml文件的形式设置,通常是在相机校准期间获得 。 我们仅对图像大小(宽度和高度)感兴趣,但是为了遵循ROS概念,我们将从yaml文件中获取它们。
  2. 获取指定的过滤器参数。 我们将在ROS包的启动文件中写下之前选择的过滤器参数。
  3. 在ROS主题/baloon_detector/twist 发布接收到的球坐标
  4. 将调试图像发布到ROS主题/baloon_detector/image_filter/baloon_detector/image_result

您可以使用普通的python baloon_pose_cv.py运行程序以执行该程序-但还有一种更方便的方法-将所需的功能打包到ROS包中,并在系统启动时配置其自动运行。


在网络创建ROS软件包有很多课程,因此我将只限于必要步骤的清单。


让我们为包创建ROS工作区目录,以及ROS包本身:


 mkdir -p ~/baloon_ws/src cd ~/baloon_ws/ catkin_make source devel/setup.bash cd src catkin_create_pkg baloon std_msgs rospy 

我们将〜/ baloon_ws / src / baloon / src目录中的文件放入运行我们的包所需的文件中:


  1. baloon_pose_cv.py-球检测程序
  2. baloon_cv.launch-启动文件以启动我们的ROS包
  3. fe130_320_01.yaml-通过摄像机校准获得的文件。 我们仅对图片的大小感兴趣,但是将来该文件可用于更深入的图像分析,从图片还原3D场景等。
  4. baloon.service,roscore.env-这些文件用于ROS程序包的自动运行

以下是每个文件的文本:


baloon_pose_cv.py-主球检测程序
 #!/usr/bin/env python # coding=UTF-8 # zuza baloon seeker import rospy from sensor_msgs.msg import CameraInfo, Image import time import cv2 from cv_bridge import CvBridge, CvBridgeError import numpy as np #import tf.transformations as t from geometry_msgs.msg import TwistStamped, Quaternion, Point, PoseStamped, TransformStamped import copy from std_msgs.msg import ColorRGBA import tf2_ros import math import yaml my_cam_info=None my_fps=0 my_last_fps=0 my_time_fps=time.time() bridge = CvBridge() mtx=None dist=None def raspicam_loop_cv(): global my_fps, my_last_fps, my_time_fps, mtx, dist # initialize the camera and grab a reference to the raw camera capture camera = cv2.VideoCapture(0) camera.set(cv2.CAP_PROP_FRAME_WIDTH, my_cam_info.width) camera.set(cv2.CAP_PROP_FRAME_HEIGHT, my_cam_info.height) camera.set(cv2.CAP_PROP_FPS, rospy.get_param('/baloon_detector/framerate')) # allow the camera to warmup time.sleep(0.1) color_blue = (255,255,0) color_red = (0,0,255) color_green = (0,255,0) color_white = (255,255,255) color_yellow = (0,255,255) color_black = (0,0,0) #    invert = rospy.get_param('/baloon_detector/invert') h1 = rospy.get_param('/baloon_detector/h1') s1 = rospy.get_param('/baloon_detector/s1') v1 = rospy.get_param('/baloon_detector/v1') h2 = rospy.get_param('/baloon_detector/h2') s2 = rospy.get_param('/baloon_detector/s2') v2 = rospy.get_param('/baloon_detector/v2') real_ballon_r = rospy.get_param('/baloon_detector/real_ballon_r') #       h_min = np.array((h1, s1, v1), np.uint8) h_max = np.array((h2, s2, v2), np.uint8) while not rospy.is_shutdown(): ret, image_raw = camera.read() # calculate FPS cur_time2 = time.time() if cur_time2-my_time_fps>5: my_last_fps=my_fps my_fps=1 my_time_fps=cur_time2 else: my_fps+=1 image_hsv = cv2.cvtColor(image_raw, cv2.COLOR_BGR2HSV ) #       HSV thresh = cv2.inRange(image_hsv, h_min, h_max) if invert>0: cv2.bitwise_not(thresh,thresh) #find contours _, contours0, hierarchy = cv2.findContours( thresh.copy(), cv2.RETR_EXTERNAL, cv2.CHAIN_APPROX_NONE) max_area = 0 max_center_x=None max_center_y=None max_baloon_r=None max_yaw_shift=None for cnt in contours0: rect = cv2.minAreaRect(cnt) box = cv2.boxPoints(rect) box = np.int0(box) center = (int(rect[0][0]),int(rect[0][1])) area = int(rect[1][0]*rect[1][1]) if area > 100: baloon_r = int(math.sqrt(area)/2) yaw_shift = int( (center[0] - my_cam_info.width/2) * 130 / my_cam_info.width) # 130 degree camera for my_cam_info.width pics image cv2.circle(image_raw, center, baloon_r , color_red, 1) if area>max_area: max_area=area max_center_x = center[0] max_center_y = center[1] max_baloon_r = baloon_r max_yaw_shift = yaw_shift #draw main baloon if max_area>0: cv2.circle(image_raw, (max_center_x,max_center_y), max_baloon_r+2 , color_blue, 2) cv2.putText(image_raw, "D=%d" % int(max_baloon_r*2), (10, 20), cv2.FONT_HERSHEY_SIMPLEX, 0.5, color_red, 1) cv2.putText(image_raw, "angle=%d '" % max_yaw_shift, (10, 40), cv2.FONT_HERSHEY_SIMPLEX, 0.5, color_green, 1) max_distance = real_ballon_r/math.tan(max_baloon_r/float(my_cam_info.width)*(math.pi*160.0/360.0)) #distance to baloon #print max_distance cv2.putText(image_raw, "%fm" % max_distance, (10, 60), cv2.FONT_HERSHEY_SIMPLEX, 0.5, color_blue, 1) cv2.line(image_raw, (max_center_x, 1), (max_center_x, my_cam_info.height-1) , color_white, 1) cv2.line(image_raw, (1,max_center_y), (my_cam_info.width-1, max_center_y) , color_white, 1) # post baloon Twist tws = TwistStamped() tws.header.stamp = rospy.Time.now() tws.header.frame_id = 'fcu' tws.twist.linear.x = max_distance tws.twist.angular.z = float(-max_yaw_shift)/360.0*math.pi#yaw tws.twist.angular.y = float( (max_center_y - my_cam_info.height/2) * 130.0 / my_cam_info.height) /360.0*math.pi #pitch publisher_baloontwist.publish(tws) #draw target cv2.line(image_raw, (my_cam_info.width/2-10, my_cam_info.height/2-10), (my_cam_info.width/2+10, my_cam_info.height/2+10) , color_yellow, 1) cv2.line(image_raw, (my_cam_info.width/2+10, my_cam_info.height/2-10), (my_cam_info.width/2-10, my_cam_info.height/2+10) , color_yellow, 1) #Draw FPS on image cv2.putText(image_raw,"fps: "+str(my_last_fps/5),(120,20), cv2.FONT_HERSHEY_SIMPLEX, 0.5,(0,255,0),1,cv2.LINE_AA) #  1   5,      if my_fps%5==0: try: publisher_image_raw_result.publish(bridge.cv2_to_imgmsg(image_raw,"bgr8")) publisher_image_raw_filter.publish(bridge.cv2_to_imgmsg(thresh, "mono8")) except CvBridgeError as e: print(e) def publish_dummy_vp(event): ps = PoseStamped() ps.header.stamp = rospy.Time.now() ps.header.frame_id = 'local_origin' ps.pose.orientation.w = 1; publisher_vp.publish(ps); def callback_handle_pose(mavros_pose): rospy.loginfo("Got mavros pose, stop publishing zeroes.") dummy_timer.shutdown() handle_pose_sub.unregister() def process_camera_info_yaml(): global mtx, dist, my_cam_info my_cam_info = CameraInfo() filename = rospy.get_param('/baloon_detector/camera_info_url') with open(filename, 'r') as ymlfile: cfg = yaml.load(ymlfile) my_cam_info.width = cfg['image_width'] my_cam_info.height= cfg['image_height'] my_cam_info.K = cfg['camera_matrix']['data'] my_cam_info.D = cfg['distortion_coefficients']['data'] mtx=np.zeros((3,3)) dist=np.zeros((1,5)) for i in range(3): for j in range(3): mtx[i,j]=my_cam_info.K[i*3+j] for i in range(5): dist[0,i]=my_cam_info.D[i] print mtx, dist if __name__ == '__main__': rospy.init_node('baloon_detector') ## init pose publishing from FCU publisher_vp = rospy.Publisher('/mavros/vision_pose/pose', PoseStamped, queue_size=1) dummy_timer=rospy.Timer(rospy.Duration(0.5), publish_dummy_vp) handle_pose_sub = rospy.Subscriber('mavros/local_position/pose', PoseStamped, callback_handle_pose) ## init camera process_camera_info_yaml() print my_cam_info rospy.loginfo("image translation starting.........") publisher_image_raw_filter = rospy.Publisher('baloon_detector/image_filter', Image, queue_size=1) publisher_image_raw_result = rospy.Publisher('baloon_detector/image_result', Image, queue_size=1) publisher_baloontwist= rospy.Publisher('baloon_detector/twist', TwistStamped ,queue_size=1) raspicam_loop_cv() try: rospy.spin() except KeyboardInterrupt: print("Shutting down") 

baloon_cv.launch-启动文件以启动我们的ROS包
 <launch> <!-- mavros --> <include file="$(find mavros)/launch/px4.launch"> <arg name="fcu_url" value="/dev/ttyAMA0:921600"/> <arg name="gcs_url" value="tcp-l://0.0.0.0:5760"/> </include> <!-- baloon pose estimator --> <node name="baloon_detector" pkg="baloon" type="baloon_pose_cv.py" output="screen"> <param name="invert" value="1"/> <param name="h1" value="7"/> <param name="h2" value="158"/> <param name="s1" value="0"/> <param name="s2" value="255"/> <param name="v1" value="0"/> <param name="v2" value="255"/> <param name="real_ballon_r" value="0.145"/> <param name="camera_info_url" value="$(find baloon)/src/fe130_320_01.yaml"/> <param name="framerate" value="40"/> </node> <!-- web video server --> <node name="web_video_server" pkg="web_video_server" type="web_video_server" required="false" respawn="true" respawn_delay="5"/> </launch> 

fe130_320_01.yaml-相机校准文件
 image_width: 320 image_height: 240 camera_name: main_camera_optical camera_matrix: rows: 3 cols: 3 data: [251.8636348237197, 0, 161.853506252244, 0, 252.36606604425, 102.0038140308112, 0, 0, 1] distortion_model: plumb_bob distortion_coefficients: rows: 1 cols: 5 data: [-0.4424451138703088, 0.1594038086314775, 0.006694781700363117, 0.00174908936506397, 0] rectification_matrix: rows: 3 cols: 3 data: [1, 0, 0, 0, 1, 0, 0, 0, 1] projection_matrix: rows: 3 cols: 4 data: [174.0442047119141, 0, 163.822732720786, 0, 0, 175.2916412353516, 105.5565883832869, 0, 0, 0, 1, 0] 

将文件放在baloon_ws / src / baloon / src目录中后,需要将属性“可执行文件”(cmod + x)添加到文件baloon_pose_cv.py和baloon.service中。 然后,作为第一个测试,我们手动启动ROS节点:


 roslaunch baloon baloon_cv.launch 

启动节点后,我们可以通过Web浏览器观察过滤器和球的图片:


并在主题/baloon_detector/twist获取检测到的球的坐标:


 pi@raspberry:~ $ rostopic list |grep baloon /baloon_detector/image_filter /baloon_detector/image_result /baloon_detector/twist pi@raspberry:~ $ rostopic echo /baloon_detector/twist header: seq: 1 stamp: secs: 1554730508 nsecs: 603406906 frame_id: "fcu" twist: linear: x: 6.6452559203 y: 0.0 z: 0.0 angular: x: 0.0 y: 0.137081068334 z: -0.165806278939 --- 

仍然需要在Raspberry的开头添加节点的自动启动。
为此,创建具有以下内容的systemd服务描述文件baloon.service:


 [Unit] Description=BALOON ROS package Requires=roscore.service After=roscore.service [Service] EnvironmentFile=/home/pi/baloon_ws/src/baloon/src/roscore.env ExecStart=/opt/ros/kinetic/bin/roslaunch baloon baloon_cv.launch --wait Restart=on-abort [Install] WantedBy=multi-user.target 

该文件引用了roscore.env环境变量的描述:


 ROS_ROOT=/opt/ros/kinetic/share/ros ROS_DISTRO=kinetic ROS_PACKAGE_PATH=/home/pi/baloon_ws/src:/opt/ros/kinetic/share ROS_PORT=11311 ROS_MASTER_URI=http://localhost:11311 CMAKE_PREFIX_PATH=/home/pi/baloon_ws/devel:/opt/ros/kinetic PATH=/opt/ros/kinetic/bin:/usr/local/sbin:/usr/local/bin:/usr/sbin:/usr/bin:/sbin:/bin:/usr/games:/usr/local/games:/snap/bin LD_LIBRARY_PATH=/opt/ros/kinetic/lib PYTHONPATH=/home/pi/catkin_ws/devel/lib/python2.7/dist-packages:/opt/ros/kinetic/lib/python2.7/dist-packages ROS_IP=192.168.11.1 

使用以下命令执行连接和启动服务:


 sudo systemctl enable ~/baloon_ws/src/baloon/src/baloon.service sudo systemctl start baloon 

现在,该节点应在Raspberry启动时自动启动。
您可以使用sudo systemctl stop baloon停止节点,取消自动启动sudo systemctl disable balloon


作为我们行动的结果,当系统在车载计算机上启动时,我们启动了“自动检球机”。


在下一部分中,我们将继续进行最后一架复归无人机的发射。


程序的源代码已上传到Github

Source: https://habr.com/ru/post/zh-CN462923/


All Articles