今天,我想告诉您如何通过Web服务的发布在Linux debian 9上提高服务器1c。
什么是1s网络服务?
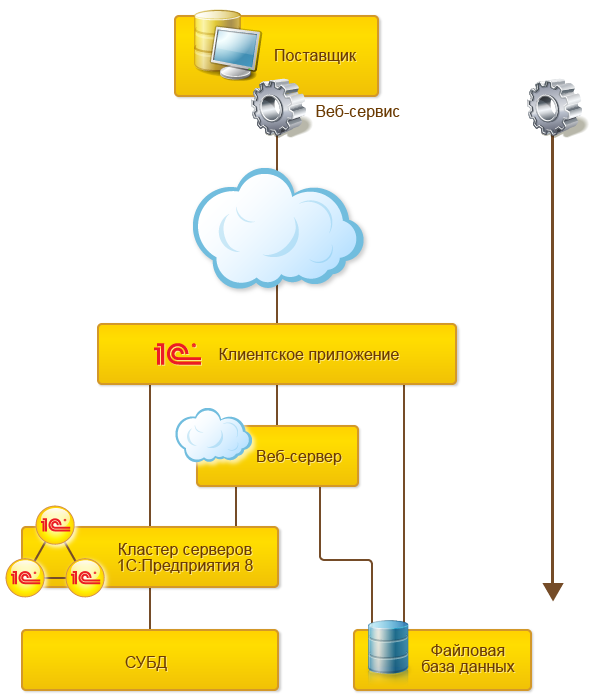
Web服务是用于与其他信息系统集成的平台机制之一。 它是支持SOA(面向服务的体系结构)的一种方法,SOA是一种面向服务的体系结构,是用于集成应用程序和信息系统的现代标准。 本质上,这是使用数据创建html页面的能力,然后您可以使用任何其他应用程序进行访问并进行选择。
优点-它工作迅速(即使有足够的数据量),也相对方便。
缺点-您的1s程序员会为您长时间抱怨很多,而他将为您的数据库编写Web服务。 这东西在写作上很特别。
我不会告诉您如何编写
网络服务 ……我会告诉您如何从服务器控制台在Linux上发布它,以及有关在Linux上安装1s服务器的一些知识。
因此,我们有debian 9 netinst,继续进行:
安装PostgresPro(请注意,它不是免费的,并且仅作为熟悉功能的一部分分发):
假设postgresql监听所有地址,而不仅仅是本地主机
取消注释并更改要收听的地址:
...
#listen_addresses ='本地主机'
...
开
...
listen_addresses ='*'
...
接下来,让我们授权网络中的用户
变更:
#IPv4本地连接:
托管所有所有127.0.0.1/32 md5
在
托管所有192.168.188.0/24 md5
托管所有所有127.0.0.1/32 md5
您可以
在此处阅读有关1s的各种Postgres安装的更多信息。
接下来,我们放置1s服务器。
我们将从站点1c下载的档案上传到服务器(在我的情况下为deb64_8_3_15_1534.tar.gz)
还有一些小事情:
现在安装Apache2
通过管理控制台或客户端1c,我们创建数据库并填充我们的配置...
现在,我们发布基础:
用1s转到文件夹。
./webinst -publish -apache24 -wsdir Test -dir /var/www/test/ -connstr "Srvr=10.7.12.108;Ref=test;" -confPath /etc/apache2/apache2.conf
我们进入var / www / test /,看看那里出现了什么。
”
<?xml版本=“ 1.0”编码=“ UTF-8”?>
<point xmlns =“ v8.1c.ru/8.2/virtual-resource-system ”
xmlns:xs =“ www.w3.org/2001/XMLSchema ”
xmlns:xsi =“ www.w3.org/2001/XMLSchema-instance ”
base =“ /测试”
ib =“ Srvr = 192.168.188.150; Ref =测试;”>
<standardOdata enable =“假”
redirectSessions =“自动使用”
sessionMaxAge =“ 20”
poolSize =“ 10”
poolTimeout =“ 5” />
”
这些是启动1s Web客户端所需的方案...现在,您可以从浏览器访问位于地址“ http:// ServerAddress / Test”的测试数据库(寄存器很重要!这是Linux!),或指定地址“ http:// ServerAddress / Test”,客户端将使用已发布的数据库。
但是
Web服务又如何呢? (在我的测试配置中,有两个:WebBuh,用于通过记帐进行数据交换,以及与同一公司的wms系统进行toplog集成)。
好吧,在我们的vrd文件中添加几行...
<?xml版本=“ 1.0”编码=“ UTF-8”?>
<point xmlns =“ v8.1c.ru/8.2/virtual-resource-system ”
xmlns:xs =“ www.w3.org/2001/XMLSchema ”
xmlns:xsi =“ www.w3.org/2001/XMLSchema-instance ”
base =“ / TestWeb”
ib =“ Srvr = IP_addres; Ref = TestWebServ”>
<standardOdata enable =“假”
redirectSessions =“自动使用”
sessionMaxAge =“ 20”
poolSize =“ 10”
poolTimeout =“ 5” />
# -
<point name="WebBuh" # -
alias="Web_buh.1cws" # Web_buh.1cws - -
enable="true" #
reuseSessions="autouse"
sessionMaxAge="20"
poolSize="10"
poolTimeout="5"/>
<point name="TopLog" #
alias="toplog.1cws" # toplog.1cws
enable="true"
reuseSessions="autouse"
sessionMaxAge="20"
poolSize="10"
poolTimeout="5"/>
保存。
现在,我们的Web服务位于以下地址:“ http://AddressServer/Test/Web_buh.1cws?”
为什么要用手来做?
由于我们的服务器没有图形外壳,因此在其上运行配置器将失败,并因此使用标准工具进行发布。 客户端上的远程配置器不会在服务器上发布Web服务。 因此,我们必须根据上述模板手动编辑配置。
生成.vrd的脚本 -感谢
TihonV