
哈Ha
我想谈谈一个名为DocumentBuilder的实用程序,该实用程序允许您生成文档,表格和演示文稿,并通过使用从模板创建简历的示例来说明如何使用它来解决问题。
构建器的工作方式如下:您可以使用文档中的特殊方法用js编写代码,将其提供给实用程序,然后收集文档。 或如果有错误则不收集。
如果要解决以下类型的任务,建议使用构建器:
- 您需要制作许多变化不大的文档,或者基于大量数据的文档。
- 您需要在任何服务中集成文档的生成。
有一些服务可让您创建简历:用户填写必填字段,然后系统生成文档并将其提供给用户。 这将是如何使用构建器的示例。
作为工具,我将使用Node.js(快速)。
计划:
- 用户在浏览器的页面上的表单中输入数据,该表单被发送到服务器。
- 在Node.js服务器上,它基于用户数据为构建器创建脚本。
- Node.js将脚本提供给构建器。
- 构建器使用脚本制作文档。
- Node.js将指向文档的链接返回给用户。
首先,创建一个表单,用户可以在其中输入数据。 该表格将包含8个字段:“全名”,“电话号码”,“电子邮件”,“个人资料”,“学位”,“大学”,“位置”,“年份”,“技能”。 技能字段可以克隆。
创建一个index.html文件并向其中添加模板代码。
<div class="fill-name"> <input type="text" id="fill-name" placeholder="full name"> </div> <div class="phone-number"> <input type="number" id="phone-number" placeholder="phone number"> </div> <div class="email"> <input type="text" id="email" placeholder="email"> </div> <div class="profile"> <textarea id="profile" placeholder="Insert a brief description of yourself"></textarea> </div> <div class="education"> <input type="text" id="degree" placeholder="degree"> <input type="text" id="university" placeholder="university"> <input type="text" id="location" placeholder="location"> <input type="date" id="year" placeholder="year"> </div> <div class="skills"> <div class="skill"> <input type="text" id="new-skill" placeholder="skill" onkeyup="add_skill_by_enter(event)"> <button onclick="add_skill()">+</button> </div> </div>
在这里,我使用两个函数:add_skill_by_enter(事件)和add_skill()。 他们需要通过按+或Enter按钮添加几个字段。 我将在稍后描述这些功能。
添加一个按钮以将表单提交到服务器:
<button onclick="sendForm()">Send</button>
现在,我们将编写用于处理表单的函数。
第一个功能是add_skill()
add_skill = () => { const newSkill = document.getElementById("new-skill"); if (newSkill.value === '') {return; }
我们添加了一个简单的功能,可以从字段中收集数据并将其发送到服务器。
get_skill_values = () => { const skills = []; if (document.getElementById('new-skill').value !== '') { skills.push(document.getElementById('new-skill').value); } Array.from(document.getElementsByClassName('skillfield')).forEach(current_element => { skills.push(current_element.innerHTML); }); return skills; }; sendForm() sendForm = () => { fetch('/', { method: 'POST', headers: { 'Content-Type': 'application/json' }, body: JSON.stringify({ userData: { fillName: document.getElementById('fill-name').value, phoneNumber: document.getElementById('phone-number').value, email: document.getElementById('email').value, profile: document.getElementById('profile').value, education: { degree: document.getElementById('degree').value, university: document.getElementById('university').value, location: document.getElementById('location').value, year: document.getElementById('year').value, }, skills: get_skill_values() } }) }).then(res => res.json()) .then(response => { location.replace('/' + response.filename);
我在Express上写服务器部分。 所有库的连接,服务器配置以及get和post方法的描述如下所示:
const path = require('path'); const express = require('express'); const bodyParser = require('body-parser'); const app = express(); app.use(bodyParser.json()); app.get('/', (req, res) => { res.sendFile(path.join(__dirname + '/index.html')); }); app.post('/', (req, res) => {
运行快递:
node main.js
在浏览器中打开地址:
http:localhost:3000
我们看到创建的表单。 我们用任意数据填充它:
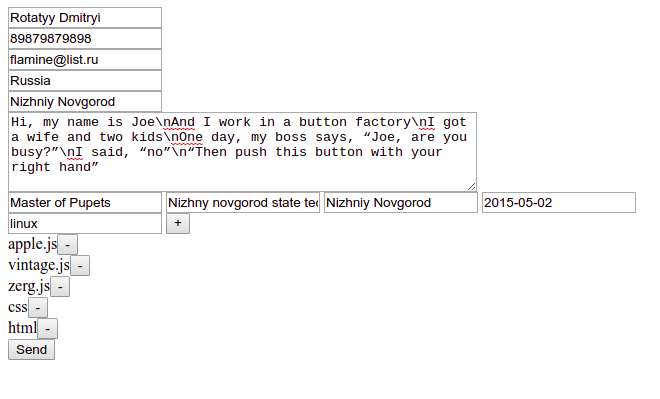
我们得到以下json:
{"userData":{"fillName":"Rotatyy Dmitryi","phoneNumber":"89879879898","email":"flamine@list.ru","profile":"Hi, my name is Joe\nAnd I work in a button factory\nI got a wife and two kids\nOne day, my boss says, “Joe, are you busy?”\nI said, “no”\n“Then push this button with your right hand”","country":"Russia","city":"Nizhniy Novgorod","education":{"degree":"Master of Pupets","university":"Nizhny novgorod state technical university","location":"Nizhniy Novgorod","year":"2015-05-02"},"skills":["apple.js","vintage.js","zerg.js","css","html","linux"]}};
现在,您需要为构建器编写脚本。 我以Google Docs提供的模板(简历模板)为基础。
该模板如下所示:
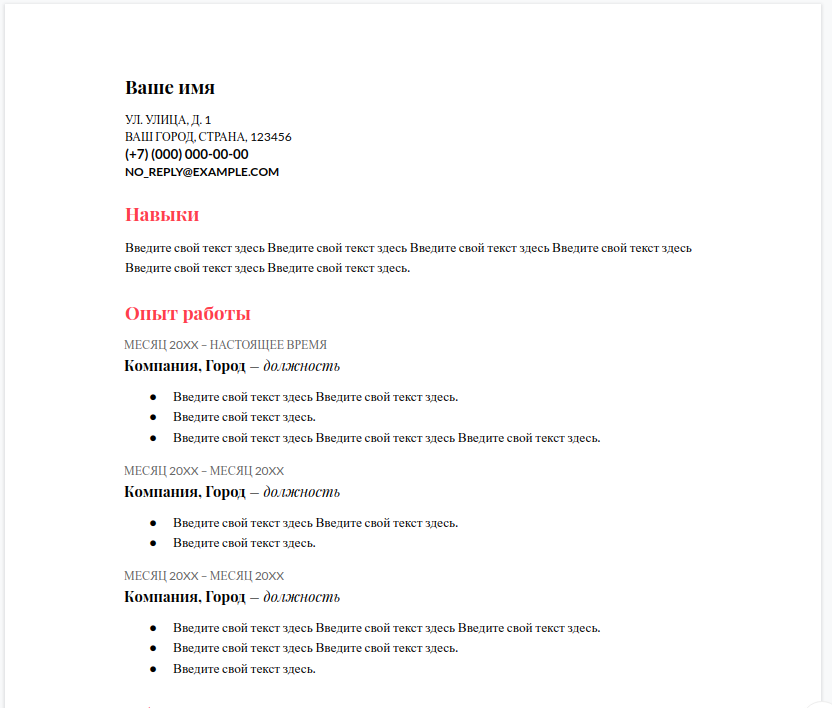
使用此数据和模板,您需要创建一个脚本,构建器将使用该脚本创建文档。
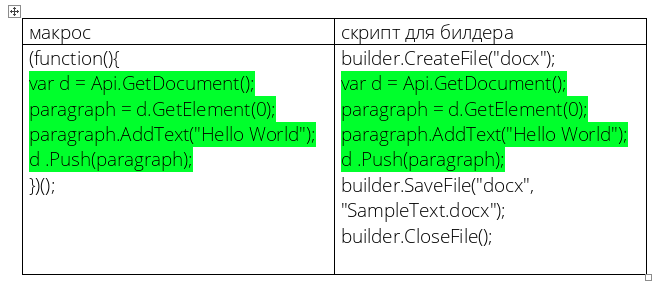
有几种方法可以做到这一点,最简单的方法是下载桌面版本的ONLYOFFICE编辑器并编写一个宏,该宏将使用数据创建文档。 然后将创建和保存文件添加到宏中-您将获得构建器的脚本。 这将起作用,因为宏和生成器使用相同的API。
为构建器创建脚本
我们首先初始化页面对象并添加来自用户的数据:
const Document = Api.GetDocument(); const data = {"userData":{"fillName":"Rotatyy Dmitryi","phoneNumber":"89879879898","email":"flamine@list.ru","profile":"Hi, my name is Joe\nAnd I work in a button factory\nI got a wife and two kids\nOne day, my boss says, “Joe, are you busy?”\nI said, “no”\n“Then push this button with your right hand”","country":"Russia","city":"Nizhniy Novgorod","education":{"degree":"Master of Pupets","university":"Nizhny novgorod state technical university","location":"Nizhniy Novgorod","year":"2015-05-02"},"skills":["apple.js","vintage.js","zerg.js","css","html","linux"]}};
现在,您需要添加具有完整用户名的段落。 它用粗体写,该段的行距为1.15。
let paragraph = document.GetElement(0);
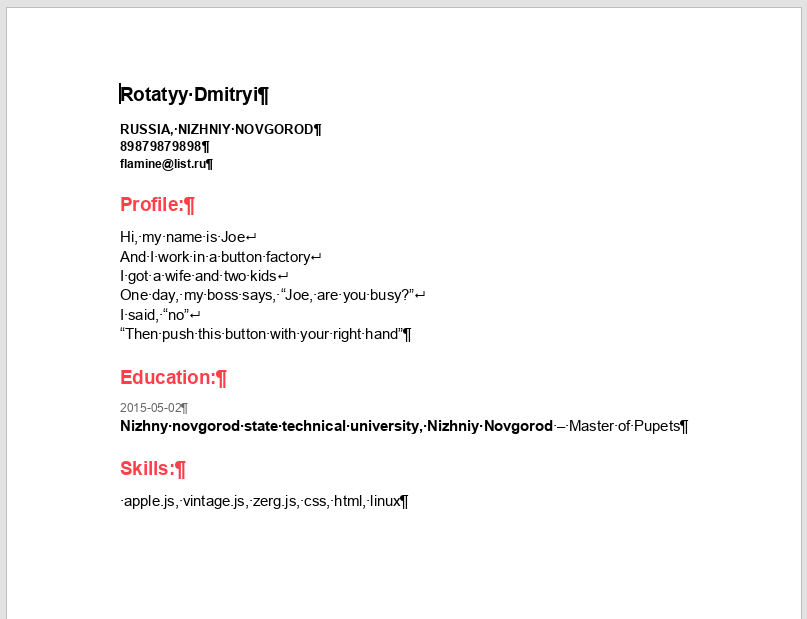
通过执行此脚本,我们得到以下文档:
现在是时候添加一些功能,以将脚本代码写入文件并生成文档。
我们生成脚本->写入文件->将文件提供给构建器->将文件链接返回给用户。
我们添加了用于使用Node.js处理文件和运行命令的附加组件连接,并且还创建了一个“ public”文件夹并将其公开:
const {exec} = require('child_process'); const fs = require('fs'); app.use(express.static('public'));
用脚本生成文本的功能将非常简单-在添加用户数据的同时,它仅返回包含构建器所有代码的字符串。 在每行的末尾添加一个换行符非常重要,否则将无效。
generate_script = (data) => { let first_template = 'builder.CreateFile("docx");\n' + 'const Document = Api.GetDocument();\n'; first_template += 'const data = ' + JSON.stringify(data) + ';\n'; first_template += 'let paragraph = Document.GetElement(0);\n' + 'FullName_style = Document.CreateStyle("FullName");\n' + .... ~~~~~~~~~~~ return first_template; };
现在,您需要将脚本写入文件并将其提供给构建器。 实际上,与构建器的所有工作都将简化为我们需要documentbuilder path/script.js Node.js执行documentbuilder path/script.js Node.js命令的事实
我们编写一个构建函数来做到这一点:
build = (data, res) => { const filename = Math.random().toString(36).substring(7) + '.docx';
添加对build方法的调用(req.body,res); 发布请求时
app.post('/', (req, res) => { build(req.body, res); });
这样就完成了。 以防万一,我在此处发布了完整的示例代码。
因此,您可以将ONLYOFFICE DocumentBuilder嵌入到Web应用程序中。
我希望尽管有很多简化,但是一切都清楚了。 我只使用了必要的最小代码来显示一切。
目前,有一些想法可以完成实用程序并扩大要解决的问题的范围。 如果您在评论或PM中分享生成文档的实际案例(当然,当然也包含演示文稿的表格),我将不胜感激。