Python + OpenCV + Keras:半小时内即可识别文本

哈Ha

在试验了以60,000个众所周知的手写数字为基础的MNIST之后,逻辑上出现了一个问题,即是否存在类似的东西,但不仅支持数字,还支持字母。 事实证明,您可能会猜到存在扩展基础知识(EMNIST),并且被称为这样的基础。

如果有人对如何使用该数据库感兴趣,可以进行简单的文本识别,欢迎加入。


注意 :这个例子是实验性的和教育性的,我只是想看看它带来了什么。 我没有计划也没有计划做第二个FineReader,所以这里的许多事情当然都没有实现。 因此,不接受“为什么”,“已经更好”等样式的声明。 可能已经有适用于Python的现成的OCR库,但是自己做是很有趣的。 顺便说一句,对于那些想了解真正的FineReader的制作方式的人,他们在Habré博客上有2014年的两篇文章: 12 (但当然没有任何公司博客中的源代码和详细信息)。 好吧,让我们开始吧,一切都在这里打开,一切都开源。
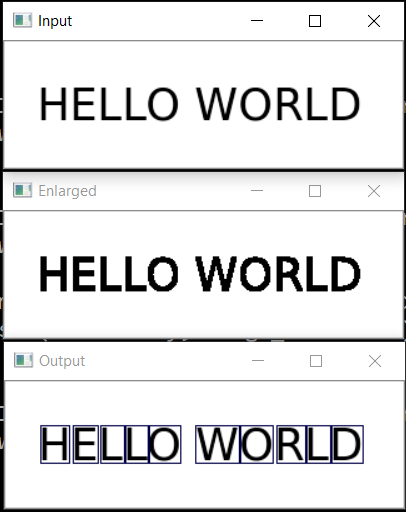
例如,我们将使用纯文本。 这是一个:

你好世界


让我们看看可以用它做什么。

将文字分解为字母


第一步是将文本分成单独的字母。 OpenCV为此很有用,更确切地说是它的findContours函数。

打开图像(cv2.imread),将其转换为黑白(cv2.cvtColor + cv2.threshold),略微增大(cv2.erode)并找到轮廓。

image_file = "text.png" img = cv2.imread(image_file) gray = cv2.cvtColor(img, cv2.COLOR_BGR2GRAY) ret, thresh = cv2.threshold(gray, 0, 255, cv2.THRESH_BINARY) img_erode = cv2.erode(thresh, np.ones((3, 3), np.uint8), iterations=1) # Get contours contours, hierarchy = cv2.findContours(img_erode, cv2.RETR_TREE, cv2.CHAIN_APPROX_NONE) output = img.copy() for idx, contour in enumerate(contours): (x, y, w, h) = cv2.boundingRect(contour) # print("R", idx, x, y, w, h, cv2.contourArea(contour), hierarchy[0][idx]) # hierarchy[i][0]: the index of the next contour of the same level # hierarchy[i][1]: the index of the previous contour of the same level # hierarchy[i][2]: the index of the first child # hierarchy[i][3]: the index of the parent if hierarchy[0][idx][3] == 0: cv2.rectangle(output, (x, y), (x + w, y + h), (70, 0, 0), 1) cv2.imshow("Input", img) cv2.imshow("Enlarged", img_erode) cv2.imshow("Output", output) cv2.waitKey(0) 

我们得到了轮廓的分层树(参数cv2.RETR_TREE)。 首先是图片的总体轮廓,然后是字母的轮廓,然后是内部轮廓。 我们只需要字母的轮廓,因此我检查“轮廓”是否是整体轮廓。 这是一种简化的方法,尽管对于识别屏幕截图并不重要,但对于实际扫描而言,这可能不起作用。

结果:


下一步是保存每个字母,之前已将其缩放为28x28正方形(以这种格式存储MNIST数据库)。 OpenCV基于numpy构建,因此我们可以使用处理数组的功能进行裁剪和缩放。

 def letters_extract(image_file: str, out_size=28) -> List[Any]: img = cv2.imread(image_file) gray = cv2.cvtColor(img, cv2.COLOR_BGR2GRAY) ret, thresh = cv2.threshold(gray, 0, 255, cv2.THRESH_BINARY) img_erode = cv2.erode(thresh, np.ones((3, 3), np.uint8), iterations=1) # Get contours contours, hierarchy = cv2.findContours(img_erode, cv2.RETR_TREE, cv2.CHAIN_APPROX_NONE) output = img.copy() letters = [] for idx, contour in enumerate(contours): (x, y, w, h) = cv2.boundingRect(contour) # print("R", idx, x, y, w, h, cv2.contourArea(contour), hierarchy[0][idx]) # hierarchy[i][0]: the index of the next contour of the same level # hierarchy[i][1]: the index of the previous contour of the same level # hierarchy[i][2]: the index of the first child # hierarchy[i][3]: the index of the parent if hierarchy[0][idx][3] == 0: cv2.rectangle(output, (x, y), (x + w, y + h), (70, 0, 0), 1) letter_crop = gray[y:y + h, x:x + w] # print(letter_crop.shape) # Resize letter canvas to square size_max = max(w, h) letter_square = 255 * np.ones(shape=[size_max, size_max], dtype=np.uint8) if w > h: # Enlarge image top-bottom # ------ # ====== # ------ y_pos = size_max//2 - h//2 letter_square[y_pos:y_pos + h, 0:w] = letter_crop elif w < h: # Enlarge image left-right # --||-- x_pos = size_max//2 - w//2 letter_square[0:h, x_pos:x_pos + w] = letter_crop else: letter_square = letter_crop # Resize letter to 28x28 and add letter and its X-coordinate letters.append((x, w, cv2.resize(letter_square, (out_size, out_size), interpolation=cv2.INTER_AREA))) # Sort array in place by X-coordinate letters.sort(key=lambda x: x[0], reverse=False) return letters 

最后,我们按照X坐标对字母进行排序,如您所见,我们将结果保存为元组(x,w,字母)的形式,以便可以从字母之间的空格中选择空格。

确保一切正常:

 cv2.imshow("0", letters[0][2]) cv2.imshow("1", letters[1][2]) cv2.imshow("2", letters[2][2]) cv2.imshow("3", letters[3][2]) cv2.imshow("4", letters[4][2]) cv2.waitKey(0) 


字母已准备好被识别,我们将使用卷积网络来识别它们-这种类型的网络非常适合此类任务。

神经网络(CNN)进行识别


源EMNIST数据集具有62个不同的字符(A..Z,0..9等):

 emnist_labels = [48, 49, 50, 51, 52, 53, 54, 55, 56, 57, 65, 66, 67, 68, 69, 70, 71, 72, 73, 74, 75, 76, 77, 78, 79, 80, 81, 82, 83, 84, 85, 86, 87, 88, 89, 90, 97, 98, 99, 100, 101, 102, 103, 104, 105, 106, 107, 108, 109, 110, 111, 112, 113, 114, 115, 116, 117, 118, 119, 120, 121, 122] 

因此,神经网络具有62个输出,在输入处它将接收28x28图像,在识别“ 1”之后将在相应的网络输出处。

创建一个网络模型。

 from tensorflow import keras from keras.models import Sequential from keras import optimizers from keras.layers import Convolution2D, MaxPooling2D, Dropout, Flatten, Dense, Reshape, LSTM, BatchNormalization from keras.optimizers import SGD, RMSprop, Adam from keras import backend as K from keras.constraints import maxnorm import tensorflow as tf def emnist_model(): model = Sequential() model.add(Convolution2D(filters=32, kernel_size=(3, 3), padding='valid', input_shape=(28, 28, 1), activation='relu')) model.add(Convolution2D(filters=64, kernel_size=(3, 3), activation='relu')) model.add(MaxPooling2D(pool_size=(2, 2))) model.add(Dropout(0.25)) model.add(Flatten()) model.add(Dense(512, activation='relu')) model.add(Dropout(0.5)) model.add(Dense(len(emnist_labels), activation='softmax')) model.compile(loss='categorical_crossentropy', optimizer='adadelta', metrics=['accuracy']) return model 

如您所见,这是一个经典的卷积网络,突出显示图像的某些特征(滤波器32和64的数量),“线性” MLP网络连接到该图像的“输出”,形成最终结果。

神经网络训练


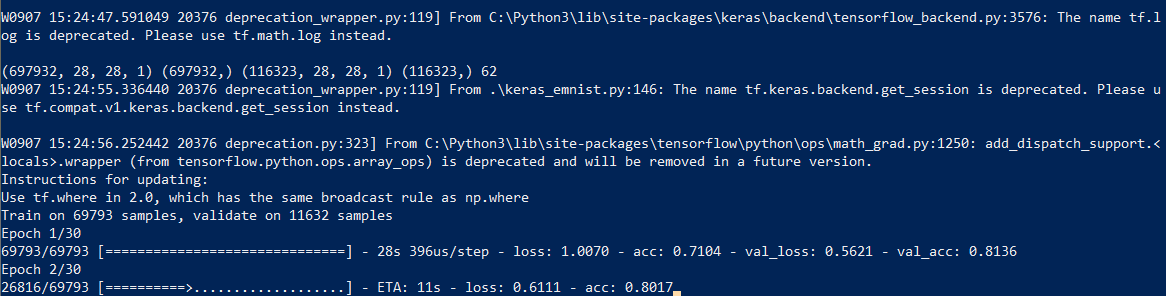
我们进入了最长的阶段-网络培训。 为此,我们使用EMNIST数据库,该数据库可以从链接下载(存档大小536Mb)。

要读取数据库,请使用idx2numpy库。 我们将准备数据进行培训和验证。

 import idx2numpy emnist_path = '/home/Documents/TestApps/keras/emnist/' X_train = idx2numpy.convert_from_file(emnist_path + 'emnist-byclass-train-images-idx3-ubyte') y_train = idx2numpy.convert_from_file(emnist_path + 'emnist-byclass-train-labels-idx1-ubyte') X_test = idx2numpy.convert_from_file(emnist_path + 'emnist-byclass-test-images-idx3-ubyte') y_test = idx2numpy.convert_from_file(emnist_path + 'emnist-byclass-test-labels-idx1-ubyte') X_train = np.reshape(X_train, (X_train.shape[0], 28, 28, 1)) X_test = np.reshape(X_test, (X_test.shape[0], 28, 28, 1)) print(X_train.shape, y_train.shape, X_test.shape, y_test.shape, len(emnist_labels)) k = 10 X_train = X_train[:X_train.shape[0] // k] y_train = y_train[:y_train.shape[0] // k] X_test = X_test[:X_test.shape[0] // k] y_test = y_test[:y_test.shape[0] // k] # Normalize X_train = X_train.astype(np.float32) X_train /= 255.0 X_test = X_test.astype(np.float32) X_test /= 255.0 x_train_cat = keras.utils.to_categorical(y_train, len(emnist_labels)) y_test_cat = keras.utils.to_categorical(y_test, len(emnist_labels)) 

我们准备了两套训练和验证套件。 字符本身是易于显示的普通数组:


我们还仅使用数据集的1/10进行训练(参数k),否则该过程将至少花费10个小时。

我们开始网络训练,在过程结束时,我们将训练后的模型保存到磁盘中。

 # Set a learning rate reduction learning_rate_reduction = keras.callbacks.ReduceLROnPlateau(monitor='val_acc', patience=3, verbose=1, factor=0.5, min_lr=0.00001) # Required for learning_rate_reduction: keras.backend.get_session().run(tf.global_variables_initializer()) model.fit(X_train, x_train_cat, validation_data=(X_test, y_test_cat), callbacks=[learning_rate_reduction], batch_size=64, epochs=30) model.save('emnist_letters.h5') 

学习过程本身大约需要半小时:


这仅需要执行一次,那么我们将使用已经保存的模型文件。 培训完成后,一切就绪,您可以识别文本。

认可度


为了识别,我们加载模型并调用predict_classes函数。

 model = keras.models.load_model('emnist_letters.h5') def emnist_predict_img(model, img): img_arr = np.expand_dims(img, axis=0) img_arr = 1 - img_arr/255.0 img_arr[0] = np.rot90(img_arr[0], 3) img_arr[0] = np.fliplr(img_arr[0]) img_arr = img_arr.reshape((1, 28, 28, 1)) result = model.predict_classes([img_arr]) return chr(emnist_labels[result[0]]) 

事实证明,数据集中的图像最初是旋转的,因此在识别之前我们必须旋转图像。

最终函数在输入端接收带有图像的文件,在输出端给出一行,该函数仅占用10行代码:

 def img_to_str(model: Any, image_file: str): letters = letters_extract(image_file) s_out = "" for i in range(len(letters)): dn = letters[i+1][0] - letters[i][0] - letters[i][1] if i < len(letters) - 1 else 0 s_out += emnist_predict_img(model, letters[i][2]) if (dn > letters[i][1]/4): s_out += ' ' return s_out 

如果字母之间的间距大于字符的1/4,我们将使用以前保存的字符宽度添加空格。

用法示例:
 model = keras.models.load_model('emnist_letters.h5') s_out = img_to_str(model, "hello_world.png") print(s_out) 

结果:


一个有趣的特征是神经网络“混淆”了字母“ O”和数字“ 0”,但这并不奇怪,因为 EMNIST的原始集包含手写字母和数字,与印刷的字母和数字并不完全相同。 理想情况下,要识别屏幕文本,您需要根据屏幕字体准备一个单独的集合,并已经在其上训练了一个神经网络。

结论


如您所见,不是众神在烧锅,而在现代图书馆的帮助下曾经看起来“神奇”的事情变得非常简单。

由于Python是跨平台的,因此代码可以在Windows,Linux和OSX上的任何地方使用。 就像Keras移植到iOS / Android上一样,从理论上讲,经过训练的模型也可以在移动设备上使用

对于那些想自己尝试的人,源代码位于破坏者的下面。

keras_emnist.py
 # Code source: dmitryelj@gmail.com import os # Force CPU # os.environ["CUDA_VISIBLE_DEVICES"] = "-1" # Debug messages # 0 = all messages are logged (default behavior) # 1 = INFO messages are not printed # 2 = INFO and WARNING messages are not printed # 3 = INFO, WARNING, and ERROR messages are not printed os.environ['TF_CPP_MIN_LOG_LEVEL'] = '3' import cv2 import imghdr import numpy as np import pathlib from tensorflow import keras from keras.models import Sequential from keras import optimizers from keras.layers import Convolution2D, MaxPooling2D, Dropout, Flatten, Dense, Reshape, LSTM, BatchNormalization from keras.optimizers import SGD, RMSprop, Adam from keras import backend as K from keras.constraints import maxnorm import tensorflow as tf from scipy import io as spio import idx2numpy # sudo pip3 install idx2numpy from matplotlib import pyplot as plt from typing import * import time # Dataset: # https://www.nist.gov/node/1298471/emnist-dataset # https://www.itl.nist.gov/iaui/vip/cs_links/EMNIST/gzip.zip def cnn_print_digit(d): print(d.shape) for x in range(28): s = "" for y in range(28): s += "{0:.1f} ".format(d[28*y + x]) print(s) def cnn_print_digit_2d(d): print(d.shape) for y in range(d.shape[0]): s = "" for x in range(d.shape[1]): s += "{0:.1f} ".format(d[x][y]) print(s) emnist_labels = [48, 49, 50, 51, 52, 53, 54, 55, 56, 57, 65, 66, 67, 68, 69, 70, 71, 72, 73, 74, 75, 76, 77, 78, 79, 80, 81, 82, 83, 84, 85, 86, 87, 88, 89, 90, 97, 98, 99, 100, 101, 102, 103, 104, 105, 106, 107, 108, 109, 110, 111, 112, 113, 114, 115, 116, 117, 118, 119, 120, 121, 122] def emnist_model(): model = Sequential() model.add(Convolution2D(filters=32, kernel_size=(3, 3), padding='valid', input_shape=(28, 28, 1), activation='relu')) model.add(Convolution2D(filters=64, kernel_size=(3, 3), activation='relu')) model.add(MaxPooling2D(pool_size=(2, 2))) model.add(Dropout(0.25)) model.add(Flatten()) model.add(Dense(512, activation='relu')) model.add(Dropout(0.5)) model.add(Dense(len(emnist_labels), activation='softmax')) model.compile(loss='categorical_crossentropy', optimizer='adadelta', metrics=['accuracy']) return model def emnist_model2(): model = Sequential() # In Keras there are two options for padding: same or valid. Same means we pad with the number on the edge and valid means no padding. model.add(Convolution2D(filters=32, kernel_size=(3, 3), activation='relu', padding='same', input_shape=(28, 28, 1))) model.add(MaxPooling2D((2, 2))) model.add(Convolution2D(64, (3, 3), activation='relu', padding='same')) model.add(MaxPooling2D((2, 2))) model.add(Convolution2D(128, (3, 3), activation='relu', padding='same')) model.add(MaxPooling2D((2, 2))) # model.add(Conv2D(128, (3, 3), activation='relu', padding='same')) # model.add(MaxPooling2D((2, 2))) ## model.add(Dropout(0.25)) model.add(Flatten()) model.add(Dense(512, activation='relu')) model.add(Dropout(0.5)) model.add(Dense(len(emnist_labels), activation='softmax')) model.compile(loss='categorical_crossentropy', optimizer='adadelta', metrics=['accuracy']) return model def emnist_model3(): model = Sequential() model.add(Convolution2D(filters=32, kernel_size=(3, 3), padding='same', input_shape=(28, 28, 1), activation='relu')) model.add(Convolution2D(filters=32, kernel_size=(3, 3), padding='same', activation='relu')) model.add(MaxPooling2D(pool_size=(2, 2))) model.add(Dropout(0.25)) model.add(Convolution2D(filters=64, kernel_size=(3, 3), padding='same', activation='relu')) model.add(Convolution2D(filters=64, kernel_size=(3, 3), padding='same', activation='relu')) model.add(MaxPooling2D(pool_size=(2, 2), strides=(2, 2))) model.add(Dropout(0.25)) model.add(Flatten()) model.add(Dense(512, activation="relu")) model.add(Dropout(0.5)) model.add(Dense(len(emnist_labels), activation="softmax")) model.compile(loss='categorical_crossentropy', optimizer=RMSprop(lr=0.001, rho=0.9, epsilon=1e-08, decay=0.0), metrics=['accuracy']) return model def emnist_train(model): t_start = time.time() emnist_path = 'D:\\Temp\\1\\' X_train = idx2numpy.convert_from_file(emnist_path + 'emnist-byclass-train-images-idx3-ubyte') y_train = idx2numpy.convert_from_file(emnist_path + 'emnist-byclass-train-labels-idx1-ubyte') X_test = idx2numpy.convert_from_file(emnist_path + 'emnist-byclass-test-images-idx3-ubyte') y_test = idx2numpy.convert_from_file(emnist_path + 'emnist-byclass-test-labels-idx1-ubyte') X_train = np.reshape(X_train, (X_train.shape[0], 28, 28, 1)) X_test = np.reshape(X_test, (X_test.shape[0], 28, 28, 1)) print(X_train.shape, y_train.shape, X_test.shape, y_test.shape, len(emnist_labels)) # Test: k = 10 X_train = X_train[:X_train.shape[0] // k] y_train = y_train[:y_train.shape[0] // k] X_test = X_test[:X_test.shape[0] // k] y_test = y_test[:y_test.shape[0] // k] # Normalize X_train = X_train.astype(np.float32) X_train /= 255.0 X_test = X_test.astype(np.float32) X_test /= 255.0 x_train_cat = keras.utils.to_categorical(y_train, len(emnist_labels)) y_test_cat = keras.utils.to_categorical(y_test, len(emnist_labels)) # Set a learning rate reduction learning_rate_reduction = keras.callbacks.ReduceLROnPlateau(monitor='val_acc', patience=3, verbose=1, factor=0.5, min_lr=0.00001) # Required for learning_rate_reduction: keras.backend.get_session().run(tf.global_variables_initializer()) model.fit(X_train, x_train_cat, validation_data=(X_test, y_test_cat), callbacks=[learning_rate_reduction], batch_size=64, epochs=30) print("Training done, dT:", time.time() - t_start) def emnist_predict(model, image_file): img = keras.preprocessing.image.load_img(image_file, target_size=(28, 28), color_mode='grayscale') emnist_predict_img(model, img) def emnist_predict_img(model, img): img_arr = np.expand_dims(img, axis=0) img_arr = 1 - img_arr/255.0 img_arr[0] = np.rot90(img_arr[0], 3) img_arr[0] = np.fliplr(img_arr[0]) img_arr = img_arr.reshape((1, 28, 28, 1)) result = model.predict_classes([img_arr]) return chr(emnist_labels[result[0]]) def letters_extract(image_file: str, out_size=28): img = cv2.imread(image_file) gray = cv2.cvtColor(img, cv2.COLOR_BGR2GRAY) ret, thresh = cv2.threshold(gray, 0, 255, cv2.THRESH_BINARY) img_erode = cv2.erode(thresh, np.ones((3, 3), np.uint8), iterations=1) # Get contours contours, hierarchy = cv2.findContours(img_erode, cv2.RETR_TREE, cv2.CHAIN_APPROX_NONE) output = img.copy() letters = [] for idx, contour in enumerate(contours): (x, y, w, h) = cv2.boundingRect(contour) # print("R", idx, x, y, w, h, cv2.contourArea(contour), hierarchy[0][idx]) # hierarchy[i][0]: the index of the next contour of the same level # hierarchy[i][1]: the index of the previous contour of the same level # hierarchy[i][2]: the index of the first child # hierarchy[i][3]: the index of the parent if hierarchy[0][idx][3] == 0: cv2.rectangle(output, (x, y), (x + w, y + h), (70, 0, 0), 1) letter_crop = gray[y:y + h, x:x + w] # print(letter_crop.shape) # Resize letter canvas to square size_max = max(w, h) letter_square = 255 * np.ones(shape=[size_max, size_max], dtype=np.uint8) if w > h: # Enlarge image top-bottom # ------ # ====== # ------ y_pos = size_max//2 - h//2 letter_square[y_pos:y_pos + h, 0:w] = letter_crop elif w < h: # Enlarge image left-right # --||-- x_pos = size_max//2 - w//2 letter_square[0:h, x_pos:x_pos + w] = letter_crop else: letter_square = letter_crop # Resize letter to 28x28 and add letter and its X-coordinate letters.append((x, w, cv2.resize(letter_square, (out_size, out_size), interpolation=cv2.INTER_AREA))) # Sort array in place by X-coordinate letters.sort(key=lambda x: x[0], reverse=False) # cv2.imshow("Input", img) # # cv2.imshow("Gray", thresh) # cv2.imshow("Enlarged", img_erode) # cv2.imshow("Output", output) # cv2.imshow("0", letters[0][2]) # cv2.imshow("1", letters[1][2]) # cv2.imshow("2", letters[2][2]) # cv2.imshow("3", letters[3][2]) # cv2.imshow("4", letters[4][2]) # cv2.waitKey(0) return letters def img_to_str(model: Any, image_file: str): letters = letters_extract(image_file) s_out = "" for i in range(len(letters)): dn = letters[i+1][0] - letters[i][0] - letters[i][1] if i < len(letters) - 1 else 0 s_out += emnist_predict_img(model, letters[i][2]) if (dn > letters[i][1]/4): s_out += ' ' return s_out if __name__ == "__main__": # model = emnist_model() # emnist_train(model) # model.save('emnist_letters.h5') model = keras.models.load_model('emnist_letters.h5') s_out = img_to_str(model, "hello_world.png") print(s_out) 


与往常一样,所有成功的实验。

Source: https://habr.com/ru/post/zh-CN466565/


All Articles