小孩子的哈皮

Hapi.js是用于构建Web应用程序的框架。 这篇文章包含了热启动的所有基本要素。 不幸的是,作者根本不是作家,因此会有很多代码和少量文字。


最有价值球员


放一堆依赖项:


npm i @hapi/hapi @hapi/boom filepaths hapi-boom-decorators 

  • hapi / hapi-实际上,我们的服务器
  • hapi / boom-用于生成标准答案的模块
  • hapi-boom-decorators- hapi /繁荣的助手
  • filepaths-递归读取文件夹的实用程序

创建一个文件夹结构和一堆启动文件:


在./src/routes/中,我们添加了api端点的描述,即1个文件-1个端点:


 // ./src/routes/home.js async function response() { // content-type            return { result: 'ok', message: 'Hello World!' }; } module.exports = { method: 'GET', //  path: '/', //  options: { handler: response // ,  ,  hapi > 17    } }; 

./src/server.js-导出服务器本身的模块。


 // ./src/server.js 'use strict'; const Hapi = require('@hapi/hapi'); const filepaths = require('filepaths'); const hapiBoomDecorators = require('hapi-boom-decorators'); const config = require('../config'); async function createServer() { //   const server = await new Hapi.Server(config.server); //   await server.register([ hapiBoomDecorators ]); //      ./src/routes/ let routes = filepaths.getSync(__dirname + '/routes/'); for(let route of routes) server.route( require(route) ); //   try { await server.start(); console.log(`Server running at: ${server.info.uri}`); } catch(err) { //    ,   console.log(JSON.stringify(err)); } //      return server; } module.exports = createServer; 

在./server.js中,我们要做的只是调用createServer()


 #!/usr/bin/env node const createServer = require('./src/server'); createServer(); 

我们启动


 node server.js 

并检查:


 curl http://127.0.0.1:3030/ {"result":"ok","message":"Hello World!"} curl http://127.0.0.1:3030/test {"statusCode":404,"error":"Not Found","message":"Not Found"} 


在野外


至少在一个实际项目中,我们需要一个数据库,一个记录器,授权,错误处理等等。


添加续集


ORM sequelize作为模块连接:


 ... const Sequelize = require('sequelize'); ... await server.register([ ... { plugin: require('hapi-sequelizejs'), options: [ { name: config.db.database, // identifier models: [__dirname + '/models/*.js'], //    //ignoredModels: [__dirname + '/server/models/**/*.js'], //  -     sequelize: new Sequelize(config.db), //  sync: true, // default false forceSync: false, // force sync (drops tables) - default false }, ] } ... ]); 

通过调用,该数据库在路由内部变得可用:


 async function response(request) { const model = request.getModel('_', '_'); } 


向请求中注入其他模块


有必要拦截“ onRequest”事件,在该事件中,我们将配置和记录器注入到请求对象中:


 ... const Logger = require('./libs/Logger'); ... async function createServer(logLVL=config.logLVL) { ... const logger = new Logger(logLVL, 'my-hapi-app'); ... server.ext({ type: 'onRequest', method: async function (request, h) { request.server.config = Object.assign({}, config); request.server.logger = logger; return h.continue; } }); ... } 


之后,在请求处理程序内,我们将可以访问配置,记录器和数据库,而无需在模块主体中另外包含一些内容:


 // ./src/routes/home.js async function response(request) { //  request.server.logger.error('request error', 'something went wrong'); //  console.log(request.server.config); //   const messages = request.getModel(request.server.config.db.database, '_'); return { result: 'ok', message: 'Hello World!' }; } module.exports = { method: 'GET', //  path: '/', //  options: { handler: response // ,  ,  hapi > 17    } }; 

因此,输入处的请求处理程序将接收其处理所需的所有内容,并且不必每次都包含相同的模块。


登入


hapi中的授权以模块形式进行。


 ... const AuthBearer = require('hapi-auth-bearer-token'); ... async function createServer(logLVL=config.logLVL) { ... await server.register([ AuthBearer, ... ]); server.auth.strategy('token', 'bearer-access-token', {// 'token' -   ,  allowQueryToken: false, unauthorized: function() { //  ,  validate  isValid=false throw Boom.unauthorized(); }, validate: function(request, token) { if( token == 'asd' ) { return { //    isValid: true, credentials: {} }; } else { return { //   isValid: false, credentials: {} }; } } }); server.auth.default('token'); //    ... } 

并且在路由内,您需要指定要使用的授权类型:


 module.exports = { method: 'GET', path: '/', auth: 'token', //  false,     options: { handler: response } }; 

如果使用了几种授权类型:


 auth: { strategies: ['token1', 'token2', 'something_else'] }, 


错误处理


默认情况下,臂杆以标准方式生成错误,通常这些答案需要以自己的格式包装。


 server.ext('onPreResponse', function (request, h) { //      Boom,     if ( !request.response.isBoom ) { return h.continue; } //  -     let responseObj = { message: request.response.output.statusCode === 401 ? 'AuthError' : 'ServerError', status: request.response.message } //     logger.error('code: ' + request.response.output.statusCode, request.response.message); return h.response(responseObj).code(request.response.output.statusCode); }); 


数据模式


这是一个很小但很重要的话题。 数据方案使您可以检查请求的有效性和响应的正确性。 您对这些方案的描述有多好,所以摇摇欲坠和自动测试将具有如此的质量。


所有数据方案均通过joi进行描述。 让我们以用户授权为例:


 const Joi = require('@hapi/joi'); const Boom = require('boom'); async function response(request) { //   const accessTokens = request.getModel(request.server.config.db.database, 'access_tokens'); const users = request.getModel(request.server.config.db.database, 'users'); //     let userRecord = await users.findOne({ where: { email: request.query.login } }); //   ,     if ( !userRecord ) { throw Boom.unauthorized(); } // ,    if ( !userRecord.verifyPassword(request.query.password) ) { throw Boom.unauthorized();//  ,    ,    } // ,    let token = await accessTokens.createAccessToken(userRecord); //    return { meta: { total: 1 }, data: [ token.dataValues ] }; } //   ,      const tokenScheme = Joi.object({ id: Joi.number().integer().example(1), user_id: Joi.number().integer().example(2), expires_at: Joi.date().example('2019-02-16T15:38:48.243Z'), token: Joi.string().example('4443655c28b42a4349809accb3f5bc71'), updatedAt: Joi.date().example('2019-02-16T15:38:48.243Z'), createdAt: Joi.date().example('2019-02-16T15:38:48.243Z') }); //   const responseScheme = Joi.object({ meta: Joi.object({ total: Joi.number().integer().example(3) }), data: Joi.array().items(tokenScheme) }); //   const requestScheme =Joi.object({ login: Joi.string().email().required().example('pupkin@gmail.com'), password: Joi.string().required().example('12345') }); module.exports = { method: 'GET', path: '/auth', options: { handler: response, validate: { query: requestScheme }, response: { schema: responseScheme } } }; 

测试:


 curl -X GET "http://localhost:3030/auth?login=pupkin@gmail.com&password=12345" 


现在发送而不是邮件,只需登录:


 curl -X GET "http://localhost:3030/auth?login=pupkin&password=12345" 


如果答案与响应方案不匹配,则服务器也将陷入500错误。


如果项目每小时开始处理超过1个请求,则可能有必要限制对响应的验证,因为 验证是一项资源密集型操作。 为此有一个参数:“样本”


 module.exports = { method: 'GET', path: '/auth', options: { handler: response, validate: { query: requestScheme }, response: { sample: 50, schema: responseScheme } } }; 

这样,只有50%的请求将是经过验证的响应。


描述默认值和示例非常重要,将来它们将用于生成文档和自动测试。
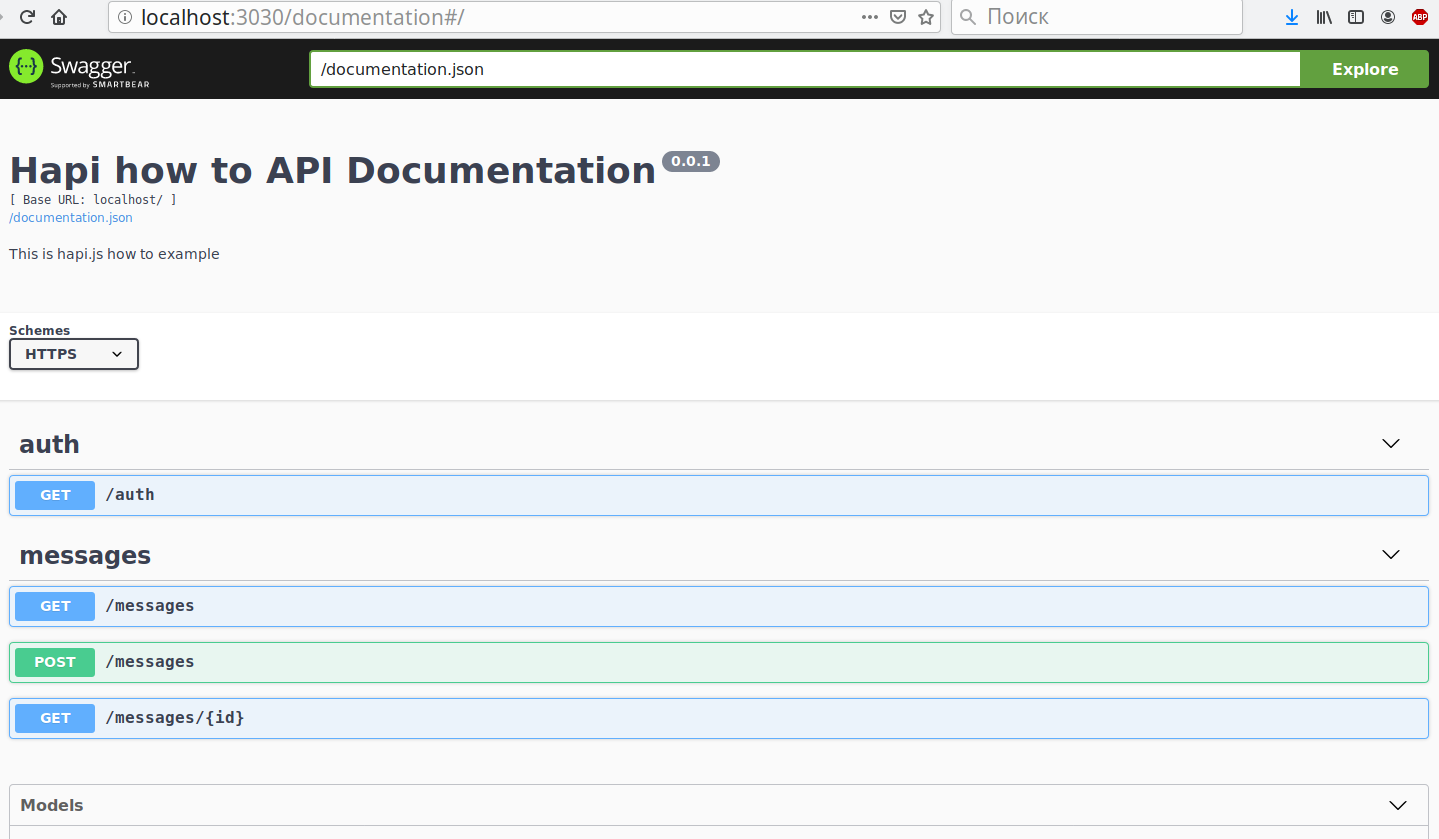


Swagger / OpenAPI


我们需要一堆其他模块:


 npm i hapi-swagger @hapi/inert @hapi/vision 

我们将它们连接到server.js


 ... const Inert = require('@hapi/inert'); const Vision = require('@hapi/vision'); const HapiSwagger = require('hapi-swagger'); const Package = require('../package'); ... const swaggerOptions = { info: { title: Package.name + ' API Documentation', description: Package.description }, jsonPath: '/documentation.json', documentationPath: '/documentation', schemes: ['https', 'http'], host: config.swaggerHost, debug: true }; ... async function createServer(logLVL=config.logLVL) { ... await server.register([ ... Inert, Vision, { plugin: HapiSwagger, options: swaggerOptions }, ... ]); ... }); 

在每条路线中,您都需要添加标签“ api”:


 module.exports = { method: 'GET', path: '/auth', options: { handler: response, tags: [ 'api' ], //    swagger'     validate: { query: requestScheme }, response: { sample: 50, schema: responseScheme } } }; 

现在,在http:// localhost:3030 / documentation上将提供一个带有文档的Web界面,在http:// localhost:3030 /documentation.json .json中提供了说明。
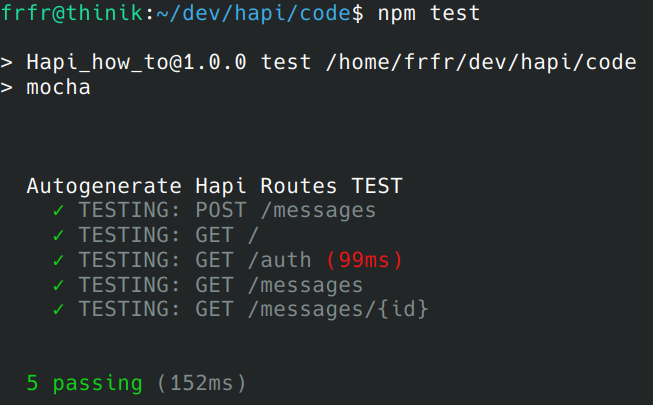


自动测试生成


如果我们定性地描述了请求和响应方案,并准备了与请求示例中描述的示例相对应的种子数据库,则根据众所周知的方案,您可以自动生成请求并检查服务器响应代码。


例如,在GET中:/ auth需要登录名和密码参数,我们将从图中指定的示例中获取它们:


 const requestScheme =Joi.object({ login: Joi.string().email().required().example('pupkin@gmail.com'), password: Joi.string().required().example('12345') }); 

如果服务器以HTTP-200-OK响应,那么我们将假定测试已通过。


不幸的是,没有现成的合适模块;您必须多说一点:


 // ./test/autogenerate.js const assert = require('assert'); const rp = require('request-promise'); const filepaths = require('filepaths'); const rsync = require('sync-request'); const config = require('./../config'); const createServer = require('../src/server'); const API_URL = 'http://0.0.0.0:3030'; const AUTH_USER = { login: 'pupkin@gmail.com', pass: '12345' }; const customExamples = { 'string': 'abc', 'number': 2, 'boolean': true, 'any': null, 'date': new Date() }; const allowedStatusCodes = { 200: true, 404: true }; function getExampleValue(joiObj) { if( joiObj == null ) // if joi is null return joiObj; if( typeof(joiObj) != 'object' ) //If it's not joi object return joiObj; if( typeof(joiObj._examples) == 'undefined' ) return customExamples[ joiObj._type ]; if( joiObj._examples.length <= 0 ) return customExamples[ joiObj._type ]; return joiObj._examples[ 0 ].value; } function generateJOIObject(schema) { if( schema._type == 'object' ) return generateJOIObject(schema._inner.children); if( schema._type == 'string' ) return getExampleValue(schema); let result = {}; let _schema; if( Array.isArray(schema) ) { _schema = {}; for(let item of schema) { _schema[ item.key ] = item.schema; } } else { _schema = schema; } for(let fieldName in _schema) { if( _schema[ fieldName ]._type == 'array' ) { result[ fieldName ] = [ generateJOIObject(_schema[ fieldName ]._inner.items[ 0 ]) ]; } else { if( Array.isArray(_schema[ fieldName ]) ) { result[ fieldName ] = getExampleValue(_schema[ fieldName ][ 0 ]); } else if( _schema[ fieldName ]._type == 'object' ) { result[ fieldName ] = generateJOIObject(_schema[ fieldName ]._inner); } else { result[ fieldName ] = getExampleValue(_schema[ fieldName ]); } } } return result } function generateQuiryParams(queryObject) { let queryArray = []; for(let name in queryObject) queryArray.push(`${name}=${queryObject[name]}`); return queryArray.join('&'); } function generatePath(basicPath, paramsScheme) { let result = basicPath; if( !paramsScheme ) return result; let replaces = generateJOIObject(paramsScheme); for(let key in replaces) result = result.replace(`{${key}}`, replaces[ key ]); return result; } function genAuthHeaders() { let result = {}; let respToken = rsync('GET', API_URL + `/auth?login=${AUTH_USER.login}&password=${AUTH_USER.pass}`); let respTokenBody = JSON.parse(respToken.getBody('utf8')); result[ 'token' ] = { Authorization: 'Bearer ' + respTokenBody.data[ 0 ].token }; return result; } function generateRequest(route, authKeys) { if( !route.options.validate ) { return false; } let options = { method: route.method, url: API_URL + generatePath(route.path, route.options.validate.params) + '?' + generateQuiryParams( generateJOIObject(route.options.validate.query || {}) ), headers: authKeys[ route.options.auth ] ? authKeys[ route.options.auth ] : {}, body: generateJOIObject(route.options.validate.payload || {}), json: true, timeout: 15000 } return options; } let authKeys = genAuthHeaders(); let testSec = [ 'POST', 'PUT', 'GET', 'DELETE' ]; let routeList = []; for(let route of filepaths.getSync(__dirname + '/../src/routes/')) routeList.push(require(route)); describe('Autogenerate Hapi Routes TEST', async () => { for(let metod of testSec) for(let testRoute of routeList) { if( testRoute.method != metod ) { continue; } it(`TESTING: ${testRoute.method} ${testRoute.path}`, async function () { let options = generateRequest(testRoute, authKeys); if( !options ) return false; let statusCode = 0; try { let result = await rp( options ); statusCode = 200; } catch(err) { statusCode = err.statusCode; } if( !allowedStatusCodes[ statusCode ] ) { console.log('*** TEST STACK FOR:', `${testRoute.method} ${testRoute.path}`); console.log('options:', options); console.log('StatusCode:', statusCode); } return assert.ok(allowedStatusCodes[ statusCode ]); }); } }); 

不要忘记依赖项:


 npm i request-promise mocha sync-request 

关于package.json


 ... "scripts": { "test": "mocha", "dbinit": "node ./scripts/dbInit.js" }, ... 

我们检查:


 npm test 


并且如果锁是某种数据方案,或者答案与方案不匹配:


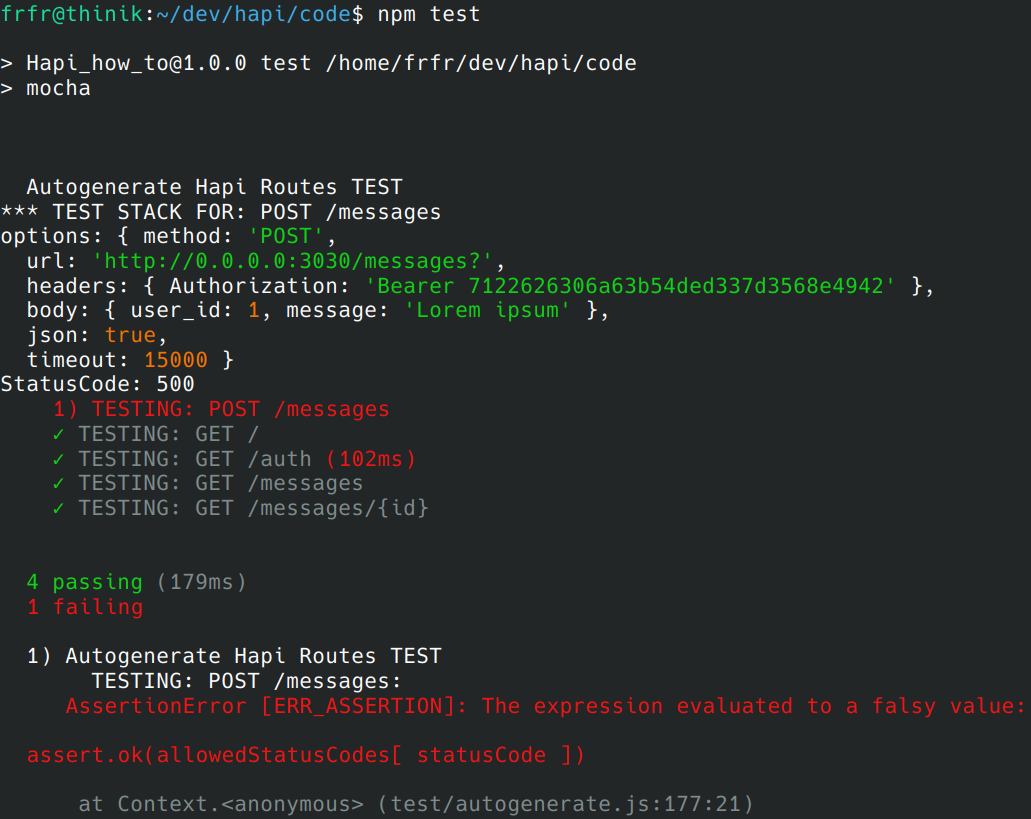
并且不要忘记,测试迟早会对数据库中的数据变得敏感。 在运行测试之前,您至少需要擦除数据库。


全部来源

Source: https://habr.com/ru/post/zh-CN467099/


All Articles