下午好,哈伯亲爱的居民!
不久前,我有机会实施一个没有特殊技术要求的小型项目。 也就是说,我可以自由选择技术栈。 因此,他不会错过在实践
Kotlin和
Vue.js时 “感觉”到
时尚,年轻,有前途但对我不熟悉的
机会 ,并添加了已经熟悉的
Spring Boot并在简单的Web应用程序上进行了尝试。
当我开始的时候,我很鲁believed地相信互联网上将会有很多关于该主题的文章和手册。 这些材料确实够用,而且都很好,但仅限于第一个REST控制器。 然后矛盾的困难开始了。 但是,即使在简单的应用程序中,我也想拥有比在页面上绘制服务器返回的文本更复杂的逻辑。
经过某种方式的整理后,我决定编写自己的手册,希望对某人有用。
这篇文章的内容和对象
该材料是“快速启动”开发Web应用程序的指南,该Web应用程序具有
Kotlin +
Spring Boot的后端和
Vue.js的前端。 我必须立即说,我不是为他们“沉迷”,也不是在谈论此堆栈的任何明确优势。 本文的目的是分享经验。
该材料是为具有Java,Spring Framework / Spring Boot,React / Angular或至少纯JavaScript经验的开发人员设计的。 适合那些没有经验的人-例如,新手程序员,但是,恐怕您将不得不自己找出一些细节。 总的来说,应该更详细地考虑本指南的某些方面,但是我认为最好在其他出版物中进行此操作,以免与本主题有很大的出入并且不会使本文繁琐。
也许这将有助于某人在无需深入探讨此主题的情况下就Kotlin进行后端开发的构想,而某人-减少工作时间,以现成的应用程序框架为基础。
我认为,尽管描述了具体的实际步骤,但总的来说,该文章具有实验性的回顾性。 现在,这种方法以及所看到的问题本身更可能是一个时髦的想法-在一个地方收集尽可能多的时髦单词。 但是将来,它可能会在企业发展中占据一席之地。 也许我们中间有一些新手(和持续的)程序员必须生活和工作,而此时Kotlin和Vue.js将会像Java和React一样受欢迎并且需求旺盛。 毕竟,Kotlin和Vue.js确实有很高的期望。
在我撰写本指南的过程中,类似的出版物(例如本指南)已经开始出现在网络上。 我再说一遍,有足够的材料可以理解对第一个REST控制器的操作顺序,但是有趣的是看到更复杂的逻辑-例如,实现按角色进行身份验证,这是相当必要的功能。 这就是我添加到自己的领导中的东西。
目录内容
快速参考
Kotlin是一种在
JVM之上运行的编程语言,由国际公司
JetBrains开发 。
Vue.js是一个
JavaScript框架,用于开发单页反应式应用程序。
开发工具
作为开发环境,我建议您使用
IntelliJ IDEA -
JetBrains的开发环境,该环境在Java社区中广受欢迎,因为它具有方便的工具和功能,可以与Kotlin一起使用,甚至可以将Java代码转换为Kotlin代码。 但是,您不应期望以这种方式可以迁移整个项目,并且突然之间一切都会自动进行。
IntelliJ IDEA Ultimate Edition的满意所有者可以安装适当的
插件 ,以方便使用Vue.js。 如果您想在
免费赠品的价格和便利性之间寻求折衷,我强烈建议您将
Microsoft Visual Code与
Vetur插件一起使用。
我想这对许多人来说是显而易见的,但以防万一,我提醒您,
npm软件包管理器必须与Vue.js一起使用。 可以在
Vue CLI网站上找到Vue.js的安装说明。
在本指南中,
Maven被用作Java项目收集器,而
PostgreSQL被用作数据库服务器。
项目初始化
通过名称创建项目目录,例如
kotlin-spring-vue 。 我们的项目将有两个模块-
后端和
前端 。 首先,将收集前端。 然后,在组装期间,后端将自己复制index.html,favicon.ico和所有静态文件(* .js,* .css,图像等)。
因此,在根目录中,我们将有两个子文件夹-
/ backend和
/ frontend 。 但是,不要急于手动创建它们。
有几种初始化后端模块的方法:
- 手动(武士路径)
- 使用Spring Tool Suite或IntelliJ IDEA Ultimate Edition生成的Spring Boot应用程序项目
- 使用Spring Initializr ,指定必要的设置-这也许是最常见的方法
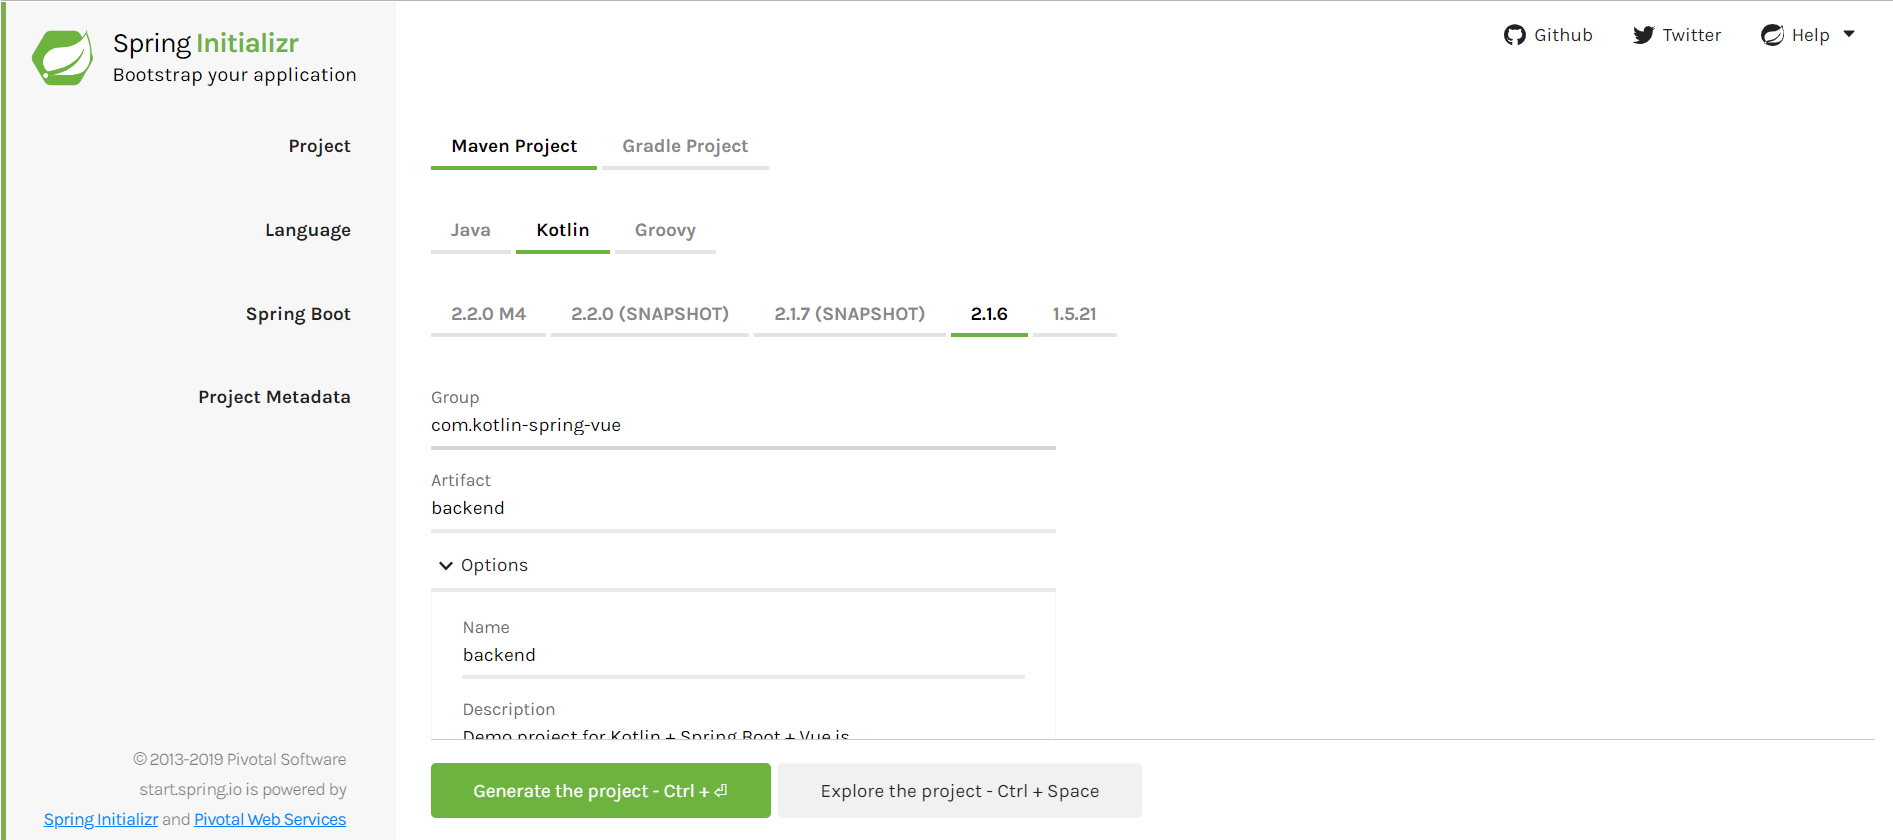
在我们的例子中,主要配置如下:
后端模块配置- 项目:Maven项目
- 语言:科特林
- 春季靴:2.1.6
- 项目元数据:Java 8,JAR打包
- 依赖项:Spring Web Starter,Spring Boot执行器,Spring Boot DevTools
pom.xml应该如下所示:
pom.xml-后端<?xml version="1.0" encoding="UTF-8"?> <project xmlns="http://maven.apache.org/POM/4.0.0" xmlns:xsi="http://www.w3.org/2001/XMLSchema-instance" xsi:schemaLocation="http://maven.apache.org/POM/4.0.0 http://maven.apache.org/xsd/maven-4.0.0.xsd"> <modelVersion>4.0.0</modelVersion> <parent> <groupId>com.kotlin-spring-vue</groupId> <artifactId>demo</artifactId> <version>0.0.1-SNAPSHOT</version> </parent> <groupId>com.kotlin-spring-vue</groupId> <artifactId>backend</artifactId> <version>0.0.1-SNAPSHOT</version> <name>backend</name> <description>Backend module for Kotlin + Spring Boot + Vue.js</description> <properties> <java.version>1.8</java.version> <kotlin.version>1.2.71</kotlin.version> <project.build.sourceEncoding>UTF-8</project.build.sourceEncoding> <project.reporting.outputEncoding>UTF-8</project.reporting.outputEncoding> <rest-assured.version>3.3.0</rest-assured.version> </properties> <dependencies> <dependency> <groupId>org.springframework.boot</groupId> <artifactId>spring-boot-starter-actuator</artifactId> </dependency> <dependency> <groupId>org.springframework.boot</groupId> <artifactId>spring-boot-starter-web</artifactId> </dependency> <dependency> <groupId>com.fasterxml.jackson.module</groupId> <artifactId>jackson-module-kotlin</artifactId> </dependency> <dependency> <groupId>org.jetbrains.kotlin</groupId> <artifactId>kotlin-reflect</artifactId> </dependency> <dependency> <groupId>org.jetbrains.kotlin</groupId> <artifactId>kotlin-stdlib-jdk8</artifactId> </dependency> <dependency> <groupId>org.springframework.boot</groupId> <artifactId>spring-boot-devtools</artifactId> <scope>runtime</scope> <optional>true</optional> </dependency> <dependency> <groupId>org.springframework.boot</groupId> <artifactId>spring-boot-starter-test</artifactId> <scope>test</scope> </dependency> </dependencies> <build> <sourceDirectory>${project.basedir}/src/main/kotlin</sourceDirectory> <testSourceDirectory>${project.basedir}/src/test/kotlin</testSourceDirectory> <plugins> <plugin> <groupId>org.springframework.boot</groupId> <artifactId>spring-boot-maven-plugin</artifactId> <configuration> <mainClass>com.kotlinspringvue.backend.BackendApplicationKt</mainClass> </configuration> </plugin> <plugin> <groupId>org.jetbrains.kotlin</groupId> <artifactId>kotlin-maven-plugin</artifactId> <configuration> <args> <arg>-Xjsr305=strict</arg> </args> <compilerPlugins> <plugin>spring</plugin> </compilerPlugins> </configuration> <dependencies> <dependency> <groupId>org.jetbrains.kotlin</groupId> <artifactId>kotlin-maven-allopen</artifactId> <version>${kotlin.version}</version> </dependency> </dependencies> </plugin> <plugin> <artifactId>maven-resources-plugin</artifactId> <executions> <execution> <id>copy Vue.js frontend content</id> <phase>generate-resources</phase> <goals> <goal>copy-resources</goal> </goals> <configuration> <outputDirectory>src/main/resources/public</outputDirectory> <overwrite>true</overwrite> <resources> <resource> <directory>${project.parent.basedir}/frontend/target/dist</directory> <includes> <include>static/</include> <include>index.html</include> <include>favicon.ico</include> </includes> </resource> </resources> </configuration> </execution> </executions> </plugin> </plugins> </build> </project>
注意事项:
- 主要类别的名称以Kt结尾
- 将资源从project_root /前端/目标/ dist复制到src / main /资源/ public
- 由spring-boot-starter-parent表示的父项目(父项目)已移至主pom.xml级别
要初始化前端模块,请转到项目根目录并执行以下命令:
$ vue create frontend
然后,您可以选择所有默认设置-在我们的情况下,这就足够了。
默认情况下,该模块将收集在
/ dist子文件夹中,但是我们需要在/ target文件夹中查看收集的文件。 为此,请使用以下设置直接在
/ frontend中创建
vue.config.js文件:
module.exports = { outputDir: 'target/dist', assetsDir: 'static' }
将以下形式
的pom.xml文件
放入 前端模块:
pom.xml-前端 <?xml version="1.0" encoding="UTF-8"?> <project xmlns="http://maven.apache.org/POM/4.0.0" xmlns:xsi="http://www.w3.org/2001/XMLSchema-instance" xsi:schemaLocation="http://maven.apache.org/POM/4.0.0 http://maven.apache.org/xsd/maven-4.0.0.xsd"> <modelVersion>4.0.0</modelVersion> <artifactId>frontend</artifactId> <parent> <groupId>com.kotlin-spring-vue</groupId> <artifactId>demo</artifactId> <version>0.0.1-SNAPSHOT</version> </parent> <properties> <project.build.sourceEncoding>UTF-8</project.build.sourceEncoding> <project.reporting.outputEncoding>UTF-8</project.reporting.outputEncoding> <java.version>1.8</java.version> <frontend-maven-plugin.version>1.6</frontend-maven-plugin.version> </properties> <build> <plugins> <plugin> <groupId>com.github.eirslett</groupId> <artifactId>frontend-maven-plugin</artifactId> <version>${frontend-maven-plugin.version}</version> <executions> <execution> <id>install node and npm</id> <goals> <goal>install-node-and-npm</goal> </goals> <configuration> <nodeVersion>v11.8.0</nodeVersion> </configuration> </execution> <execution> <id>npm install</id> <goals> <goal>npm</goal> </goals> <phase>generate-resources</phase> <configuration> <arguments>install</arguments> </configuration> </execution> <execution> <id>npm run build</id> <goals> <goal>npm</goal> </goals> <configuration> <arguments>run build</arguments> </configuration> </execution> </executions> </plugin> </plugins> </build> </project>
最后,将
pom.xml放在项目的根目录中:
pom.xml <?xml version="1.0" encoding="UTF-8"?> <project xmlns="http://maven.apache.org/POM/4.0.0" xmlns:xsi="http://www.w3.org/2001/XMLSchema-instance" xsi:schemaLocation="http://maven.apache.org/POM/4.0.0 http://maven.apache.org/xsd/maven-4.0.0.xsd"> <modelVersion>4.0.0</modelVersion> <groupId>com.kotlin-spring-vue</groupId> <artifactId>demo</artifactId> <packaging>pom</packaging> <version>0.0.1-SNAPSHOT</version> <name>kotlin-spring-vue</name> <description>Kotlin + Spring Boot + Vue.js</description> <modules> <module>frontend</module> <module>backend</module> </modules> <parent> <groupId>org.springframework.boot</groupId> <artifactId>spring-boot-starter-parent</artifactId> <version>2.1.3.RELEASE</version> <relativePath/> </parent> <properties> <main.basedir>${project.basedir}</main.basedir> </properties> <build> <plugins> <plugin> <groupId>org.jacoco</groupId> <artifactId>jacoco-maven-plugin</artifactId> <executions> <execution> <id>pre-unit-test</id> <goals> <goal>prepare-agent</goal> </goals> </execution> <execution> <id>post-unit-test</id> <phase>test</phase> <goals> <goal>report</goal> </goals> </execution> </executions> </plugin> <plugin> <groupId>org.eluder.coveralls</groupId> <artifactId>coveralls-maven-plugin</artifactId> </plugin> <plugin> <groupId>org.jetbrains.kotlin</groupId> <artifactId>kotlin-maven-plugin</artifactId> <version>${kotlin.version}</version> <executions> <execution> <id>compile</id> <phase>compile</phase> <goals> <goal>compile</goal> </goals> </execution> <execution> <id>test-compile</id> <phase>test-compile</phase> <goals> <goal>test-compile</goal> </goals> </execution> </executions> <configuration> <jvmTarget>1.8</jvmTarget> </configuration> </plugin> </plugins> </build> </project>
在这里,我们看到了两个模块-
前端和
后端 ,以及parent-
spring-boot-starter-parent 。
重要:模块必须按此顺序组装-首先是前端,然后是后端。
现在我们可以构建项目:
$ mvn install
并且,如果一切都组装好了,请运行该应用程序:
$ mvn --projects backend spring-boot:run
默认的Vue.js页面将位于
http://本地主机:8080 / :

REST API
现在,让我们创建一些简单的REST服务。 例如,“您好,[用户名]!” (默认设置为World),它计算了我们将其拉出的次数。
为此,我们需要一个由数字和字符串组成的数据结构-该类的唯一目的是存储数据。 Kotlin
为此具有
数据类 。 我们的班级将如下所示:
data class Greeting(val id: Long, val content: String)
仅此而已。 现在我们可以直接编写服务了。
注意:为方便起见,在声明类之前,它将使用
@RequestMapping注释将所有服务带到单独的route
/ api 。
import org.springframework.web.bind.annotation.* import com.kotlinspringvue.backend.model.Greeting import java.util.concurrent.atomic.AtomicLong @RestController @RequestMapping("/api") class BackendController() { val counter = AtomicLong() @GetMapping("/greeting") fun greeting(@RequestParam(value = "name", defaultValue = "World") name: String) = Greeting(counter.incrementAndGet(), "Hello, $name") }
现在重新启动应用程序,然后查看结果
http:// localhost:8080 / api / greeting?Name = Vadim :
{"id":1,"content":"Hello, Vadim"}
我们将刷新页面,并确保计数器正常工作:
{"id":2,"content":"Hello, Vadim"}
现在,让我们在前端工作,以在页面上漂亮地绘制结果。
安装
vue-router以便在我们的应用程序中的“页面”(实际上是路线和组件,因为我们只有一页)上实现导航:
$ npm install --save vue-router
将
router.js添加到
/ src-该组件将负责路由:
router.js import Vue from 'vue' import Router from 'vue-router' import HelloWorld from '@/components/HelloWorld' import Greeting from '@/components/Greeting' Vue.use(Router) export default new Router({ mode: 'history', routes: [ { path: '/', name: 'Greeting', component: Greeting }, { path: '/hello-world', name: 'HelloWorld', component: HelloWorld } ] })
注意:根路由(“ /”)将对我们的Greeting.vue组件可用,稍后我们将进行编写。
现在,我们将导入路由器。 为此,请对
main.js import Vue from 'vue' import App from './App.vue' import router from './router' Vue.config.productionTip = false new Vue({ router, render: h => h(App), }).$mount('#app')
然后
应用程序 <template> <div id="app"> <router-view></router-view> </div> </template> <script> export default { name: 'app' } </script> <style> </style>
要执行服务器请求,请使用AXIOS HTTP客户端:
$ npm install --save axios
为了避免每次在每个组件中写入相同的设置(例如,请求路由为“ / api”),建议将它们放入
单独的http-common.js组件中 :
import axios from 'axios' export const AXIOS = axios.create({ baseURL: `/api` })
注意:为避免在输出到控制台时发出警告(
console.log() ),建议在
package.json中编写以下行:
"rules": { "no-console": "off" }
现在,最后,创建组件(在
/ src / components中 )
问候语 import {AXIOS} from './http-common' <template> <div id="greeting"> <h3>Greeting component</h3> <p>Counter: {{ counter }}</p> <p>Username: {{ username }}</p> </div> </template> <script> export default { name: 'Greeting', data() { return { counter: 0, username: '' } }, methods: { loadGreeting() { AXIOS.get('/greeting', { params: { name: 'Vadim' } }) .then(response => { this.$data.counter = response.data.id; this.$data.username = response.data.content; }) .catch(error => { console.log('ERROR: ' + error.response.data); }) } }, mounted() { this.loadGreeting(); } } </script>
注意事项:- 查询参数被硬编码为仅查看该方法如何工作
- 加载页面( mount() )后立即调用加载和呈现数据的功能(
loadGreeting() () ) - 我们已经使用http-common的自定义设置导入了axios

数据库连接
现在,我们以
PostgreSQL和
Spring Data为例查看与数据库交互的过程。
首先,创建一个测试板:
CREATE TABLE public."person" ( id serial NOT NULL, name character varying, PRIMARY KEY (id) );
并用数据填充它:
INSERT INTO person (name) VALUES ('John'), ('Griselda'), ('Bobby');
补充后端模块的pom.xml: <properties> ... <postgresql.version>42.2.5</postgresql.version> ... </properties> ... <dependency> <groupId>org.springframework.boot</groupId> <artifactId>spring-boot-starter-data-jpa</artifactId> </dependency> <dependency> <groupId>org.postgresql</groupId> <artifactId>postgresql</artifactId> <version>${postgresql.version}</version> </dependency> ... <plugin> <groupId>org.jetbrains.kotlin</groupId> <artifactId>kotlin-maven-plugin</artifactId> <configuration> <args> <arg>-Xjsr305=strict</arg> </args> <compilerPlugins> <plugin>spring</plugin> <plugin>jpa</plugin> </compilerPlugins> </configuration> ... <dependency> <groupId>org.jetbrains.kotlin</groupId> <artifactId>kotlin-maven-noarg</artifactId> <version>${kotlin.version}</version> </dependency>
现在,我们将使用数据库连接设置来补充后端模块的
application.properties文件:
spring.datasource.url=${SPRING_DATASOURCE_URL} spring.datasource.username=${SPRING_DATASOURCE_USERNAME} spring.datasource.password=${SPRING_DATASOURCE_PASSWORD} spring.jpa.generate-ddl=true spring.jpa.properties.hibernate.temp.use_jdbc_metadata_defaults = false spring.jpa.database-platform=org.hibernate.dialect.PostgreSQL9Dialect spring.jpa.properties.hibernate.jdbc.lob.non_contextual_creation=true
注意:以这种形式,前三个参数指的是环境变量。 我强烈建议通过环境变量或启动参数传递敏感参数。 但是,如果您确定它们不会落入狡猾的攻击者手中,则可以明确地询问他们。
让我们为一个对象关系映射创建一个实体(实体类):
人 import javax.persistence.Column import javax.persistence.Entity import javax.persistence.GeneratedValue import javax.persistence.GenerationType import javax.persistence.Id import javax.persistence.Table @Entity @Table (name="person") data class Person( @Id @GeneratedValue(strategy = GenerationType.AUTO) val id: Long, @Column(nullable = false) val name: String )
还有一个CRUD存储库可用于我们的表:
仓库 import com.kotlinspringvue.backend.jpa.Person import org.springframework.stereotype.Repository import org.springframework.data.repository.CrudRepository import org.springframework.data.jpa.repository.JpaRepository import org.springframework.data.repository.query.Param @Repository interface PersonRepository: CrudRepository<Person, Long> {}
注意:我们将使用
findAll()方法,该方法无需重新定义,因此将正文保留为空。
最后,我们将更新控制器,以了解如何使用实际的数据库:
BackendController.kt import com.kotlinspringvue.backend.repository.PersonRepository import org.springframework.beans.factory.annotation.Autowired … @Autowired lateinit var personRepository: PersonRepository … @GetMapping("/persons") fun getPersons() = personRepository.findAll()
运行该应用程序,单击链接
https:// localhost:8080 / api / person ,以确保一切正常:
[{"id":1,"name":"John"},{"id":2,"name":"Griselda"},{"id":3,"name":"Bobby"}]
认证方式
现在我们可以继续进行身份验证-这也是区分数据访问的应用程序的基本功能之一。
考虑使用
JWT (JSON Web令牌)实现自己的授权服务器。
为什么不使用基本身份验证?- 我认为,即使在相对安全的使用环境中,基本身份验证也无法应对现代威胁的挑战。
- 您可以找到有关此主题的更多材料。
为什么不开箱即用 Spring OAuth Security的OAuth?- 因为OAuth有更多内容。
- 这种方法可以由外部环境决定:客户需求,架构师的想法等。
- 如果您是新手开发人员,那么从战略角度来看,更深入地研究安全功能将很有用。
后端
除来宾外,我们的应用程序中还将有两个用户组-普通用户和管理员。 让我们创建三个表:
用户 -用于存储用户数据,
角色 -用于存储有关角色的信息,
users_roles-用于链接前两个表。
创建表,添加约束并填充角色表 CREATE TABLE public.users ( id serial NOT NULL, username character varying, first_name character varying, last_name character varying, email character varying, password character varying, enabled boolean, PRIMARY KEY (id) ); CREATE TABLE public.roles ( id serial NOT NULL, name character varying, PRIMARY KEY (id) ); CREATE TABLE public.users_roles ( id serial NOT NULL, user_id integer, role_id integer, PRIMARY KEY (id) ); ALTER TABLE public.users_roles ADD CONSTRAINT users_roles_users_fk FOREIGN KEY (user_id) REFERENCES public.users (id) MATCH SIMPLE ON UPDATE CASCADE ON DELETE CASCADE; ALTER TABLE public.users_roles ADD CONSTRAINT users_roles_roles_fk FOREIGN KEY (role_id) REFERENCES public.roles (id) MATCH SIMPLE ON UPDATE CASCADE ON DELETE CASCADE; INSERT INTO roles (name) VALUES ('ROLE_USER'), ('ROLE_ADMIN');
让我们创建实体类:
User.kt import javax.persistence.* @Entity @Table(name = "users") data class User ( @Id @GeneratedValue(strategy = GenerationType.AUTO) val id: Long? = 0, @Column(name="username") var username: String?=null, @Column(name="first_name") var firstName: String?=null, @Column(name="last_name") var lastName: String?=null, @Column(name="email") var email: String?=null, @Column(name="password") var password: String?=null, @Column(name="enabled") var enabled: Boolean = false, @ManyToMany(fetch = FetchType.EAGER) @JoinTable( name = "users_roles", joinColumns = [JoinColumn(name = "user_id", referencedColumnName = "id")], inverseJoinColumns = [JoinColumn(name = "role_id", referencedColumnName = "id")] ) var roles: Collection<Role>? = null )
注意: 用户和
角色表之间存在多对多关系-一个用户可以具有多个角色(例如,普通用户和管理员),并且可以为多个用户分配一个角色。
供考虑的信息:一种方法是为用户赋予单独的权限(权限),而角色则意味着一组权限。 在此处阅读有关角色和权限之间区别的更多信息:
授予的权限与Spring Security中的角色 。
角色 import javax.persistence.* @Entity @Table(name = "roles") data class Role ( @Id @GeneratedValue(strategy = GenerationType.AUTO) val id: Long, @Column(name="name") val name: String )
创建用于处理表的存储库:
UsersRepository.kt import java.util.Optional import com.kotlinspringvue.backend.jpa.User import org.springframework.data.repository.CrudRepository import org.springframework.data.repository.query.Param import org.springframework.data.jpa.repository.JpaRepository import javax.transaction.Transactional interface UserRepository: JpaRepository<User, Long> { fun existsByUsername(@Param("username") username: String): Boolean fun findByUsername(@Param("username") username: String): Optional<User> fun findByEmail(@Param("email") email: String): Optional<User> @Transactional fun deleteByUsername(@Param("username") username: String) }
RolesRepository.kt import com.kotlinspringvue.backend.jpa.Role import org.springframework.data.repository.CrudRepository import org.springframework.data.repository.query.Param import org.springframework.data.jpa.repository.JpaRepository interface RoleRepository : JpaRepository<Role, Long> { fun findByName(@Param("name") name: String): Role }
将新的依赖项添加到
后端模块pom.xml <dependency> <groupId>org.springframework.boot</groupId> <artifactId>spring-boot-starter-security</artifactId> </dependency> <dependency> <groupId>com.fasterxml.jackson.module</groupId> <artifactId>jackson-module-kotlin</artifactId> </dependency> <dependency> <groupId>io.jsonwebtoken</groupId> <artifactId>jjwt</artifactId> <version>0.9.0</version> </dependency> <dependency> <groupId>io.jsonwebtoken</groupId> <artifactId>jjwt-api</artifactId> <version>0.10.6</version> </dependency>
并在
application.properties中添加用于使用令牌的新参数:
assm.app.jwtSecret=jwtAssmSecretKey assm.app.jwtExpiration=86400
现在,我们将创建用于存储来自授权和注册表单的数据的类:
LoginUser.kt class LoginUser : Serializable { @JsonProperty("username") var username: String? = null @JsonProperty("password") var password: String? = null constructor() {} constructor(username: String, password: String) { this.username = username this.password = password } companion object { private const val serialVersionUID = -1764970284520387975L } }
NewUser.kt import com.fasterxml.jackson.annotation.JsonProperty import java.io.Serializable class NewUser : Serializable { @JsonProperty("username") var username: String? = null @JsonProperty("firstName") var firstName: String? = null @JsonProperty("lastName") var lastName: String? = null @JsonProperty("email") var email: String? = null @JsonProperty("password") var password: String? = null constructor() {} constructor(username: String, firstName: String, lastName: String, email: String, password: String, recaptchaToken: String) { this.username = username this.firstName = firstName this.lastName = lastName this.email = email this.password = password } companion object { private const val serialVersionUID = -1764970284520387975L } }
让我们为服务器响应创建特殊的类-返回身份验证令牌和通用(字符串):
JwtRespons.kt import org.springframework.security.core.GrantedAuthority class JwtResponse(var accessToken: String?, var username: String?, val authorities: Collection<GrantedAuthority>) { var type = "Bearer" }
ResponseMessage.kt class ResponseMessage(var message: String?)
我们还将需要“用户已存在”例外。
UserAlreadyExistException.kt class UserAlreadyExistException : RuntimeException { constructor() : super() {} constructor(message: String, cause: Throwable) : super(message, cause) {} constructor(message: String) : super(message) {} constructor(cause: Throwable) : super(cause) {} companion object { private val serialVersionUID = 5861310537366287163L } }
要定义用户角色,我们需要一个实现
UserDetailsService接口的附加服务:
UserDetailsServiceImpl.kt import com.kotlinspringvue.backend.repository.UserRepository import org.springframework.beans.factory.annotation.Autowired import org.springframework.security.core.userdetails.UserDetails import org.springframework.security.core.userdetails.UserDetailsService import org.springframework.security.core.userdetails.UsernameNotFoundException import org.springframework.stereotype.Service import org.springframework.security.core.GrantedAuthority import org.springframework.security.core.authority.SimpleGrantedAuthority import java.util.stream.Collectors @Service class UserDetailsServiceImpl: UserDetailsService { @Autowired lateinit var userRepository: UserRepository @Throws(UsernameNotFoundException::class) override fun loadUserByUsername(username: String): UserDetails { val user = userRepository.findByUsername(username).get() ?: throw UsernameNotFoundException("User '$username' not found") val authorities: List<GrantedAuthority> = user.roles!!.stream().map({ role -> SimpleGrantedAuthority(role.name)}).collect(Collectors.toList<GrantedAuthority>()) return org.springframework.security.core.userdetails.User .withUsername(username) .password(user.password) .authorities(authorities) .accountExpired(false) .accountLocked(false) .credentialsExpired(false) .disabled(false) .build() } }
要使用JWT,我们需要三个类:
JwtAuthEntryPoint-用于处理授权错误并在网络安全设置中进一步使用:
JwtAuthEntryPoint.kt import javax.servlet.ServletException import javax.servlet.http.HttpServletRequest import javax.servlet.http.HttpServletResponse import org.slf4j.Logger import org.slf4j.LoggerFactory import org.springframework.security.core.AuthenticationException import org.springframework.security.web.AuthenticationEntryPoint import org.springframework.stereotype.Component @Component class JwtAuthEntryPoint : AuthenticationEntryPoint { @Throws(IOException::class, ServletException::class) override fun commence(request: HttpServletRequest, response: HttpServletResponse, e: AuthenticationException) { logger.error("Unauthorized error. Message - {}", e!!.message) response.sendError(HttpServletResponse.SC_UNAUTHORIZED, "Invalid credentials") } companion object { private val logger = LoggerFactory.getLogger(JwtAuthEntryPoint::class.java) } }
JwtProvider-生成和验证令牌,以及通过其令牌确定用户:
JwtProvider.kt import io.jsonwebtoken.* import org.springframework.beans.factory.annotation.Autowired import org.slf4j.Logger import org.slf4j.LoggerFactory import org.springframework.beans.factory.annotation.Value import org.springframework.security.core.Authentication import org.springframework.stereotype.Component import org.springframework.security.core.GrantedAuthority import org.springframework.security.core.authority.SimpleGrantedAuthority import com.kotlinspringvue.backend.repository.UserRepository import java.util.Date @Component public class JwtProvider { private val logger: Logger = LoggerFactory.getLogger(JwtProvider::class.java) @Autowired lateinit var userRepository: UserRepository @Value("\${assm.app.jwtSecret}") lateinit var jwtSecret: String @Value("\${assm.app.jwtExpiration}") var jwtExpiration:Int?=0 fun generateJwtToken(username: String): String { return Jwts.builder() .setSubject(username) .setIssuedAt(Date()) .setExpiration(Date((Date()).getTime() + jwtExpiration!! * 1000)) .signWith(SignatureAlgorithm.HS512, jwtSecret) .compact() } fun validateJwtToken(authToken: String): Boolean { try { Jwts.parser().setSigningKey(jwtSecret).parseClaimsJws(authToken) return true } catch (e: SignatureException) { logger.error("Invalid JWT signature -> Message: {} ", e) } catch (e: MalformedJwtException) { logger.error("Invalid JWT token -> Message: {}", e) } catch (e: ExpiredJwtException) { logger.error("Expired JWT token -> Message: {}", e) } catch (e: UnsupportedJwtException) { logger.error("Unsupported JWT token -> Message: {}", e) } catch (e: IllegalArgumentException) { logger.error("JWT claims string is empty -> Message: {}", e) } return false } fun getUserNameFromJwtToken(token: String): String { return Jwts.parser() .setSigningKey(jwtSecret) .parseClaimsJws(token) .getBody().getSubject() } }
JwtAuthTokenFilter-认证用户并过滤请求:
JwtAuthTokenFilter.kt import java.io.IOException import javax.servlet.FilterChain import javax.servlet.ServletException import javax.servlet.http.HttpServletRequest import javax.servlet.http.HttpServletResponse import org.slf4j.LoggerFactory import org.springframework.beans.factory.annotation.Autowired import org.springframework.security.authentication.UsernamePasswordAuthenticationToken import org.springframework.security.core.context.SecurityContextHolder import org.springframework.security.core.userdetails.UserDetails import org.springframework.security.web.authentication.WebAuthenticationDetailsSource import org.springframework.web.filter.OncePerRequestFilter import com.kotlinspringvue.backend.service.UserDetailsServiceImpl class JwtAuthTokenFilter : OncePerRequestFilter() { @Autowired private val tokenProvider: JwtProvider? = null @Autowired private val userDetailsService: UserDetailsServiceImpl? = null @Throws(ServletException::class, IOException::class) override fun doFilterInternal(request: HttpServletRequest, response: HttpServletResponse, filterChain: FilterChain) { try { val jwt = getJwt(request) if (jwt != null && tokenProvider!!.validateJwtToken(jwt)) { val username = tokenProvider.getUserNameFromJwtToken(jwt) val userDetails = userDetailsService!!.loadUserByUsername(username) val authentication = UsernamePasswordAuthenticationToken( userDetails, null, userDetails.getAuthorities()) authentication.setDetails(WebAuthenticationDetailsSource().buildDetails(request)) SecurityContextHolder.getContext().setAuthentication(authentication) } } catch (e: Exception) { logger.error("Can NOT set user authentication -> Message: {}", e) } filterChain.doFilter(request, response) } private fun getJwt(request: HttpServletRequest): String? { val authHeader = request.getHeader("Authorization") return if (authHeader != null && authHeader.startsWith("Bearer ")) { authHeader.replace("Bearer ", "") } else null } companion object { private val logger = LoggerFactory.getLogger(JwtAuthTokenFilter::class.java) } }
现在我们可以配置负责网络安全的bean:
WebSecurityConfig.kt import org.springframework.context.annotation.Bean import org.springframework.context.annotation.Configuration import org.springframework.beans.factory.annotation.Autowired import org.springframework.security.web.authentication.UsernamePasswordAuthenticationFilter import org.springframework.security.config.http.SessionCreationPolicy import org.springframework.security.authentication.AuthenticationManager import org.springframework.security.config.annotation.authentication.builders.AuthenticationManagerBuilder import org.springframework.security.config.annotation.web.configuration.EnableWebSecurity import org.springframework.security.config.annotation.method.configuration.EnableGlobalMethodSecurity import org.springframework.security.config.annotation.web.builders.HttpSecurity import org.springframework.security.config.annotation.web.configuration.WebSecurityConfigurerAdapter import org.springframework.security.crypto.bcrypt.BCryptPasswordEncoder import com.kotlinspringvue.backend.jwt.JwtAuthEntryPoint import com.kotlinspringvue.backend.jwt.JwtAuthTokenFilter import com.kotlinspringvue.backend.service.UserDetailsServiceImpl @Configuration @EnableWebSecurity @EnableGlobalMethodSecurity(prePostEnabled = true) class WebSecurityConfig : WebSecurityConfigurerAdapter() { @Autowired internal var userDetailsService: UserDetailsServiceImpl? = null @Autowired private val unauthorizedHandler: JwtAuthEntryPoint? = null @Bean fun bCryptPasswordEncoder(): BCryptPasswordEncoder { return BCryptPasswordEncoder() } @Bean fun authenticationJwtTokenFilter(): JwtAuthTokenFilter { return JwtAuthTokenFilter() } @Throws(Exception::class) override fun configure(authenticationManagerBuilder: AuthenticationManagerBuilder) { authenticationManagerBuilder .userDetailsService(userDetailsService) .passwordEncoder(bCryptPasswordEncoder()) } @Bean @Throws(Exception::class) override fun authenticationManagerBean(): AuthenticationManager { return super.authenticationManagerBean() } @Throws(Exception::class) override protected fun configure(http: HttpSecurity) { http.csrf().disable().authorizeRequests() .antMatchers("/**").permitAll() .anyRequest().authenticated() .and() .exceptionHandling().authenticationEntryPoint(unauthorizedHandler).and() .sessionManagement().sessionCreationPolicy(SessionCreationPolicy.STATELESS) http.addFilterBefore(authenticationJwtTokenFilter(), UsernamePasswordAuthenticationFilter::class.java) } }
创建用于注册和授权的控制器:AuthController.kt import javax.validation.Valid import java.util.* import java.util.stream.Collectors import org.springframework.security.core.Authentication import org.springframework.beans.factory.annotation.Autowired import org.springframework.http.HttpStatus import org.springframework.http.ResponseEntity import org.springframework.security.authentication.AuthenticationManager import org.springframework.security.authentication.UsernamePasswordAuthenticationToken import org.springframework.security.core.context.SecurityContextHolder import org.springframework.security.core.userdetails.UserDetails import org.springframework.security.crypto.password.PasswordEncoder import org.springframework.security.access.prepost.PreAuthorize import org.springframework.security.core.GrantedAuthority import org.springframework.security.core.authority.SimpleGrantedAuthority import org.springframework.web.bind.annotation.CrossOrigin import org.springframework.web.bind.annotation.PostMapping import org.springframework.web.bind.annotation.RequestBody import org.springframework.web.bind.annotation.RequestMapping import org.springframework.web.bind.annotation.RestController import com.kotlinspringvue.backend.model.LoginUser import com.kotlinspringvue.backend.model.NewUser import com.kotlinspringvue.backend.web.response.JwtResponse import com.kotlinspringvue.backend.web.response.ResponseMessage import com.kotlinspringvue.backend.jpa.User import com.kotlinspringvue.backend.repository.UserRepository import com.kotlinspringvue.backend.repository.RoleRepository import com.kotlinspringvue.backend.jwt.JwtProvider @CrossOrigin(origins = ["*"], maxAge = 3600) @RestController @RequestMapping("/api/auth") class AuthController() { @Autowired lateinit var authenticationManager: AuthenticationManager @Autowired lateinit var userRepository: UserRepository @Autowired lateinit var roleRepository: RoleRepository @Autowired lateinit var encoder: PasswordEncoder @Autowired lateinit var jwtProvider: JwtProvider @PostMapping("/signin") fun authenticateUser(@Valid @RequestBody loginRequest: LoginUser): ResponseEntity<*> { val userCandidate: Optional <User> = userRepository.findByUsername(loginRequest.username!!) if (userCandidate.isPresent) { val user: User = userCandidate.get() val authentication = authenticationManager.authenticate( UsernamePasswordAuthenticationToken(loginRequest.username, loginRequest.password)) SecurityContextHolder.getContext().setAuthentication(authentication) val jwt: String = jwtProvider.generateJwtToken(user.username!!) val authorities: List<GrantedAuthority> = user.roles!!.stream().map({ role -> SimpleGrantedAuthority(role.name)}).collect(Collectors.toList<GrantedAuthority>()) return ResponseEntity.ok(JwtResponse(jwt, user.username, authorities)) } else { return ResponseEntity(ResponseMessage("User not found!"), HttpStatus.BAD_REQUEST) } } @PostMapping("/signup") fun registerUser(@Valid @RequestBody newUser: NewUser): ResponseEntity<*> { val userCandidate: Optional <User> = userRepository.findByUsername(newUser.username!!) if (!userCandidate.isPresent) { if (usernameExists(newUser.username!!)) { return ResponseEntity(ResponseMessage("Username is already taken!"), HttpStatus.BAD_REQUEST) } else if (emailExists(newUser.email!!)) { return ResponseEntity(ResponseMessage("Email is already in use!"), HttpStatus.BAD_REQUEST) }
:
- signin — , , , , (, authorities — )
- signup — , , , users ROLE_USER
最后,我们用两种方法补充BackendController:一种将返回仅管理员(具有ROLE_USER和ROLE_ADMIN特权的用户)和普通用户(ROLE_USER)可以访问的数据。BackendController.kt import org.springframework.security.access.prepost.PreAuthorize import org.springframework.security.core.Authentication import com.kotlinspringvue.backend.repository.UserRepository import com.kotlinspringvue.backend.jpa.User … @Autowired lateinit var userRepository: UserRepository … @GetMapping("/usercontent") @PreAuthorize("hasRole('USER') or hasRole('ADMIN')") @ResponseBody fun getUserContent(authentication: Authentication): String { val user: User = userRepository.findByUsername(authentication.name).get() return "Hello " + user.firstName + " " + user.lastName + "!" } @GetMapping("/admincontent") @PreAuthorize("hasRole('ADMIN')") @ResponseBody fun getAdminContent(): String { return "Admin's content" }
前端
让我们创建一些新组件:使用模板内容(为了方便复制粘贴开始):组件模板 <template> <div> </div> </template> <script> </script> <style> </style>
在模板中的每个div上添加id =“ component_name ”,并在脚本中导出默认的{name:'[component_name]'}。现在添加新路线:router.js import Vue from 'vue' import Router from 'vue-router' import Home from '@/components/Home' import SignIn from '@/components/SignIn' import SignUp from '@/components/SignUp' import AdminPage from '@/components/AdminPage' import UserPage from '@/components/UserPage' Vue.use(Router) export default new Router({ mode: 'history', routes: [ { path: '/', name: 'Home', component: Home }, { path: '/home', name: 'Home', component: Home }, { path: '/login', name: 'SignIn', component: SignIn }, { path: '/register', name: 'SignUp', component: SignUp }, { path: '/user', name: 'UserPage', component: UserPage }, { path: '/admin', name: 'AdminPage', component: AdminPage } ] })
我们将使用Vuex存储令牌并在查询服务器时使用它们。Vuex是一种状态管理模式+ Vue.js库 它充当所有具有规则的应用程序组件的集中式数据仓库,以确保只能以可预测的方式更改状态。 $ npm install --save vuex
将store作为一个单独的文件添加到src / store中:index.js import Vue from 'vue'; import Vuex from 'vuex'; Vue.use(Vuex); const state = { token: localStorage.getItem('user-token') || '', role: localStorage.getItem('user-role') || '', username: localStorage.getItem('user-name') || '', authorities: localStorage.getItem('authorities') || '', }; const getters = { isAuthenticated: state => { if (state.token != null && state.token != '') { return true; } else { return false; } }, isAdmin: state => { if (state.role === 'admin') { return true; } else { return false; } }, getUsername: state => { return state.username; }, getAuthorities: state => { return state.authorities; }, getToken: state => { return state.token; } }; const mutations = { auth_login: (state, user) => { localStorage.setItem('user-token', user.token); localStorage.setItem('user-name', user.name); localStorage.setItem('user-authorities', user.roles); state.token = user.token; state.username = user.username; state.authorities = user.roles; var isUser = false; var isAdmin = false; for (var i = 0; i < user.roles.length; i++) { if (user.roles[i].authority === 'ROLE_USER') { isUser = true; } else if (user.roles[i].authority === 'ROLE_ADMIN') { isAdmin = true; } } if (isUser) { localStorage.setItem('user-role', 'user'); state.role = 'user'; } if (isAdmin) { localStorage.setItem('user-role', 'admin'); state.role = 'admin'; } }, auth_logout: () => { state.token = ''; state.role = ''; state.username = ''; state.authorities = []; localStorage.removeItem('user-token'); localStorage.removeItem('user-role'); localStorage.removeItem('user-name'); localStorage.removeItem('user-authorities'); } }; const actions = { login: (context, user) => { context.commit('auth_login', user) }, logout: (context) => { context.commit('auth_logout'); } }; export const store = new Vuex.Store({ state, getters, mutations, actions });
, :
- store — , — , , ( — (authorities): — , , admin user —
- getters —
- mutations —
- actions — ,
: (mutations) — .
我们将对main.js import { store } from './store'; ... new Vue({ router, store, render: h => h(App) }).$mount('#app')
为了使界面立即变得美观和整洁,即使在实验应用程序中,我也使用。但是,正如他们所说,这只是一个口味问题,并不影响基本功能: $ npm install --save bootstrap bootstrap-vue
main.js中的Bootstrap import BootstrapVue from 'bootstrap-vue' import 'bootstrap/dist/css/bootstrap.css' import 'bootstrap-vue/dist/bootstrap-vue.css' … Vue.use(BootstrapVue)
现在,让我们来研究App组件:- 添加“注销”所有授权用户的功能
- 注销后将自动重定向添加到主页
- 我们将为所有授权用户显示导航菜单按钮“用户”和“注销”,为未授权用户显示“登录”
- 我们只会向授权管理员显示导航菜单的“管理员”按钮
为此:添加logout()方法 methods: { logout() { this.$store.dispatch('logout'); this.$router.push('/') } }
并编辑模板 <template> <div id="app"> <b-navbar style="width: 100%" type="dark" variant="dark"> <b-navbar-brand id="nav-brand" href="#">Kotlin+Spring+Vue</b-navbar-brand> <router-link to="/"><img height="30px" src="./assets/img/kotlin-logo.png" alt="Kotlin+Spring+Vue"/></router-link> <router-link to="/"><img height="30px" src="./assets/img/spring-boot-logo.png" alt="Kotlin+Spring+Vue"/></router-link> <router-link to="/"><img height="30px" src="./assets/img/vuejs-logo.png" alt="Kotlin+Spring+Vue"/></router-link> <router-link to="/user" class="nav-link text-light" v-if="this.$store.getters.isAuthenticated">User</router-link> <router-link to="/admin" class="nav-link text-light" v-if="this.$store.getters.isAuthenticated && this.$store.getters.isAdmin">Admin</router-link> <router-link to="/register" class="nav-link text-light" v-if="!this.$store.getters.isAuthenticated">Register</router-link> <router-link to="/login" class="nav-link text-light" v-if="!this.$store.getters.isAuthenticated">Login</router-link> <a href="#" class="nav-link text-light" v-if="this.$store.getters.isAuthenticated" v-on:click="logout">Logout </a> </b-navbar> <router-view></router-view> </div> </template>
:- store , . , , («v-if»)
- Kotlin, Spring Boot Vue.js, /assets/img/ . , ( )
更新组件:主场 <template> <div div="home"> <b-jumbotron> <template slot="header">Kotlin + Spring Boot + Vue.js</template> <template slot="lead"> This is the demo web-application written in Kotlin using Spring Boot and Vue.js for frontend </template> <hr class="my-4" /> <p v-if="!this.$store.getters.isAuthenticated"> Login and start </p> <router-link to="/login" v-if="!this.$store.getters.isAuthenticated"> <b-button variant="primary">Login</b-button> </router-link> </b-jumbotron> </div> </template> <script> </script> <style> </style>
登录 <template> <div div="signin"> <div class="login-form"> <b-card title="Login" tag="article" style="max-width: 20rem;" class="mb-2" > <div> <b-alert :show="dismissCountDown" dismissible variant="danger" @dismissed="dismissCountDown=0" @dismiss-count-down="countDownChanged" > {{ alertMessage }} </b-alert> </div> <div> <b-form-input type="text" placeholder="Username" v-model="username" /> <div class="mt-2"></div> <b-form-input type="password" placeholder="Password" v-model="password" /> <div class="mt-2"></div> </div> <b-button v-on:click="login" variant="primary">Login</b-button> <hr class="my-4" /> <b-button variant="link">Forget password?</b-button> </b-card> </div> </div> </template> <script> import {AXIOS} from './http-common' export default { name: 'SignIn', data() { return { username: '', password: '', dismissSecs: 5, dismissCountDown: 0, alertMessage: 'Request error', } }, methods: { login() { AXIOS.post(`/auth/signin`, {'username': this.$data.username, 'password': this.$data.password}) .then(response => { this.$store.dispatch('login', {'token': response.data.accessToken, 'roles': response.data.authorities, 'username': response.data.username}); this.$router.push('/home') }, error => { this.$data.alertMessage = (error.response.data.message.length < 150) ? error.response.data.message : 'Request error. Please, report this error website owners'; console.log(error) }) .catch(e => { console.log(e); this.showAlert(); }) }, countDownChanged(dismissCountDown) { this.dismissCountDown = dismissCountDown }, showAlert() { this.dismissCountDown = this.dismissSecs }, } } </script> <style> .login-form { margin-left: 38%; margin-top: 50px; } </style>
:
- POST-
- storage
- «» Bootstrap
- , /home
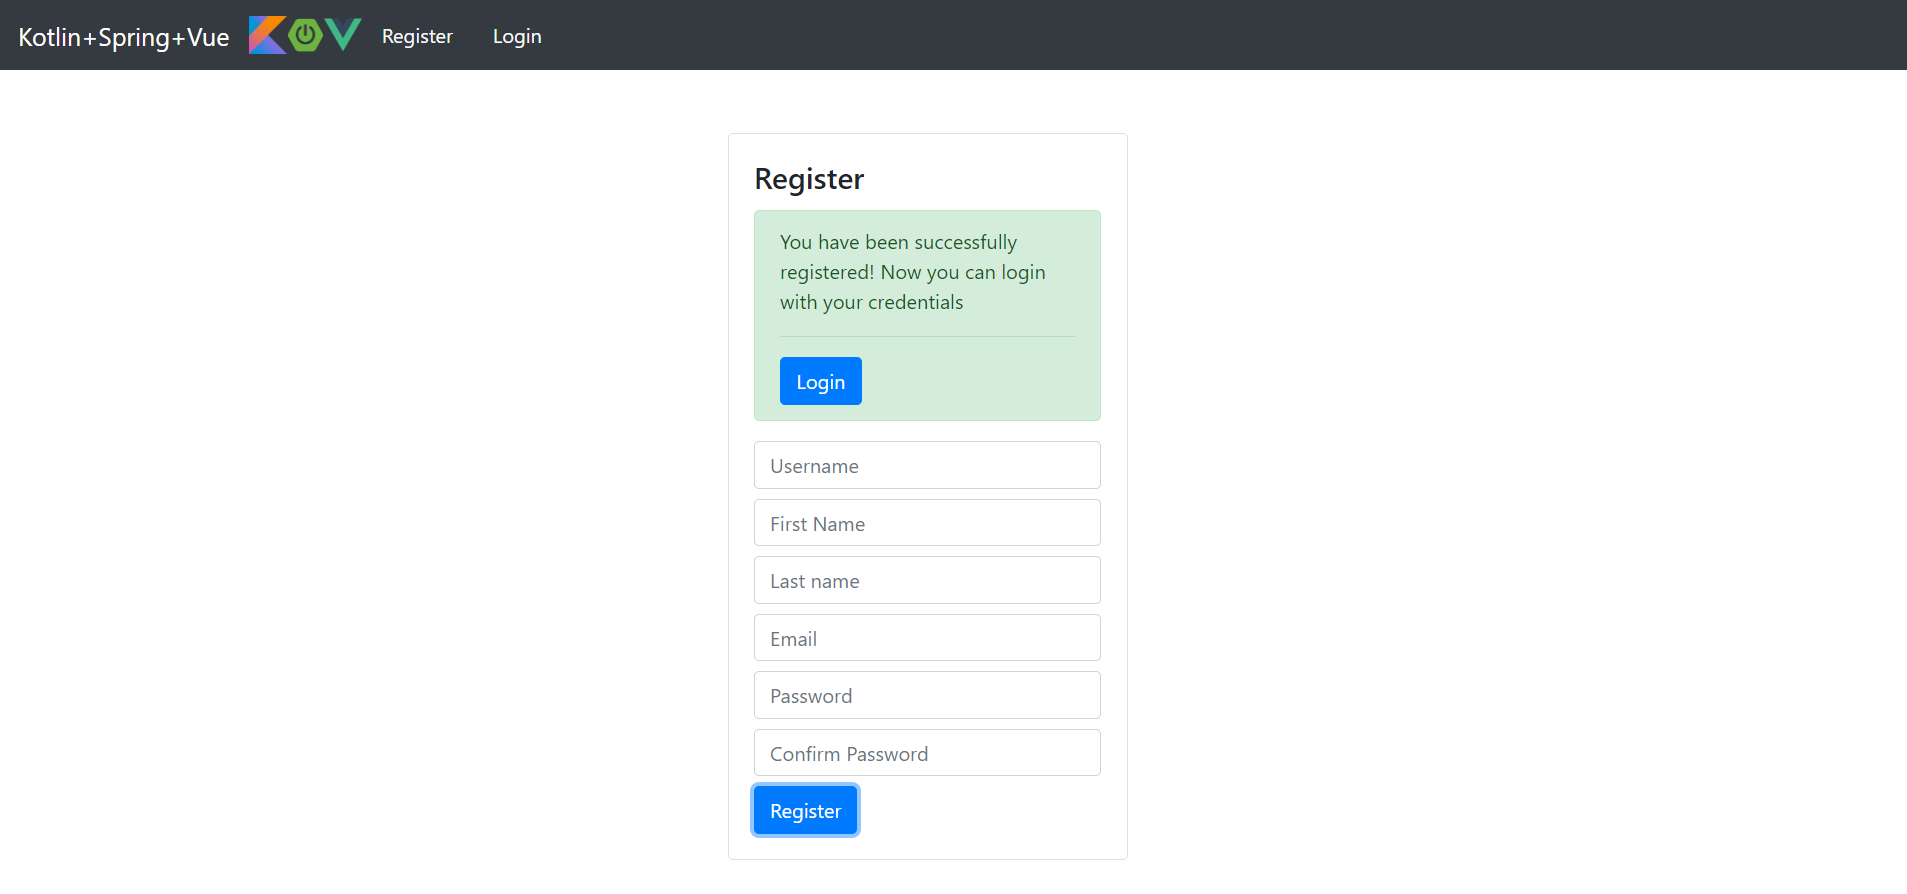
注册 <template> <div div="signup"> <div class="login-form"> <b-card title="Register" tag="article" style="max-width: 20rem;" class="mb-2" > <div> <b-alert :show="dismissCountDown" dismissible variant="danger" @dismissed="dismissCountDown=0" @dismiss-count-down="countDownChanged" > {{ alertMessage }} </b-alert> </div> <div> <b-alert variant="success" :show="successfullyRegistered"> You have been successfully registered! Now you can login with your credentials <hr /> <router-link to="/login"> <b-button variant="primary">Login</b-button> </router-link> </b-alert> </div> <div> <b-form-input type="text" placeholder="Username" v-model="username" /> <div class="mt-2"></div> <b-form-input type="text" placeholder="First Name" v-model="firstname" /> <div class="mt-2"></div> <b-form-input type="text" placeholder="Last name" v-model="lastname" /> <div class="mt-2"></div> <b-form-input type="text" placeholder="Email" v-model="email" /> <div class="mt-2"></div> <b-form-input type="password" placeholder="Password" v-model="password" /> <div class="mt-2"></div> <b-form-input type="password" placeholder="Confirm Password" v-model="confirmpassword" /> <div class="mt-2"></div> </div> <b-button v-on:click="register" variant="primary">Register</b-button> </b-card> </div> </div> </template> <script> import {AXIOS} from './http-common' export default { name: 'SignUp', data () { return { username: '', firstname: '', lastname: '', email: '', password: '', confirmpassword: '', dismissSecs: 5, dismissCountDown: 0, alertMessage: '', successfullyRegistered: false } }, methods: { register: function () { if (this.$data.username === '' || this.$data.username == null) { this.$data.alertMessage = 'Please, fill "Username" field'; this.showAlert(); } else if (this.$data.firstname === '' || this.$data.firstname == null) { this.$data.alertMessage = 'Please, fill "First name" field'; this.showAlert(); } else if (this.$data.lastname === '' || this.$data.lastname == null) { this.$data.alertMessage = 'Please, fill "Last name" field'; this.showAlert(); } else if (this.$data.email === '' || this.$data.email == null) { this.$data.alertMessage = 'Please, fill "Email" field'; this.showAlert(); } else if (!this.$data.email.includes('@')) { this.$data.alertMessage = 'Email is incorrect'; this.showAlert(); } else if (this.$data.password === '' || this.$data.password == null) { this.$data.alertMessage = 'Please, fill "Password" field'; this.showAlert(); } else if (this.$data.confirmpassword === '' || this.$data.confirmpassword == null) { this.$data.alertMessage = 'Please, confirm password'; this.showAlert(); } else if (this.$data.confirmpassword !== this.$data.password) { this.$data.alertMessage = 'Passwords are not match'; this.showAlert(); } else { var newUser = { 'username': this.$data.username, 'firstName': this.$data.firstname, 'lastName': this.$data.lastname, 'email': this.$data.email, 'password': this.$data.password }; AXIOS.post('/auth/signup', newUser) .then(response => { console.log(response); this.successAlert(); }, error => { this.$data.alertMessage = (error.response.data.message.length < 150) ? error.response.data.message : 'Request error. Please, report this error website owners' this.showAlert(); }) .catch(error => { console.log(error); this.$data.alertMessage = 'Request error. Please, report this error website owners'; this.showAlert(); }); } }, countDownChanged(dismissCountDown) { this.dismissCountDown = dismissCountDown }, showAlert() { this.dismissCountDown = this.dismissSecs }, successAlert() { this.username = ''; this.firstname = ''; this.lastname = ''; this.email = ''; this.password = ''; this.confirmpassword = ''; this.successfullyRegistered = true; } } } </script> <style> .login-form { margin-left: 38%; margin-top: 50px; } </style>
:
- POST-
- Bootstrap
- , Bootstrap-
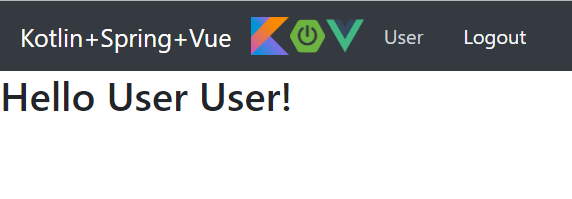
UserPage.vue <template> <div div="userpage"> <h2>{{ pageContent }}</h2> </div> </template> <script> import {AXIOS} from './http-common' export default { name: 'UserPage', data() { return { pageContent: '' } }, methods: { loadUserContent() { const header = {'Authorization': 'Bearer ' + this.$store.getters.getToken}; AXIOS.get('/usercontent', { headers: header }) .then(response => { this.$data.pageContent = response.data; }) .catch(error => { console.log('ERROR: ' + error.response.data); }) } }, mounted() { this.loadUserContent(); } } </script> <style> </style>
:
管理员权限 <template> <div div="adminpage"> <h2>{{ pageContent }}</h2> </div> </template> <script> import {AXIOS} from './http-common' export default { name: 'AdminPage', data() { return { pageContent: '' } }, methods: { loadUserContent() { const header = {'Authorization': 'Bearer ' + this.$store.getters.getToken}; AXIOS.get('/admincontent', { headers: header }) .then(response => { this.$data.pageContent = response.data; }) .catch(error => { console.log('ERROR: ' + error.response.data); }) } }, mounted() { this.loadUserContent(); } } </script> <style> </style>
,
UserPage .
应用启动
我们将注册第一位管理员: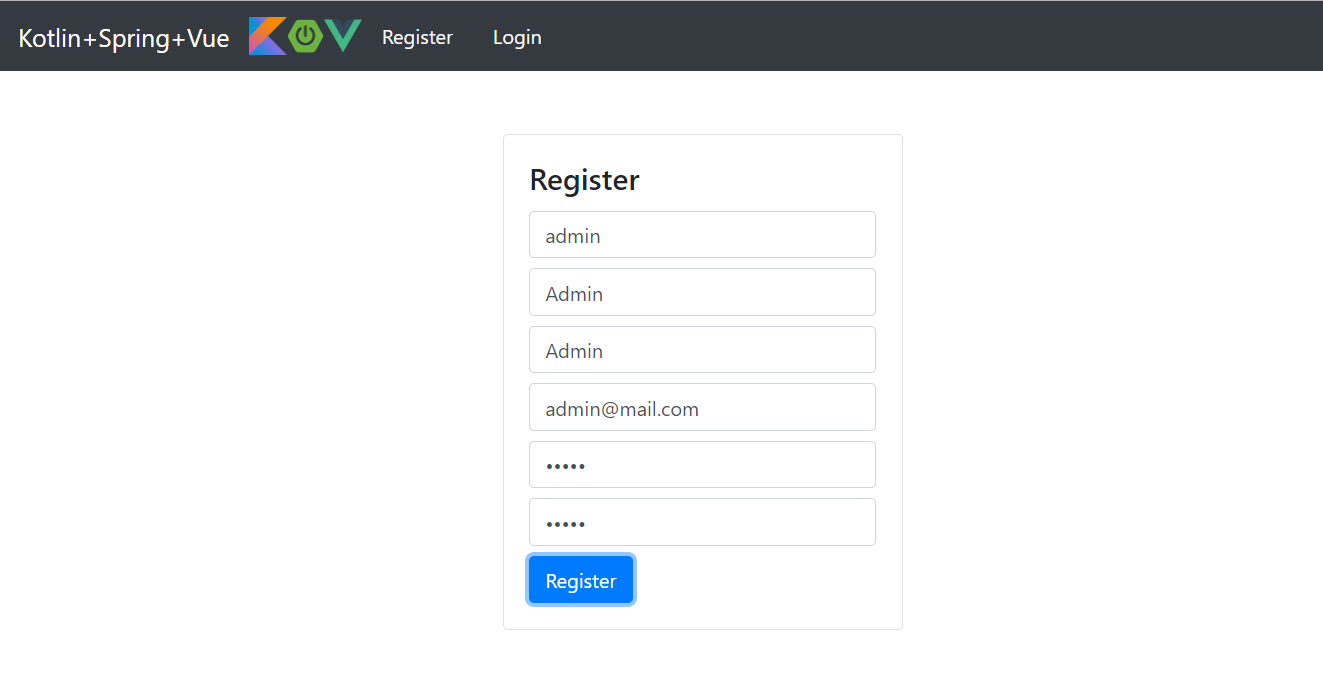
 重要提示:默认情况下,所有新用户都是常规用户。让我们给第一位管理员他的权限:
 INSERT INTO users_roles (user_id, role_id) VALUES (1, 2);
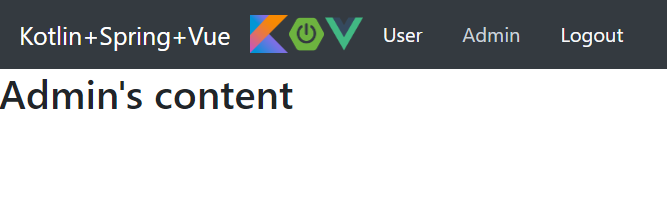
然后:- 让我们以管理员身份登录
- 检查用户页面:
- 检查管理页面:
- 注销管理员帐户
- 注册普通用户帐户
- 检查用户页面的可用性
- 让我们尝试使用REST API获取管理数据:http://本地主机:8080 / api / admincontent
ERROR 77100 --- [nio-8080-exec-2] ckbackend.jwt.JwtAuthEntryPoint : Unauthorized error. Message - Full authentication is required to access this resource
改善方法
一般来说,在任何业务中总会有很多。我将列出最明显的内容:- 用于构建Gradle(如果您认为这是一种改进)
- 立即用单元测试覆盖代码(毫无疑问,这是一种好习惯)
- 从一开始就构建CI / CD管道:在存储库中放置代码,包含应用程序,自动化组装和部署
- 添加PUT和DELETE请求(例如,更新用户数据和删除帐户)
- 实施帐户激活/停用
- 不要使用本地存储来存储令牌-这是不安全的
- 使用OAuth
- 注册新用户时验证电子邮件地址
- 使用垃圾邮件防护,例如reCAPTCHA
有用的链接
在此添加此材料。