DirectisRX服务的Redis扩展和故障转移

Redis是完全放在RAM中的NoSQL类的数据库管理系统(非关系DBMS)。 要访问数据,使用“键”-“值”模型。 这种DBMS通常用于在可伸缩服务中存储高速缓存,用于存储图像和小数据。

由于以下原因,Redis DBMS被广泛使用:

  • 高速,因为 所有数据都存储在RAM中;
  • 跨平台
  • 根据BSD许可进行分发(适用于开源软件)。

Redis的分布范围和适用性可以通过该项目官方网站上大量的带有各种案例的文档来估算。

如果使用DirectumRX服务的水平扩展,则必须使用Redis故障安全安装才能与DirectumRX存储服务和DirectumRX Web访问服务一起正常使用。

图片

Redis将存储操作数据,缓存和其他在伸缩模式下运行的服务所必需的信息,以便用户与系统交互的过程不取决于他当前使用的安装。

Redis将不会存储敏感数据,并且不会承受重负载。 但是,如果Redis失败,则用户在安装之间进行切换时会遇到很多错误。

在Redis官方网站上,有两种方法可以确保水平缩放和容错:

  1. 使用Redis Sentiel
  2. 使用Redis集群

考虑自定义这些选项。

配置Redis Sentiel


Redis 2.4中实现了使用Redis Sentiel(Redis跟踪节点)的选项,该选项包括使用附加的Redis Sentiel服务来监视向导的可用性。 如果向导失败,他还将执行副本节点的配置。 确定哪个SLAVE节点将成为MASTER并随时随地执行重新配置。

实施经典方案:

图片

可以有许多SLAVE节点(根据官方网站最多可以有1000个),为了进行生产性工作,建议至少使用两个SLAVE节点。

通常,以以下方式配置方案:在MASTER和SLAVE节点上配置Redis Sentiel服务,如果MASTER节点发生故障,则其余监视节点决定引入新的MASTER。

可从产品开发人员官方网站上下载最新版本的Redis。 但是,分发站点仅适用于Linux。 有一次,正在开发将Redis移植到Windows Microsoft 项目 ,但是目前该项目停止了3.2.100版的开发,因此在本文中,我们将考虑最相关的部署选项-在Linux上。

作为测试节点,我们将使用两个虚拟主机redis1和redis2以及已安装的Debian 10 Linux发行版。

首先,从默认存储库更新软件包列表,然后安装Redis:

apt-get update && apt-get upgrade apt install redis-server 

检查版本:

 root@redis1:/home/user# redis-server -v Redis server v=5.0.3 sha=00000000:0 malloc=jemalloc-5.1.0 bits=64 build=afa0decbb6de285f 

让redis1充当MASTER节点,让redis2充当SLAVE节点。

为此,我们在Redis配置文件中写入必要的参数,这些参数将使您可以创建副本(尚未容错)。

对于配置文件/etc/redis/redis.conf中的redis1,请指定:

 # ,   MASTER     . requirepass TestPass 

对于配置文件/etc/redis/redis.conf中的redis2,请指定:

 #   MASTER  . slaveof redis1 6379 #      . masterauth TestPass #   ,         . requirepass TestPass 

在两个节点上重新启动redis-server服务:

 root@redis1:/etc/redis# /etc/init.d/redis-server stop [ ok ] Stopping redis-server (via systemctl): redis-server.service. root@redis1:/etc/redis# /etc/init.d/redis-server start [ ok ] Starting redis-server (via systemctl): redis-server.service. root@redis2:/etc/redis# /etc/init.d/redis-server stop [ ok ] Stopping redis-server (via systemctl): redis-server.service. root@redis2:/etc/redis# /etc/init.d/redis-server start [ ok ] Starting redis-server (via systemctl): redis-server.service. 

我们在MASTER端检查节点是否成为副本并获得了必要的角色:

 root@redis1:/etc/redis# redis-cli -a TestPass info replication Warning: Using a password with '-a' or '-u' option on the command line interface may not be safe. # Replication role:master connected_slaves:1 slave0:ip=192.168.9.96,port=6379,state=online,offset=28,lag=0 master_replid:56b0a702d5823d107b0ca1ca2c80f8ef650a4b28 master_replid2:0000000000000000000000000000000000000000 master_repl_offset:28 second_repl_offset:-1 repl_backlog_active:1 repl_backlog_size:1048576 repl_backlog_first_byte_offset:1 repl_backlog_histlen:28 

在从设备方面,我们看到了相同的情况:
 root@redis2:/etc/redis# redis-cli -a TestPass info replication Warning: Using a password with '-a' or '-u' option on the command line interface may not be safe. # Replication role:slave master_host:redis1 master_port:6379 master_link_status:up master_last_io_seconds_ago:4 master_sync_in_progress:0 slave_repl_offset:14 slave_priority:100 slave_read_only:1 connected_slaves:0 master_replid:56b0a702d5823d107b0ca1ca2c80f8ef650a4b28 master_replid2:0000000000000000000000000000000000000000 master_repl_offset:14 second_repl_offset:-1 repl_backlog_active:1 repl_backlog_size:1048576 repl_backlog_first_byte_offset:1 repl_backlog_histlen:14 

现在,您需要配置副本,以便在其中一个节点发生故障的情况下自动还原副本。 为此,我们需要Redis Sentinel跟踪服务。

根据文档 ,Redis Sentinel监视服务可以执行以下操作:

  1. 检查MASTER和SLAVE节点的可用性,并能够发送有关节点不可访问性的警报。
  2. 如果MASTER节点发生故障,见证节点可以将SLAVE节点置于MASTER模式,并重新配置其余的SLAVE节点,然后它们就可以与新的MASTER一起使用。
  3. 更改MASTER和SLAVE节点的配置文件。

为了保证实验的纯洁性,我们将见证服务放置在单独的redis3 VM上。

我们以相同的方式连接Redis存储库并安装redis-sentinel软件包:

 apt install redis-sentinel 

安装后,需要在监视节点/etc/redis/sentinel.conf的配置文件中进行设置:

 #    redis1   6379. #   1 -      , #        MASTER-. #       , #     MASTER-. sentinel monitor master01 redis1 6379 1 #  3 ,       . sentinel down-after-milliseconds master01 3000 #    MASTER- sentinel failover-timeout master01 6000 # ,  SLAVE-   . #    ,    , #      . sentinel parallel-syncs master01 1 #    . bind 192.168.9.97 127.0.0.1 ::1 #    MASTER-. sentinel auth-pass master01 TestPass 

进行设置后,重新启动服务:

 root@redis3:/etc/redis# /etc/init.d/redis-sentinel restart [ ok ] Restarting redis-sentinel (via systemctl): redis-sentinel.service. 

检查跟踪服务是否看到MASTER和SLAVE:

 root@redis3:/etc/redis# redis-cli -p 26379 info sentinel # Sentinel sentinel_masters:1 sentinel_tilt:0 sentinel_running_scripts:0 sentinel_scripts_queue_length:0 sentinel_simulate_failure_flags:0 master0:name=master01,status=ok,address=192.168.9.95:6379,slaves=1,sentinels=1 

我们开始实验。

我们模拟一个故障,在redis1节点上停止redis-server服务并获取见证节点的当前信息:

 root@redis3:/etc/redis# redis-cli -p 26379 info sentinel # Sentinel sentinel_masters:1 sentinel_tilt:0 sentinel_running_scripts:0 sentinel_scripts_queue_length:0 sentinel_simulate_failure_flags:0 master0:name=master01,status=ok,address=192.168.9.96:6379,slaves=1,sentinels=1 

我们看到MASTER发生了变化。

我们将还原redis1节点的操作并检查其状态:

 root@redis3:/var/log/redis# redis-cli -h redis1 -p 6379 -a TestPass info replication Warning: Using a password with '-a' or '-u' option on the command line interface may not be safe. # Replication role:slave master_host:192.168.9.96 master_port:6379 master_link_status:up master_last_io_seconds_ago:1 master_sync_in_progress:0 slave_repl_offset:15977 slave_priority:100 slave_read_only:1 connected_slaves:0 master_replid:6c0c7d0eedccede56f211f2db74a98c4d0ff6d56 master_replid2:0000000000000000000000000000000000000000 master_repl_offset:15977 second_repl_offset:-1 repl_backlog_active:1 repl_backlog_size:1048576 repl_backlog_first_byte_offset:1 repl_backlog_histlen:15977 

我们看到该节点收到了SLAVE角色,而redis2节点是MASTER节点。

模拟redis2节点的故障并检查见证节点的状态:

 root@redis3:/var/log/redis# redis-cli -p 26379 info sentinel # Sentinel sentinel_masters:1 sentinel_tilt:0 sentinel_running_scripts:0 sentinel_scripts_queue_length:0 sentinel_simulate_failure_flags:0 master0:name=master01,status=ok,address=192.168.9.95:6379,slaves=1,sentinels=1 

以及redis1节点的状态:

 root@redis3:/var/log/redis# redis-cli -h redis1 -p 6379 -a TestPass info replication Warning: Using a password with '-a' or '-u' option on the command line interface may not be safe. # Replication role:master connected_slaves:0 master_replid:6e9d67d6460815b925319c2bafb58bf2c435cffb master_replid2:6c0c7d0eedccede56f211f2db74a98c4d0ff6d56 master_repl_offset:33610 second_repl_offset:26483 repl_backlog_active:1 repl_backlog_size:1048576 repl_backlog_first_byte_offset:1 repl_backlog_histlen:33610 

很好,该机制有效。 但是现在出现了一个问题,我们将如何连接DirectumRX服务,因为它们需要一个节点地址。 我们将使用HAProxy服务解决这种情况。

Redis节点代理


任何代理tcp服务都可以充当Redis节点的反向代理。 在本文中,我们将考虑使用HAProxy,因为HAProxy是旨在提供高可用性和负载平衡的专用工具,并且已被众所周知的联机服务使用。 在开发人员页面上阅读有关HAProxy的更多信息。

在redis3节点上安装HAProxy:

 root@redis3:/var/log/redis# apt install haproxy 

在HAProxy配置文件/etc/haproxy/haproxy.cfg中,添加用于将请求代理到Redis节点的设置:

 … frontend ft_redis bind *:6379 name redis mode tcp default_backend bk_redis backend bk_redis mode tcp option tcp-check tcp-check connect #  ,         . tcp-check send AUTH\ TestPass\r\n tcp-check expect string +OK tcp-check send PING\r\n tcp-check expect string +PONG tcp-check send info\ replication\r\n #    MASTER, .. SLAVE      . tcp-check expect string role:master tcp-check send QUIT\r\n tcp-check expect string +OK server Redis1 redis1:6379 check inter 3s server Redis2 redis2:6379 check inter 3s 

在此配置中,表明我们将在端口6379的地址上代理到达当前虚拟机的所有接口的所有请求。我们会将请求传输到将对其具有MASTER角色的节点进行响应。

重新启动haproxy服务:

 root@redis3:/etc/haproxy# /etc/init.d/haproxy restart 

让我们尝试使用redis-cli客户端进行连接并创建一个测试密钥:

 root@redis3:/etc/haproxy# redis-cli -p 6379 -a TestPass Warning: Using a password with '-a' or '-u' option on the command line interface may not be safe. 127.0.0.1:6379> SET TestKey "Some test string" OK 127.0.0.1:6379> GET TestKey "Some test string" 127.0.0.1:6379> info keyspace # Keyspace db0:keys=1,expires=0,avg_ttl=0 

停止redis1节点,然后再次查询键列表:

 127.0.0.1:6379> info keyspace Error: Server closed the connection (3.01s) 127.0.0.1:6379> info keyspace # Keyspace db0:keys=1,expires=0,avg_ttl=0 (2.01s) 127.0.0.1:6379> GET TestKey "Some test string" 

我们看到一段时间以来,连接已断开,但随后又恢复了连接,所有数据都保留在原位。

现在,只需在DirectumRX服务的配置文件中注册反向代理地址即可连接到Redis。

配置Redis集群


Redis Cluster clustering选项(为redis 3.0及更高版本实现)是使用数据分段和复制创建和管理集群的解决方案。 在多个MASTER节点之一发生故障时,执行节点管理,复制,节点上的数据同步以及确保客户端应用程序对MASTER节点的访问等任务。

图片

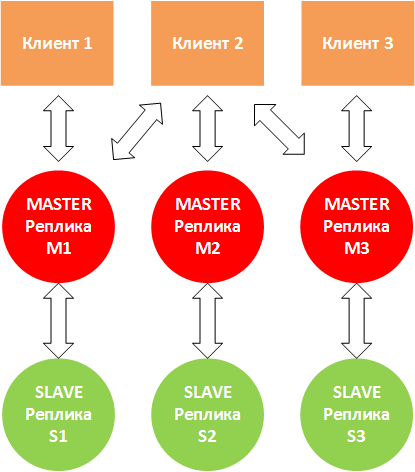
Redis Cluster在多主机模式下工作,每个MASTER节点可以有一个或多个SLAVE节点(最多1000个)。

扩展是集群的主要功能。 另外,集群可以保证Redis服务的容错能力:

  • 如果某些节点不起作用,群集会将负载从它们重新分配给其他节点;
  • 如果关键节点不起作用,则整个群集结束。

当客户端2写入节点M2时,可能会出现这种情况。 M2回答“确定”并尝试写入S2。 同时,M2不等待与S2的数据交换正确完成,而是立即响应客户端。 在这种情况下,S2复制副本可能没有全部数据。 因此,建议使用多个SLAVE副本。

当M1,M3停止“看到” M2并且客户端仍继续将数据写入M2时,也可能会出现这种情况。 如果不可用性将持续相当长的一段时间(cluster-node-timeout参数),则在这种情况下,S2将进入MASTER模式,而M2将自行停止工作。

官方文档建议使用6个节点-每个节点一个Redis实例,这样可以提高可靠性,但没有人禁止使用具有以下连接拓扑的三个节点:

图片

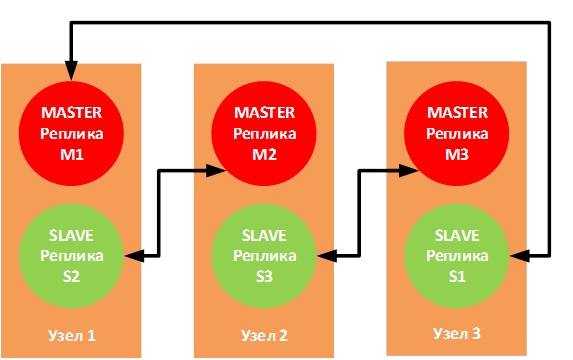
如果物理节点之一发生故障,相应的SLAVE副本将进入MASTER模式,并且操作不会中断。

我们在测试平台上实现3个虚拟机(redis1,redis2和redis3),每个虚拟机将运行2个Redis实例。

客户端应用程序将连接到客户端配置文件中指定的特定端口,因此,MASTER-SLAVE对应在相同的端口上工作。

对于M1-S1对,我们将使用端口6381
对于M2-S2对,我们将使用端口6382
对于M3-S3对,我们将使用端口6383

准备配置文件

在redis1上:

 cp /etc/redis/redis.conf /etc/redis/m1_redis.conf cp /etc/redis/redis.conf /etc/redis/s2_redis.conf mv /etc/redis/redis.conf /etc/redis/redis.bak 

在redis2上:

 cp /etc/redis/redis.conf /etc/redis/m2_redis.conf cp /etc/redis/redis.conf /etc/redis/s3_redis.conf mv /etc/redis/redis.conf /etc/redis/redis.bak 

在redis3上:

 cp /etc/redis/redis.conf /etc/redis/m3_redis.conf cp /etc/redis/redis.conf /etc/redis/s1_redis.conf mv /etc/redis/redis.conf /etc/redis/redis.bak 

根据模板填写配置文件:

 bind <IP- > protected-mode no #      ,    . port <> pidfile /var/run/redis_<>.pid # <yes/no> -   Redis Cluster cluster-enabled yes # ,      : #  ,  ,    . #         . cluster-config-file nodes-<>.conf #  ,  master-   , #          slaves #    . cluster-node-timeout 15000 

让我们启动Redis节点:

节点redis1:

 root@redis1:/etc/redis# redis-server /etc/redis/m1_redis.conf root@redis1:/etc/redis# redis-server /etc/redis/s2_redis.conf 

Redis2节点:

 root@redis2:/etc/redis# redis-server /etc/redis/m2_redis.conf root@redis2:/etc/redis# redis-server /etc/redis/s3_redis.conf 

Redis3节点:

 root@redis3:/etc/redis# redis-server /etc/redis/m3_redis.conf root@redis3:/etc/redis# redis-server /etc/redis/s1_redis.conf 

要配置集群,您需要使用redis-cli客户端实用程序,向其传递一系列将扮演MASTER和SLAVE角色的服务器的ip:端口对:

 redis-cli --cluster create redis1-ip:6381 redis2-ip:6382 redis3-ip:6383 redis1-ip:6382 redis2-ip:6383 redis3-ip:6381 --cluster-replicas 1 

,--cluster-replicas 1选项告诉您每个主服务器有多少个SLAVE,并从传输的副本列表中自动选择它们。

 root@redis1:~/redis/src# redis-cli --cluster create 192.168.9.51:6381 192.168.9.52:6382 192.168.9.53:6383 192.168.9.51:6382 192.168.9.52:6383 192.168.9.53:6381 --cluster-replicas 1 >>> Performing hash slots allocation on 6 nodes... Master[0] -> Slots 0 - 5460 Master[1] -> Slots 5461 - 10922 Master[2] -> Slots 10923 - 16383 Adding replica 192.168.9.52:6383 to 192.168.9.51:6381 Adding replica 192.168.9.51:6382 to 192.168.9.52:6382 Adding replica 192.168.9.53:6381 to 192.168.9.53:6383 >>> Trying to optimize slaves allocation for anti-affinity [OK] Perfect anti-affinity obtained! M: e92cb96fd6c20db7509662a248902e3751ebe95f 192.168.9.51:6381 slots:[0-5460] (5461 slots) master M: d499af3672b3063c7239572ec311ad3160f280ae 192.168.9.52:6382 slots:[5461-10922] (5462 slots) master M: 3a41475e1613519c3ecdec695736a898262a24a5 192.168.9.53:6383 slots:[10923-16383] (5461 slots) master S: 182e5cffc9c31c231de69ddbaf507ec1fe17bb09 192.168.9.51:6382 replicates d499af3672b3063c7239572ec311ad3160f280ae S: 44f656062259005adea58bc5ad024071a050e192 192.168.9.52:6383 replicates 3a41475e1613519c3ecdec695736a898262a24a5 S: 485ffb786e9763955e6f10ffc59247690ad9bc11 192.168.9.53:6381 replicates e92cb96fd6c20db7509662a248902e3751ebe95f Can I set the above configuration? (type 'yes' to accept): yes >>> Nodes configuration updated >>> Assign a different config epoch to each node >>> Sending CLUSTER MEET messages to join the cluster Waiting for the cluster to join ..... >>> Performing Cluster Check (using node 192.168.9.51:6381) M: e92cb96fd6c20db7509662a248902e3751ebe95f 192.168.9.51:6381 slots:[0-5460] (5461 slots) master 1 additional replica(s) M: d499af3672b3063c7239572ec311ad3160f280ae 192.168.9.52:6382 slots:[5461-10922] (5462 slots) master 1 additional replica(s) S: 485ffb786e9763955e6f10ffc59247690ad9bc11 192.168.9.53:6381 slots: (0 slots) slave replicates e92cb96fd6c20db7509662a248902e3751ebe95f S: 182e5cffc9c31c231de69ddbaf507ec1fe17bb09 192.168.9.51:6382 slots: (0 slots) slave replicates d499af3672b3063c7239572ec311ad3160f280ae S: 44f656062259005adea58bc5ad024071a050e192 192.168.9.52:6383 slots: (0 slots) slave replicates 3a41475e1613519c3ecdec695736a898262a24a5 M: 3a41475e1613519c3ecdec695736a898262a24a5 192.168.9.53:6383 slots:[10923-16383] (5461 slots) master 1 additional replica(s) [OK] All nodes agree about slots configuration. >>> Check for open slots... >>> Check slots coverage... [OK] All 16384 slots covered. 

群集已正确构建。 我们将显示有关集群的信息:

 root@redis1:~/redis/src# redis-cli -c -h 192.168.9.51 -p 6381 192.168.9.51:6381> CLUSTER INFO cluster_state:ok cluster_slots_assigned:16384 cluster_slots_ok:16384 cluster_slots_pfail:0 cluster_slots_fail:0 cluster_known_nodes:6 cluster_size:3 cluster_current_epoch:6 cluster_my_epoch:1 cluster_stats_messages_ping_sent:1254 cluster_stats_messages_pong_sent:1243 cluster_stats_messages_sent:2497 cluster_stats_messages_ping_received:1238 cluster_stats_messages_pong_received:1254 cluster_stats_messages_meet_received:5 cluster_stats_messages_received:2497 192.168.9.51:6381> 

与Redis Sentiel一样,要测试特定的副本,可以使用INFO复制命令:

 root@redis1:~/redis/src# redis-cli -c -h 192.168.9.51 -p 6381 192.168.9.51:6381> INFO replication # Replication role:master connected_slaves:1 slave0:ip=192.168.9.53,port=6381,state=online,offset=1946,lag=0 master_replid:59cd95d394dad9d0e49042637fdfd5290db4abfe master_replid2:0000000000000000000000000000000000000000 master_repl_offset:1946 second_repl_offset:-1 repl_backlog_active:1 repl_backlog_size:1048576 repl_backlog_first_byte_offset:1 repl_backlog_histlen:1946 192.168.9.51:6381> 

让我们尝试创建几个密钥,并验证这些密钥是否出现在副本中:

 192.168.9.51:6381> SET key1 test1 -> Redirected to slot [9189] located at 192.168.9.52:6382 OK 192.168.9.52:6382> SET key2 test2 -> Redirected to slot [4998] located at 192.168.9.51:6381 OK 192.168.9.51:6381> SET key3 test3 OK 192.168.9.51:6381> 

检查M2:

 root@redis2:/home/user# redis-cli -c -h 192.168.9.52 -p 6382 192.168.9.52:6382> GET key1 "test1" 192.168.9.52:6382> GET key2 -> Redirected to slot [4998] located at 192.168.9.51:6381 "test2" 192.168.9.51:6381> GET key3 "test3" 192.168.9.51:6381> 

在M3上:

 root@redis3:/home/user# redis-cli -c -h 192.168.9.53 -p 6383 192.168.9.53:6383> GET key1 -> Redirected to slot [9189] located at 192.168.9.52:6382 "test1" 192.168.9.52:6382> GET key2 -> Redirected to slot [4998] located at 192.168.9.51:6381 "test2" 192.168.9.51:6381> GET key3 "test3" 192.168.9.51:6381> 

我们将禁用redis1节点并检查S1的工作方式:

 192.168.9.52:6382> CLUSTER NODES <b>182e5cffc9c31c231de69ddbaf507ec1fe17bb09 192.168.9.51:6382@16382 slave,fail d499af3672b3063c7239572ec311ad3160f280ae 1569509904727 1569509900000 4 connected</b> 485ffb786e9763955e6f10ffc59247690ad9bc11 <i>192.168.9.53:6381@16381 master</i> - 0 1569510017272 7 connected 0-5460 44f656062259005adea58bc5ad024071a050e192 192.168.9.52:6383@16383 slave 3a41475e1613519c3ecdec695736a898262a24a5 0 1569510018274 5 connected <b>e92cb96fd6c20db7509662a248902e3751ebe95f 192.168.9.51:6381@16381 master,fail - 1569509906731 1569509901721 1 connected</b> 3a41475e1613519c3ecdec695736a898262a24a5 192.168.9.53:6383@16383 master - 0 1569510019275 3 connected 10923-16383 d499af3672b3063c7239572ec311ad3160f280ae 192.168.9.52:6382@16382 myself,master - 0 1569510017000 2 connected 5461-10922 

我们看到有关M1和S2故障以及S3已切换到MASTER模式的信息。

检查密钥的存储位置:

 192.168.9.52:6382> GET key1 "test1" 192.168.9.52:6382> GET key2 -> Redirected to slot [4998] located at 192.168.9.53:6381 "test2" 192.168.9.53:6381> GET key3 "test3" 192.168.9.53:6381> 

以前存储在redis1上的密钥现在在redis3上可用。

恢复redis1节点的操作,并检查节点M1和S2的状态:

 192.168.9.53:6381> CLUSTER NODES <i>e92cb96fd6c20db7509662a248902e3751ebe95f 192.168.9.51:6381@16381 slave 485ffb786e9763955e6f10ffc59247690ad9bc11 0 1569511658217 7 connected 182e5cffc9c31c231de69ddbaf507ec1fe17bb09 192.168.9.51:6382@16382 slave d499af3672b3063c7239572ec311ad3160f280ae 0 1569511657000 4 connected</i> d499af3672b3063c7239572ec311ad3160f280ae 192.168.9.52:6382@16382 master - 0 1569511656000 2 connected 5461-10922 3a41475e1613519c3ecdec695736a898262a24a5 192.168.9.53:6383@16383 master - 0 1569511656000 3 connected 10923-16383 485ffb786e9763955e6f10ffc59247690ad9bc11 192.168.9.53:6381@16381 myself,master - 0 1569511656000 7 connected 0-5460 44f656062259005adea58bc5ad024071a050e192 192.168.9.52:6383@16383 slave 3a41475e1613519c3ecdec695736a898262a24a5 0 1569511657216 5 connected 

M1和S2的运行状况已经恢复,但是现在M1处于从模式。

密钥也位于redis3节点上:

 192.168.9.53:6383> GET key1 -> Redirected to slot [9189] located at 192.168.9.52:6382 "test1" 192.168.9.52:6382> GET key2 -> Redirected to slot [4998] located at 192.168.9.53:6381 "test2" 192.168.9.53:6383> GET key3 -> Redirected to slot [935] located at 192.168.9.53:6381 "test3" 

已配置集群并测试了Redis恢复。

要访问DirectumRX服务,还需要配置反向代理,就像设置Redis Sentiel一样。

而不是结论


本文并未考虑提高Redis容错能力的另一种方法-使用第三方群集资源管理器(例如Pacemaker) 。 在这种情况下,可以通过两个节点来解决问题,但是在紧急情况下很有可能会丢失数据。

对于反向代理(在本例中为HAProxy),也希望提供容错功能,但是此问题也不在本文讨论范围之内。 如果您对该主题感兴趣,还可以在单​​独的文章中考虑这些部署选项,并逐步进行调整和测试结果。

您可以在下面的链接中找到有关该主题的更多信息:
Redis集群教程
Redis Sentinel文档
HAProxy配置手册

Source: https://habr.com/ru/post/zh-CN469543/


All Articles