今天,我想告诉您有关Mobx过渡是如何在我们的项目中进行的,它具有什么优势。 还将显示一个典型项目,并对主要问题进行解释。 但首先,介绍一下。

为什么需要切换到某些内容? 实际上,这个问题的答案已经成功了一半。 现在,许多人只因为新技术而喜欢应用新技术。 简历中有一条不错的路线,即自我发展的可能性,这是趋势。 只要您能前进就很好。
但是,每种工具都必须解决自己的问题,并且在编写商业代码时我们会以一种或另一种方式排斥它们。
在我们的项目中,有许多小部件,用户可在其中输入数据并与表单进行交互。 通常,每个小部件都有几个屏幕。 曾几何时,它们都可以在客户端上使用的旧版MarkoJS +模板引擎上运行。 与表单的交互以命令式的方式编写,如果...否则,则使用回调,而这一切似乎都已经过去了。
然后是时候到
React了 。 客户端上的业务逻辑越来越厚,有很多交互选项,命令性代码变成了一个复杂的混乱局面。 事实证明,声明式反应代码更加方便。 最终有可能专注于逻辑而不是表示形式,重用组件并轻松地在不同员工之间分配用于开发新功能的任务。
但是随着时间的流逝,纯React上的应用仍然存在于切实的边界上。 当然,我们为每个人编写this.setState并考虑它的异步性很无聊,但是在组件的整个厚度中抛出数据和回调使它特别困难。 简而言之,现在是将数据和表示完全分离的时刻了。 这不是如何在纯React上做到这一点的问题,但是在实现前端应用程序Flux架构的行业框架中,最近很流行。
根据空缺中的文章和参考文献的数量,
Redux是我们中最著名的。 实际上,到最后一刻,我已经把手伸进了我们的项目中并开始开发(从字面上看!)恶魔穿过了哈伯,然后才开始讨论“ Redux或Mobx?”主题。 这是本文:
habr.com/en/post/459706 。 阅读了它以及其中的所有注释之后,我意识到我仍然会使用
Mobx 。
再说一遍。 最重要问题的答案-为什么所有这些? -看起来像这样:现在该将演示文稿和数据分开了,我想以声明式(以及呈现)的方式构建数据管理,不对回调和转发的属性进行交叉授粉。
现在我们准备继续。
1.关于申请
我们需要在前端构建一个屏幕和表单的设计器,然后可以将其快速改组,并根据业务需求的变化相互连接。 这不可避免地将我们带到以下位置:创建完全隔离的组件的集合,以及与我们的每个小部件相对应的一些基本组件(实际上,这些是在常规应用程序中每次在新业务案例下每次创建的单独的SPA)。
这些示例将显示其中一个小工具的截短版本。 为了不堆积多余的代码,请使其成为三个输入字段和按钮的形式。
2.资料
Mobx本质上不是一个框架;它只是一个库。 该手册明确指出它不会直接组织您的数据。 您自己必须提出这样的组织。 顺便说一下,我们使用
Mobx 4,因为版本5使用Sybmol数据类型,不幸的是,并非所有浏览器都支持该数据类型。
因此,所有数据都分配给单独的实体。 我们的应用程序针对两个文件夹:
-放置所有视图的
组件-store ,其中将包含数据以及使用它们的逻辑。
例如,对我们而言,典型的数据输入组件由两个文件组成:
Input.js和
InputStore.js 。 第一个文件是一个严格负责显示的愚蠢的React组件,第二个文件是该组件的数据,用户规则(
onClick ,
onChange等)
在直接查看示例之前,我们需要解决另一个重要问题。
3.管理
好吧,我们拥有View-Store的完全自主组件,但是如何在整个应用程序中融合在一起呢? 为了进行显示,我们将拥有
App.js的根组件,对于管理数据流,主存储为
mainStore.js 。 原理很简单:mainStore知道所有必需组件的所有存储库的所有信息(将在下面显示如何实现)。 其他存储库对世界一无所知(当然,会有一个例外-字典)。 因此,我们可以保证知道我们的数据将流向何处以及在何处进行拦截。
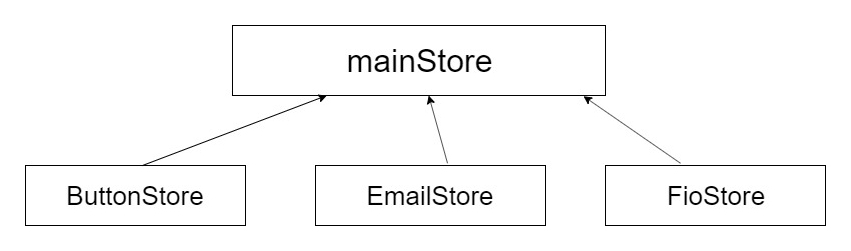 mainStore以
声明方式,通过更改其状态的一部分,可以控制其余组件。 在下图中,“
操作”和“
状态”是指组件存储,而“
计算值”是指
mainStore :

让我们开始编写代码。 主应用程序文件index.js:
import React from "react"; import ReactDOM from "react-dom"; import {Provider} from "mobx-react"; import App from "./components/App"; import mainStore from "./stores/mainStore"; import optionsStore from "./stores/optionsStore";
在这里,您可以看到Mobx的基本概念。 数据(存储)可通过
提供程序机制在应用程序中的任何位置使用。 我们通过列出所需的存储设备来包装我们的应用程序。 要使用
提供程序,我们连接
mobx-react模块 。 为了使主控制存储区
mainStore从一开始就可以访问所有其他数据,我们在
mainStore中初始化子存储
区 :
现在是
App.js ,它是我们应用程序的框架
import React from "react"; import {observer, inject} from "mobx-react"; import ButtonArea from "./ButtonArea"; import Email from "./Email"; import Fio from "./Fio"; import l10n from "../../../l10n/localization.js"; @inject("mainStore") @observer export default class App extends React.Component { constructor(props) { super(props); }; render() { const mainStore = this.props.mainStore; return ( <div className="container"> <Fio label={l10n.ru.profile.name} name={"name"} value={mainStore.userData.name} daData={true} /> <Fio label={l10n.ru.profile.surname} name={"surname"} value={mainStore.userData.surname} daData={true} /> <Email label={l10n.ru.profile.email} name={"email"} value={mainStore.userData.email} /> <ButtonArea /> </div> ); } }
Mobx还有另外两个基本概念:
注入和
观察器 。
注入仅在应用程序中实现必要的存储。 我们应用程序的不同部分使用不同的存储库,这些存储库在
inject中列出,并用逗号分隔。 自然地,可插拔存储应该首先在
Provider中列出。 可以通过
this.props.yourStoreName在组件中使用存储库。
观察者 -装饰者指示我们的组件将订阅使用Mobx修改的数据。 数据已更改-组件中发生了反应(如下所示)。 因此,没有特殊的订阅和回调-Mobx会自己提供更改!
我们将返回在
mainStore中管理整个应用程序,但现在我们将处理组件。 我们有三种类型
-Fio ,
电子邮件 ,
按钮 。 让第一个和第三个通用,并使用
电子邮件 -自定义。 让我们从他开始。
该显示是通常的哑响应组件:
Email.js import React from "react"; import {inject, observer} from 'mobx-react'; @inject("EmailStore") @observer export default class Email extends React.Component { constructor(props) { super(props); }; componentDidMount = () => { this.props.EmailStore.validate(this.props.name); }; componentWillUnmount = () => { this.props.EmailStore.unmount(this.props.name); }; render() { const name = this.props.name; const EmailStore = this.props.EmailStore; const params = EmailStore.params; let status = "form-group email "; if (params.isCorrect && params.onceValidated) status += "valid"; if (params.isWrong && params.onceValidated) status += "error"; return ( <div className={status}> <label htmlFor={name}>{this.props.label}</label> <input type="email" disabled={this.props.disabled} name={name} id={name} value={params.value} onChange={(e) => EmailStore.bindData(e, name)} /> </div> ); } }
我们连接了验证的外部组件,在元素已经包含在布局中之后执行此操作很重要。 因此,store中的方法在
componentDidMount中被调用。
现在仓库本身:
EmailStore.js import {action, observable} from 'mobx'; import reactTriggerChange from "react-trigger-change"; import Validators from "../../../helpers/Validators"; import { getTarget } from "../../../helpers/elementaries"; export default class EmailStore { @observable params = { value : "", disabled : null, isCorrect : null, isWrong : null, onceValidated : null, prevalidated : null } @action bindData = (e, name) => { this.params.value = getTarget(e).value; }; @action validate = (name) => { const callbacks = { success : (formatedValue) => { this.params.value = formatedValue; this.params.isCorrect = true; this.params.isWrong = false; this.params.onceValidated = true; }, fail : (formatedValue) => { this.params.value = formatedValue; this.params.isCorrect = false; this.params.isWrong = true; } }; const options = { type : "email" }; const element = document.getElementById(name); new Validators(element, options, callbacks).init();
值得关注两个新实体。
可观察的 -一个对象,其任何字段的更改都由Mobx监视(并将信号发送给
观察者 ,
观察者已预订了我们的特定存储)。
动作 -此装饰器应包装任何更改应用程序状态和/或引起副作用的处理程序。 在这里,我们在
@observable params中更改value的
值 。
就是这样,我们的简单组件已准备就绪! 他可以跟踪用户数据并进行记录。 稍后,我们将看到
mainStore中央存储库如何订阅以更改此数据。
现在是典型的
Fio组件。 它与上一个组件的区别在于,我们将在一个应用程序中无限次使用这种类型的组件。 这对组件存储施加了一些其他要求。 最重要的是,我们将使用出色的
DaData服务对输入字符进行更多提示。 显示方式
Fio.js import React from "react"; import {inject, observer} from 'mobx-react'; import {get} from 'mobx'; @inject("FioStore") @observer export default class Fio extends React.Component { constructor(props) { super(props); }; componentDidMount = () => { this.props.FioStore.registration(this.props); }; componentWillUnmount = () => { this.props.FioStore.unmount(this.props.name); }; render() { const FioStore = this.props.FioStore; const name = this.props.name; const item = get(FioStore.items, name); if (item && item.isCorrect && item.onceValidated && !item.prevalidated) status = "valid"; if (item && item.isWrong && item.onceValidated) status = "error";
这里有一些新内容:我们不直接访问组件的状态,而是通过
get进行访问 :
get(FioStore.items, name)
事实是,组件实例的数量是无限的,并且此类型的所有组件的存储库都是一个。 因此,在注册期间,我们在
Map中输入每个实例的参数:
Fiostore.js import {action, autorun, observable, get, set} from 'mobx'; import reactTriggerChange from "react-trigger-change"; import Validators from "../../../helpers/Validators"; import { getDaData, blockValidate } from "../../../helpers/functions"; import { getAttrValue, scrollToElement, getTarget } from "../../../helpers/elementaries"; export default class FioStore { constructor() { autorun(() => { const self = this; $("body").click((e) => { if (e.target.className !== "suggestion-item" && e.target.className !== "suggestion-text") { const items = self.items.entries(); for (var [key, value] of items) { value.suggestions = []; } } }); }) } @observable items = new Map([]); @action registration = (params) => { const nameExists = get(this.items, params.name); if (!blockValidate({params, nameExists, type: "Fio"})) return false;
我们通用组件的状态初始化如下:
@observable items = new Map([]);
使用常规JS对象会更方便,但是,在更改其字段的值时不会被“点击”, 将新组件添加到页面时,将动态添加字段。 收到DaData提示后,我们将单独取出。
按钮组件看起来相似,但是没有提示:
Button.js import React from "react"; import {inject, observer} from 'mobx-react'; @inject("ButtonStore") @observer export default class CustomButton extends React.Component { constructor(props) { super(props); }; componentDidMount = () => { this.props.ButtonStore.registration(this.props); }; componentWillUnmount = () => { this.props.ButtonStore.unmount(this.props.name); }; render() { const name = this.props.name; return ( <div className="form-group button"> <button disabled={this.props.disabled} onClick={(e) => this.props.ButtonStore.bindClick(e, name)} name={name} id={name} >{this.props.text}</button> </div> ); } }
ButtonStore.js import {action, observable, get, set} from 'mobx'; import {blockValidate} from "../../../helpers/functions"; export default class ButtonStore { constructor() {} @observable items = new Map([]) @action registration = (params) => { const nameExists = get(this.items, params.name); if (!blockValidate({params, nameExists, type: "Button"})) return false;
Button的组件由
ButtonArea的HOC组件
包装 。 请注意,较老的商店包括自己的商店,而最小的商店。 在嵌套组件链中,无需转发任何参数和回调。 特定组件操作所需的所有内容都直接添加到该组件中。
ButtonArea.js import React from "react"; import {inject, observer} from 'mobx-react'; import l10n from "../../../l10n/localization.js"; import Button from "./Button"; @inject("mainStore", "optionsStore") @observer export default class ButtonArea extends React.Component { constructor(props) { super(props); }; render() { return ( <div className="button-container"> <p>{this.props.optionsStore.dict.buttonsHeading}</p> <Button name={"send_data"} disabled={this.props.mainStore.buttons.sendData.disabled ? true : false} text={l10n.ru.common.continue} /> </div> ); } }
因此,我们已经准备好所有组件。 这件事留给了
mainStore的经理
。 首先,所有的存储代码:
mainStore.js import {observable, computed, autorun, reaction, get, action} from 'mobx'; import optionsStore from "./optionsStore"; import ButtonStore from "./ButtonStore"; import FioStore from "./FioStore"; import EmailStore from "./EmailStore"; import { fetchOrdinary, sendStats } from "../../../helpers/functions"; import l10n from "../../../l10n/localization.js"; class mainStore { constructor() { this.ButtonStore = new ButtonStore(); this.FioStore = new FioStore(); this.EmailStore = new EmailStore(); autorun(() => { this.fillBlocks(); this.fillData(); }); reaction( () => this.dataInput, (result) => { let isIncorrect = false; for (let i in result) { for (let j in result[i]) { const res = result[i][j]; if (!res.isCorrect) isIncorrect = true; this.userData[j] = res.value; } }; if (!isIncorrect) { this.buttons.sendData.disabled = false } else { this.buttons.sendData.disabled = true }; } ); reaction( () => this.sendDataButton, (result) => { if (result) { if (result.isClicked) { get(this.ButtonStore.items, "send_data").isClicked = false; const authRequestSuccess = () => { console.log("request is success!") }; const authRequestFail = () => { console.log("request is fail!") }; const request = { method : "send_userdata", params : { name : this.userData.name, surname : this.userData.surname, email : this.userData.email } }; console.log("Request body is:"); console.log(request); fetchOrdinary( optionsStore.OPTIONS.sendIdentUrl, JSON.stringify(request), { success: authRequestSuccess, fail: authRequestFail } ); } } } ); } @observable userData = { name : "", surname : "", email : "" }; @observable buttons = { sendData : { disabled : true } }; componentsMap = { userData : [ ["name", "fio"], ["surname", "fio"], ["email", "email"], ["send_data", "button"] ] }; @observable listenerBlocks = {}; @action fillBlocks = () => { for (let i in this.componentsMap) { const pageBlock = this.componentsMap[i];
其他一些关键实体。
计算的是一个装饰器,用于跟踪我们
可观察的物体中的变化的函数。 Mobx的一个重要优点是它仅跟踪经过计算然后作为结果返回的数据。 仅在必要时才会发生反应,并因此重新绘制虚拟DOM。
反应 -用于根据状态变化组织副作用的工具。 它具有两个功能:第一个计算出状态,返回计算出的状态,第二个具有随状态变化而变化的效果。 在我们的示例中,
反应进行了两次。 首先,我们查看字段的状态并得出整个表格是否正确的结论,并记录每个字段的值。 在第二个步骤中,我们单击一个按钮(更确切地说,如果有一个标志“按钮被按下”),我们将数据发送到服务器。 数据对象显示在浏览器控制台中。 因为
mainStore知道所有存储库,所以在处理完按钮的单击后,我们可以立即以命令式禁用标记:
get(this.ButtonStore.items, "send_data").isClicked = false;
您可以讨论这种强制性命令的接受程度如何,但是在任何情况下,控件仅在一个方向上进行-从
mainStore到
ButtonStore 。
自动运行用于我们要直接运行某些操作的地方,而不是作为存储更改的反应。 在我们的示例中,启动了一个辅助功能,以及用字典中的数据预填充表单字段。
因此,我们采取的行动顺序如下。 组件跟踪用户事件并更改其状态。
mainStore通过
计算仅基于那些已更改的状态
来计算结果。 不同的
计算对象在不同的存储库中寻找不同状态的变化。 此外,通过
反应,基于
计算结果,
我们将执行带有
observable的操作 ,并执行副作用(例如,我们发出AJAX请求)。
Obsevables订阅了子组件,必要时可以重画这些子组件。 单向数据流,可以完全控制更改的位置和内容。
您可以自己
尝试该示例和代码。 链接到存储库:
github.com/botyaslonim/mobx-habr 。
然后像往常一样:
npm i ,
npm run local 。 在公用文件夹中,为
index.html文件。 DaData提示适用于我的免费帐户,因此,由于habr效应,它们可能会在某些时候掉线。
对于
Mobx上应用程序工作的任何建设性意见和建议,我将感到高兴
!最后,我要说的是,该库大大简化了数据处理工作。 对于中小型应用程序,它无疑是一个非常方便的工具,它无需考虑组件和回调的属性,而直接专注于业务逻辑。