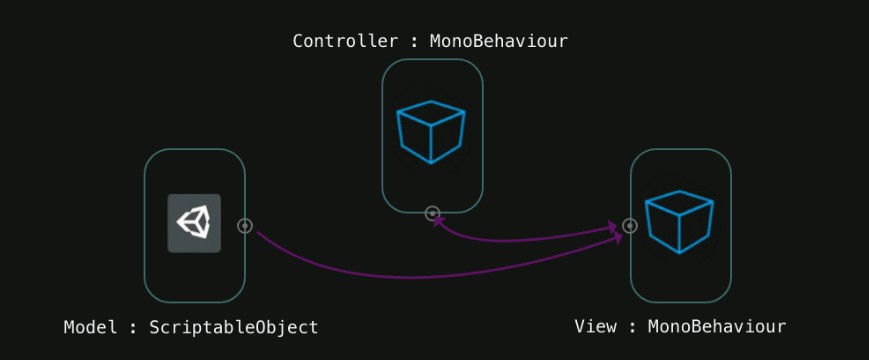
MVC(模型-视图-控制器)是一种方案,涉及将应用程序数据,用户界面和控制逻辑划分为三个单独的组件,以便每个组件都可以独立修改。 开发人员
Cem Ugur Karacam在Unity上分享了他的编程经验,并简要介绍了可脚本对象。 我们提供他在dev.to上发表的文章的翻译。
欢迎来到我的第一部分,该部分涉及使用可脚本对象在Unity中实现MVC。 在本文中,我只写了使用脚本对象的基础知识,并且总的来说,本文将变得简单明了。
首先,找出Unity开发人员对可脚本对象的看法:
- 这是一个可以继承的类,以创建不应附加到场景中另一个对象的对象。
- 这样创建的对象的最大好处是,仅将其用于保存数据即可。
现在顺理成章地问:为什么要编写脚本对象?
可脚本编写的对象是Unity引擎功能的一部分,因此此类对象具有许多内置功能,可用于编辑器。
我喜欢在Unity上开发项目时使用的方法。 您可以创建自己的工具并轻松自定义默认情况下安装的工具。 可脚本编写的对象极大地扩展了您的功能,因为它们允许您创建数据的自定义容器并将其作为资产存储在项目中。

上图是在Unity中使用脚本对象的示例。 在项目中创建的单个.asset文件可能包含多个系统运行所必需的信息,并确保保留其设置。 如果您想了解更多信息,可以在YouTube上观看一段很棒的视频,上面有关于SO(可编写脚本的对象)的演讲,名为“
在光荣的可编写脚本的对象革命中推翻MonoBehaviour暴政 ”。
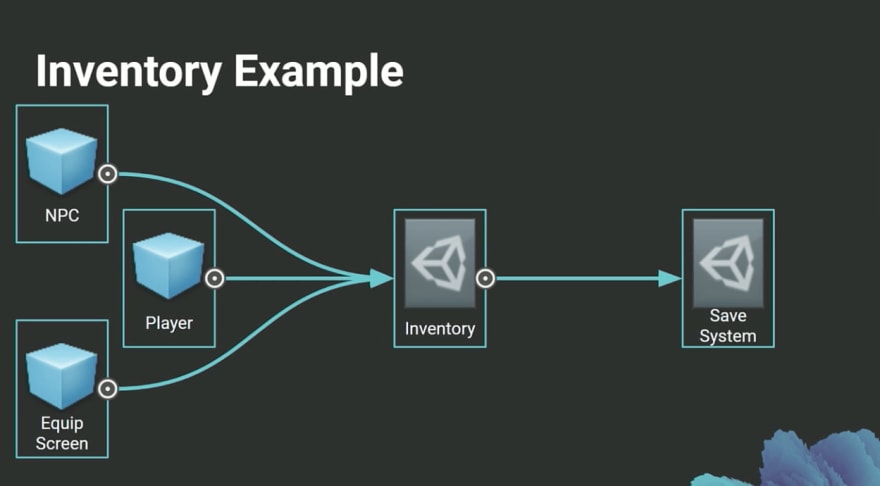
上面显示了另一个很好的例子。 在这里,游戏对象引用一个库存对象,然后保存系统将它们全部管理。 该图像来自另一个出色的演讲“带有可脚本化对象的
游戏体系结构 ”(
带有可脚本化对象的游戏体系结构 ),我强烈建议您阅读它。
另一个很棒的功能是,当您了解可脚本编写的对象时,您很可能不想使用其他数据存储格式,例如JSON或XML,因为SO是在Unity中存储数据最方便的格式。
好吧,让我们看看实际的脚本对象。
using UnityEngine; public class ItemData : ScriptableObject { public string itemName; public ItemType type; public float attack; } public enum ItemType { Dagger, Axe, Sword, Staff }
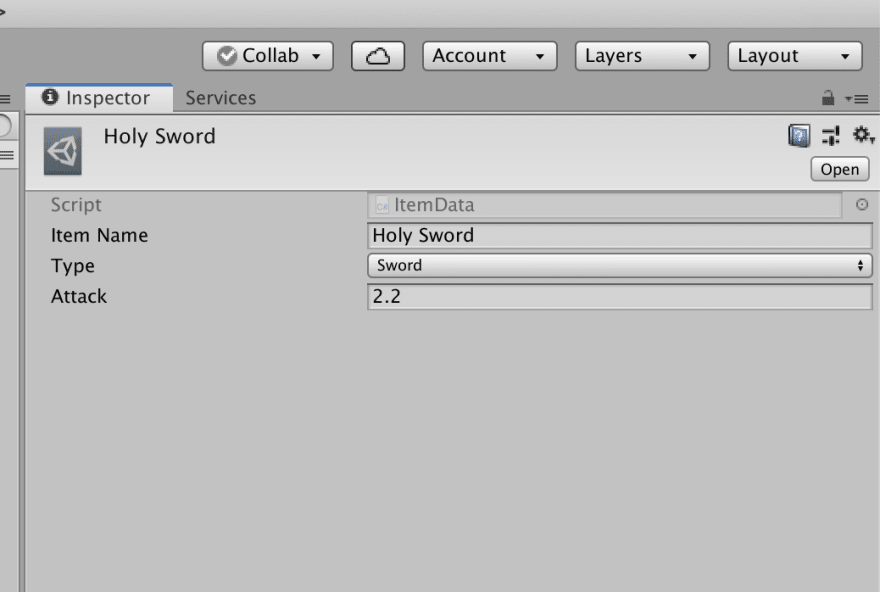
我们编写了一个名为
ItemData的类以及RPG游戏的一些典型属性。 接下来,我们将在项目中创建几个此类项目,从脚本中访问它们并在控制台中显示值。 但是首先,在我们的代码中添加一行重要内容。
using UnityEngine; [CreateAssetMenu] public class ItemData : ScriptableObject { public string itemName; public ItemType type; public float attack; } public enum ItemType { Dagger, Axe, Sword, Staff }
我们在
ItemData类之前添加的
CreateAssetMenu属性向Unity表示我们要创建.asset文件,该类将通过菜单存储在其中。 否则,我们将无法使用鼠标右键或项目文件夹中的“创建”按钮来执行此操作。
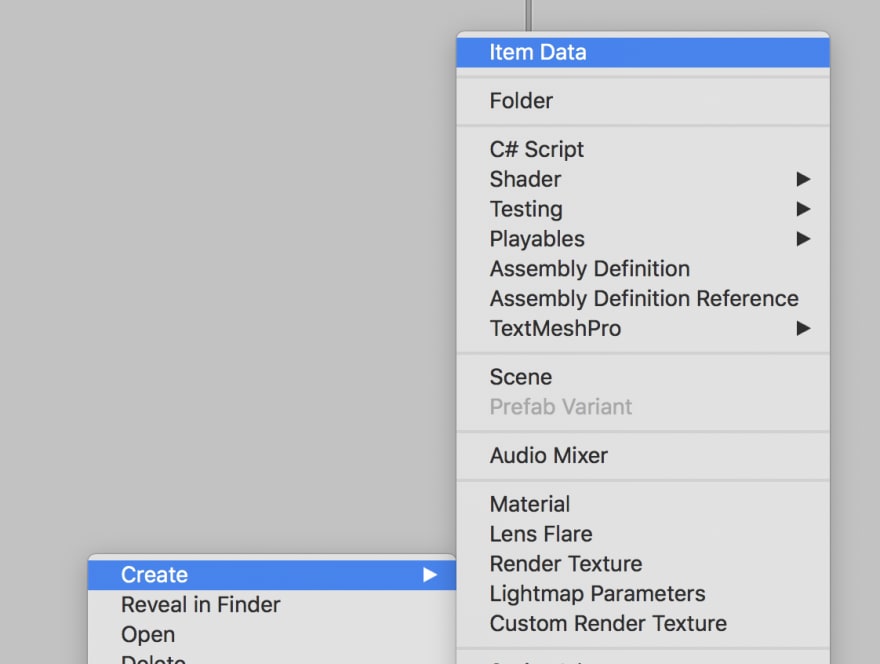

创建一个名为
Items的文件夹,然后尝试在此文件夹中创建
ItemData对象。
现在,我们将编写另一个名为
Inventory脚本来处理数据文件。
using UnityEngine; public class Inventory : MonoBehaviour { public ItemData[] inventory; }
向其添加一个方法,该方法将向控制台输出信息。 我们还运行检查以免超出数组的范围,而是绕行绕行数组。
using UnityEngine; public class Inventory : MonoBehaviour { public ItemData[] inventory; int index = 0; public void NextItemInfo() { if (index > inventory.Length) { index = 0; } Debug.Log("Item name: " + inventory[index].name); Debug.Log ("Attack power: " + inventory[index].attack); switch(inventory[index].type) { case ItemType.Axe: Debug.Log("Item type: Axe"); break; case ItemType.Dagger: Debug.Log("Item type: Dagger"); break; case ItemType.Staff: Debug.Log("Item type: Staff"); break; case ItemType.Sword: Debug.Log("Item type: Sword"); break; } index ++; } }
我将对方法的调用分配给空格键。 在Unity中,这非常容易。 多亏了
Input类,我们可以在
Update方法中检查是否已按下所需的键。
using UnityEngine; public class Inventory : MonoBehaviour { public ItemData[] inventory; int index = 0; private void Update() { if (Input.GetKeyDown(KeyCode.Space)) { NextItemInfo(); } } public void NextItemInfo() { if (index > inventory.Length) { index = 0; } Debug.Log("Item name: " + inventory[index].name); Debug.Log ("Attack power: " + inventory[index].attack); switch(inventory[index].type) { case ItemType.Axe: Debug.Log("Item type: Axe"); break; case ItemType.Dagger: Debug.Log("Item type: Dagger"); break; case ItemType.Staff: Debug.Log("Item type: Staff"); break; case ItemType.Sword: Debug.Log("Item type: Sword"); break; } index ++; } }
现在该切换回Unity编辑器了。 我们将使用
Items文件夹中先前创建的
ItemData文件填充
inventory数组。 但是首先,在场景中创建一个空对象,然后向其中添加我们的
Inventory脚本。

现在让我们运行项目并进行测试。
有效! 现在,我想向您展示Scriptable Object不仅可以存储数据,还可以存储使用它们的方法。 例如,让我们在
ItemData类中添加一种计算价格的方法。 有关更多信息,请在
此处和
此处查看文档。
using UnityEngine; [CreateAssetMenu] public class ItemData : ScriptableObject { public string itemName; public ItemType type; public float attack; public float GetPrice() { return attack * 40; } }
然后,在
Inventory类中使用新方法。
using UnityEngine; public class Inventory : MonoBehaviour { public ItemData[] inventory; int index = 0; private void Update() { if (Input.GetKeyDown(KeyCode.Space)) { NextItemInfo(); } } public void NextItemInfo() { if (index == inventory.Length) { index = 0; } Debug.Log("Item name: " + inventory[index].name); Debug.Log ("Attack power: " + inventory[index].attack); switch(inventory[index].type) { case ItemType.Axe: Debug.Log("Item type: Axe"); break; case ItemType.Dagger: Debug.Log("Item type: Dagger"); break; case ItemType.Staff: Debug.Log("Item type: Staff"); break; case ItemType.Sword: Debug.Log("Item type: Sword"); break; } Debug.Log("Item price: " + inventory[index].GetPrice()); index ++; } }
现在,我们将重现所有内容并查看结果。

本教程中的示例在
GitHub上 !
故事的第一部分结束了。 在下一篇文章中,我们将讨论在Unity中使用MVC。 但是,由于我们已经熟悉可脚本编写的对象,因此我们将添加一些新功能,使其像真正的Unity专家一样更加酷和难。