哈Ha! 我叫Nikita,我在ABBYY上使用移动SDK,并且还处理UI组件,以便在智能手机上扫描和方便地查看多页文档。 该组件由几个部分组成,可减少基于
ABBYY Mobile Capture技术开发应用程序的时间。 首先,用于扫描文件的照相机; 其次,带有捕获结果的编辑器屏幕(即自动拍摄的照片)和用于校正文档边框的屏幕。
开发人员只需调用几个方法就足够了-现在在他的应用程序中已经有一个可以自动扫描文档的照相机。 但是,除了配置的摄像机外,您还需要为客户提供对扫描结果的便捷访问,即 自动拍照。 如果客户扫描合同或章程,则可能会有很多此类照片。
在这篇文章中,我将讨论在实现编辑器屏幕以及文档捕获结果过程中出现的困难。 屏幕本身是两个
UICollectionView ,我将它们称为大小。 我将省略手动调整文档边框和文档其他工作的可能性,并且在滚动过程中我将重点介绍动画和布局功能。 在GIF下方,您可以看到最终发生了什么。 到资源库的链接将在文章的末尾。
作为参考,我经常关注Apple系统应用程序。 当您仔细查看其应用程序的动画和其他界面解决方案时,您会开始欣赏它们对各种琐事的殷勤态度。 现在,我们将以“
照片”应用程序(iOS 12)为参考。 我将提请您注意此应用程序的特定功能,然后我们将尝试实现它们。
我们将介绍
UICollectionViewFlowLayout大多数自定义
UICollectionViewFlowLayout ,了解如何实现视差和轮播等常见技术,并讨论在插入和删除单元格时与自定义动画相关的问题。
功能回顾
要添加细节,我将在“
照片”应用程序中描述令我满意的具体小事情,然后以适当的顺序实现它们。
- 大集合中的视差效果
- 少量收藏的元素居中。
- 小集合中项目的动态大小
- 放置小单元格元素的逻辑不仅取决于contentOffset,还取决于用户交互
- 用于移动和删除的自定义动画
- 更改方向时,“活动”单元格的索引不会丢失
1.视差
什么是视差?
视差滚动是计算机图形学中的一种技术,其中背景图像比前景图像移动通过相机的速度更慢,从而在2D场景中产生深度幻觉,并增加了虚拟体验的沉浸感。
您会注意到,滚动时,单元格的帧移动速度快于其中的图像。
让我们开始吧! 创建单元的子类,将UIImageView放入其中。
class PreviewCollectionViewCell: UICollectionViewCell { private(set) var imageView = UIImageView() override init(frame: CGRect) { super.init(frame: frame) addSubview(imageView) clipsToBounds = true imageView.snp.makeConstraints { $0.edges.equalToSuperview() } } }
现在,您需要了解如何移动
imageView ,以创建视差效果。 为此,您需要在滚动过程中重新定义单元格的行为。 苹果:
避免子类化UICollectionView 。 集合视图几乎没有或没有它自己的外观。 而是从数据源对象中提取所有视图,并从布局对象中提取所有与布局有关的信息。 如果要尝试在三个维度上布置项目,则正确的方法是实施自定义布局,该布局设置每个单元的3D变换并正确查看。
好的,让我们创建
布局对象 。
UICollectionView具有属性
collectionViewLayout ,它从中学习有关单元格位置的信息。
UICollectionViewFlowLayout是抽象
UICollectionViewLayout的实现,后者是
collectionViewLayout属性。
UICollectionViewLayout正在等待有人对其进行子类化并提供适当的内容。 UICollectionViewFlowLayout是UICollectionViewFlowLayout的具体类,已实现所有四个成员,以这种方式将以网格方式排列单元。
创建
UICollectionViewFlowLayout的子类并覆盖其
layoutAttributesForElements(in:) 。 该方法返回一个
UICollectionViewLayoutAttributes数组,该数组提供有关如何显示特定单元格的信息。
每当
contentOffset更改时,以及布局无效时,收集请求属性。 另外,我们将通过添加
parallaxValue属性来创建自定义属性,该属性确定图片的帧相对于单元格的帧延迟了多少。 对于属性子类,必须
NSCopiyng覆盖
NSCopiyng 。 苹果:
如果您继承并实现了任何自定义布局属性,则还必须重写继承的isEqual:方法以比较属性的值。 在iOS 7和更高版本中,如果集合属性未更改,则它们不会应用布局属性。 它通过使用isEqual:方法比较旧属性对象和新属性对象来确定属性是否已更改。 因为此方法的默认实现仅检查此类的现有属性,所以您必须实现自己的方法版本以比较任何其他属性。 如果您的自定义属性都相等,请调用super并在实现结束时返回结果值。
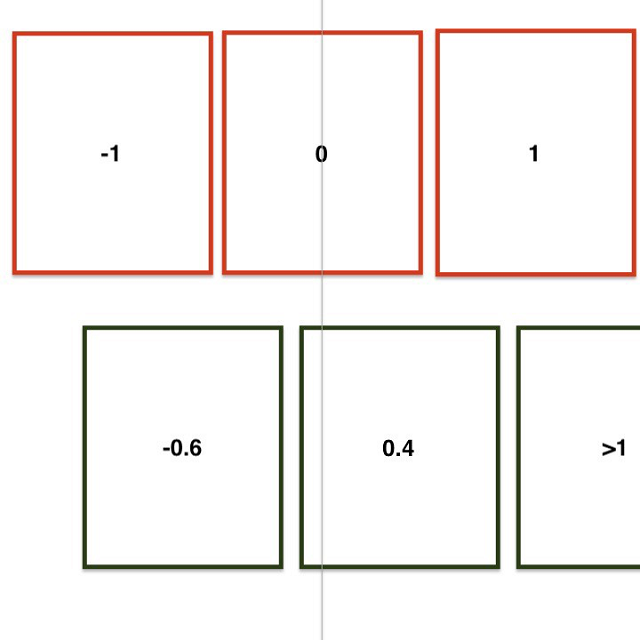
如何找出
parallaxValue ? 让我们计算一下您需要移动多少位置才能使其位于中心。 如果此距离大于单元格的宽度,请对其进行锤击。 否则,将此距离除以
单元的宽度。 该距离越接近零,视差效果越弱。
class ParallaxLayoutAttributes: UICollectionViewLayoutAttributes { var parallaxValue: CGFloat? } class PreviewLayout: UICollectionViewFlowLayout { var offsetBetweenCells: CGFloat = 44 override func shouldInvalidateLayout(forBoundsChange newBounds: CGRect) -> Bool { return true } override class var layoutAttributesClass: AnyClass { return ParallaxLayoutAttributes.self } override func layoutAttributesForElements(in rect: CGRect) -> [UICollectionViewLayoutAttributes]? { return super.layoutAttributesForElements(in: rect)? .compactMap { $0.copy() as? ParallaxLayoutAttributes } .compactMap(prepareAttributes) } private func prepareAttributes(attributes: ParallaxLayoutAttributes) -> ParallaxLayoutAttributes { guard let collectionView = self.collectionView else { return attributes } let width = itemSize.width let centerX = width / 2 let distanceToCenter = attributes.center.x - collectionView.contentOffset.x let relativeDistanceToCenter = (distanceToCenter - centerX) / width if abs(relativeDistanceToCenter) >= 1 { attributes.parallaxValue = nil attributes.transform = .identity } else { attributes.parallaxValue = relativeDistanceToCenter attributes.transform = CGAffineTransform(translationX: relativeDistanceToCenter * offsetBetweenCells, y: 0) } return attributes } }


当集合收到必要的属性时,单元
将应用它们。 可以在单元的子类中覆盖此行为。 让我们根据
parallaxValue值
imageView 。 但是,
contentMode == .aspectFit的图片移位正常工作,这还不够,因为图片框与
clipsToBounds == true框不一致,当
clipsToBounds == true时,图像框将被裁剪。 放置一个与图像大小匹配的遮罩,并使用适当的
contentMode ,如有必要,我们将对其进行更新。 现在一切正常!
extension PreviewCollectionViewCell { override func layoutSubviews() { super.layoutSubviews() guard let imageSize = imageView.image?.size else { return } let imageRect = AVMakeRect(aspectRatio: imageSize, insideRect: bounds) let path = UIBezierPath(rect: imageRect) let shapeLayer = CAShapeLayer() shapeLayer.path = path.cgPath layer.mask = shapeLayer } override func apply(_ layoutAttributes: UICollectionViewLayoutAttributes) { guard let attrs = layoutAttributes as? ParallaxLayoutAttributes else { return super.apply(layoutAttributes) } let parallaxValue = attrs.parallaxValue ?? 0 let transition = -(bounds.width * 0.3 * parallaxValue) imageView.transform = CGAffineTransform(translationX: transition, y: .zero) } }
2.少量收藏的元素居中
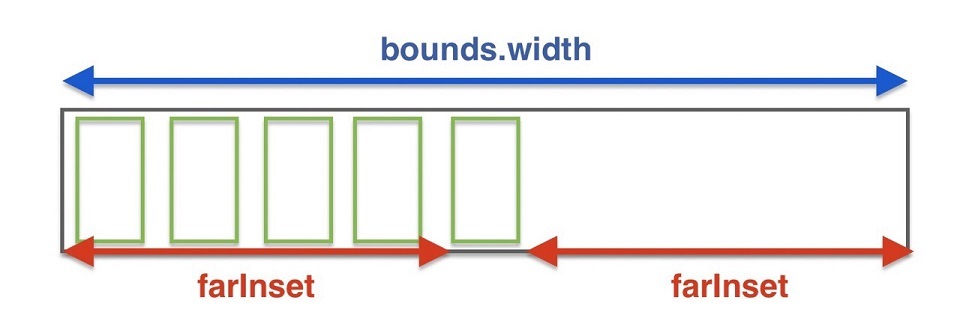
这里的一切都很简单。 通过在左右两侧都设置较大的
inset ,可以实现此效果。 左右滚动时,仅当最后一个单元格离开可见内容时才需要开始
bouncing 。 也就是说,可见内容应等于单元格的大小。
extension ThumbnailFlowLayout { var farInset: CGFloat { guard let collection = collectionView else { return .zero } return (collection.bounds.width - itemSize.width) / 2 } var insets: UIEdgeInsets { UIEdgeInsets(top: .zero, left: farInset, bottom: .zero, right: farInset) } override func prepare() { collectionView?.contentInset = insets super.prepare() } }
有关居中的更多信息:当集合完成滚动时,布局将请求
contentOffset停在该位置。 为此,请重写
targetContentOffset(forProposedContentOffset:withScrollingVelocity:) 。 苹果:
如果希望滚动行为捕捉到特定边界,则可以覆盖此方法,并使用它来更改停止点。 例如,您可能使用此方法始终停止在项目之间的边界上滚动,而不是在项目中间停止。
为了使一切变得美丽,我们将
始终停在最近的单元格的中心。 计算最接近的单元格的中心是一件微不足道的任务,但是您需要小心并考虑
contentInset 。
override func targetContentOffset(forProposedContentOffset proposedContentOffset: CGPoint, withScrollingVelocity velocity: CGPoint) -> CGPoint { guard let collection = collectionView else { return super.targetContentOffset(forProposedContentOffset: proposedContentOffset, withScrollingVelocity: velocity) } let cellWithSpacing = itemSize.width + config.distanceBetween let relative = (proposedContentOffset.x + collection.contentInset.left) / cellWithSpacing let leftIndex = max(0, floor(relative)) let rightIndex = min(ceil(relative), CGFloat(itemsCount)) let leftCenter = leftIndex * cellWithSpacing - collection.contentInset.left let rightCenter = rightIndex * cellWithSpacing - collection.contentInset.left if abs(leftCenter - proposedContentOffset.x) < abs(rightCenter - proposedContentOffset.x) { return CGPoint(x: leftCenter, y: proposedContentOffset.y) } else { return CGPoint(x: rightCenter, y: proposedContentOffset.y) } }
3.小集合元素的动态大小
如果滚动大集合,则
contentOffset将更改为一个小集合。 而且,少量收藏品的中央单元格没有其余部分大。 边单元的大小固定,中间的边单元与其包含的图片的纵横比一致。
您可以使用与视差相同的技术。 让我们为一个小集合创建一个自定义
UICollectionViewFlowLayout并重新定义
prepareAttributes(attributes:鉴于该小集合的布局逻辑将变得更加复杂,我们将创建一个单独的实体来存储和计算单元格几何。
struct Cell { let indexPath: IndexPath let dims: Dimensions let state: State func updated(new state: State) -> Cell { return Cell(indexPath: indexPath, dims: dims, state: state) } } extension Cell { struct Dimensions { let defaultSize: CGSize let aspectRatio: CGFloat let inset: CGFloat let insetAsExpanded: CGFloat } struct State { let expanding: CGFloat static var `default`: State { State(expanding: .zero) } } }
UICollectionViewFlowLayout具有
collectionViewContentSize属性,该属性确定可以滚动的区域的大小。 为了不使我们的生活复杂化,让我们保持其恒定不变,而与中央单元的大小无关。 为了使每个单元格具有正确的几何形状,您需要了解图片的
aspectRatio和距
contentOffset单元格中心的距离。 单元格越近,其
size.width / size.height越接近
aspectRatio 。 调整特定单元格的大小时,请使用
affineTransform移动其余单元格(向左和向右)。 事实证明,要计算特定单元的几何形状,您需要了解邻居(可见)的属性。
extension Cell { func attributes(from layout: ThumbnailLayout, with sideCells: [Cell]) -> UICollectionViewLayoutAttributes? { let attributes = layout.layoutAttributesForItem(at: indexPath) attributes?.size = size attributes?.center = center let translate = sideCells.reduce(0) { (current, cell) -> CGFloat in if indexPath < cell.indexPath { return current - cell.additionalWidth / 2 } if indexPath > cell.indexPath { return current + cell.additionalWidth / 2 } return current } attributes?.transform = CGAffineTransform(translationX: translate, y: .zero) return attributes } var additionalWidth: CGFloat { (dims.defaultSize.height * dims.aspectRatio - dims.defaultSize.width) * state.expanding } var size: CGSize { CGSize(width: dims.defaultSize.width + additionalWidth, height: dims.defaultSize.height) } var center: CGPoint { CGPoint(x: CGFloat(indexPath.row) * (dims.defaultSize.width + dims.inset) + dims.defaultSize.width / 2, y: dims.defaultSize.height / 2) } }
state.expanding被认为与
parallaxValue几乎相同。
func cell(for index: IndexPath, offsetX: CGFloat) -> Cell { let cell = Cell( indexPath: index, dims: Cell.Dimensions( defaultSize: itemSize, aspectRatio: dataSource(index.row), inset: config.distanceBetween, insetAsExpanded: config.distanceBetweenFocused), state: .default) guard let attribute = cell.attributes(from: self, with: []) else { return cell } let cellOffset = attribute.center.x - itemSize.width / 2 let widthWithOffset = itemSize.width + config.distanceBetween if abs(cellOffset - offsetX) < widthWithOffset { let expanding = 1 - abs(cellOffset - offsetX) / widthWithOffset return cell.updated(by: .expand(expanding)) } return cell } override func layoutAttributesForElements(in rect: CGRect) -> [UICollectionViewLayoutAttributes]? { return (0 ..< itemsCount) .map { IndexPath(row: $0, section: 0) } .map { cell(for: $0, offsetX: offsetWithoutInsets.x) } .compactMap { $0.attributes(from: self, with: cells) } }
4.放置小单元格元素的逻辑不仅取决于contentOffset,而且取决于用户交互
当用户滚动浏览一个小集合时,所有单元格的大小均相同。 滚动大集合时,情况并非如此。 (
请参见gif 3和5 )。 让我们编写一个动画器,以更新
ThumbnailLayout布局的属性。 动画师将自己存储
DisplayLink并每秒调用该块60次,从而可以访问当前进度。
easing functions各种
easing functions到动画制作器上很容易。 可以在文章末尾的链接上的github上查看实现。
让我们在
ThumbnailLayout输入
expandingRate属性,通过该属性
expanding所有
Cell expanding都将相乘。 事实证明,
expandingRate表示如果特定图片居中,则它将在
aspectRatio影响其尺寸。 使用
expandingRate == 0所有像元的大小相同。 在一个小集合的滚动开始时,我们将运行一个动画器,该动画器将ExpandingRate设置为0,在滚动结束时,反之亦然,将其设置为1。实际上,在更新布局时,中央单元和侧面单元的大小将发生变化。 与
contentOffset和抽搐没有
contentOffset !
class ScrollAnimation: NSObject { enum `Type` { case begin case end } let type: Type func run(completion: @escaping () -> Void) { let toValue: CGFloat = self.type == .begin ? 0 : 1 let currentExpanding = thumbnails.config.expandingRate let duration = TimeInterval(0.15 * abs(currentExpanding - toValue)) let animator = Animator(onProgress: { current, _ in let rate = currentExpanding + (toValue - currentExpanding) * current self.thumbnails.config.expandingRate = rate self.thumbnails.invalidateLayout() }, easing: .easeInOut) animator.animate(duration: duration) { _ in completion() } } }
func scrollViewWillBeginDragging(_ scrollView: UIScrollView) { if scrollView == thumbnails.collectionView { handle(event: .beginScrolling)
5.用于移动和删除的自定义动画
有很多文章讲述如何制作自定义动画来更新单元格,但在我们的情况下,它们对我们没有帮助。 文章和教程描述了如何覆盖更新后的单元格的属性。 在我们的情况下,更改已删除单元格的布局会产生副作用-相邻单元格的
expanding会发生变化,在动画过程中,该
expanding往往会取代已删除单元格的位置。
在
UICollectionViewFlowLayout更新内容的工作方式如下。 删除/添加单元格后,将开始
prepare(forCollectionViewUpdates:)方法,并提供一个
UICollectionViewUpdateItem数组,该数组可告诉我们更新/删除/添加了哪些单元格的索引。 接下来,布局将调用一组方法
finalLayoutAttributesForDisappearingItem(at:) initialLayoutAttributesForAppearingDecorationElement(ofKind:at:)
和他们的朋友一起装饰/补充意见。 收到更新数据的属性后,将调用
finalizeCollectionViewUpdates 。 苹果:
收集视图将在最后对所有更改进行动画处理之前,将此方法称为最后一步。 在用于执行所有插入,删除和移动动画的动画块中调用此方法,因此您可以根据需要使用此方法创建其他动画。 否则,您可以使用它来执行与管理布局对象的状态信息相关的所有最新任务。
麻烦的是,我们只能为
更新的单元格专门设置属性,而我们需要以不同的方式为所有单元格更改它们。 新的中心单元格应更改
aspectRatio ,而侧面单元格应进行
transform 。

在检查了删除/插入期间收集单元的默认动画的工作原理后,我们知道
finalizeCollectionViewUpdates中的层单元包含
CABasicAnimation ,如果您要为其余单元自定义动画,则可以在其中进行更改。 当日志显示在
performBatchUpdates和
prepare(forCollectionViewUpdates:) prepareAttributes(attributes:) prepare(forCollectionViewUpdates:)被调用时,情况变得更糟了,单元格的数量可能已经错误,尽管
collectionViewUpdates尚未启动,但很难维护和理解。 该怎么办? 您可以禁用这些内置动画!
final override func prepare(forCollectionViewUpdates updateItems: [UICollectionViewUpdateItem]) { super.prepare(forCollectionViewUpdates: updateItems) CATransaction.begin() CATransaction.setDisableActions(true) } final override func finalizeCollectionViewUpdates() { CATransaction.commit() }
配备了已经编写的动画制作器,我们将根据要求删除所有必需的动画,并在动画结束时启动
dataSource更新。 因此,我们将在更新时简化集合的动画,因为我们自己控制何时更改单元格数。
func delete( at indexPath: IndexPath, dataSourceUpdate: @escaping () -> Void, completion: (() -> Void)?) { DeleteAnimation(thumbnails: thumbnails, preview: preview, index: indexPath).run { let previousCount = self.thumbnails.itemsCount if previousCount == indexPath.row + 1 { self.activeIndex = previousCount - 1 } dataSourceUpdate() self.thumbnails.collectionView?.deleteItems(at: [indexPath]) self.preview.collectionView?.deleteItems(at: [indexPath]) completion?() } }
这样的动画将如何工作? 在
ThumbnailLayout我们存储可选的手册,这些手册可以更新特定单元格的几何形状。
class ThumbnailLayout { typealias CellUpdate = (Cell) -> Cell var updates: [IndexPath: CellUpdate] = [:]
有了这样的工具,您可以对单元的几何形状进行任何操作,在动画制作器工作期间抛出更新,并在赞美中将其删除。 也有可能合并更新。
updates[index] = newUpdate(updates[index])
删除动画代码非常麻烦;它位于存储库中的
DeleteAnimation.swift文件中。 单元之间焦点切换的动画以相同的方式实现。

6.更改方向时,“活动”单元格的索引不会丢失
即使您只是在
contentOffset中以及在更改方向时弹出一些值,也会调用
scrollViewDidScroll(_ scrollView:) 。 当两个集合的滚动同步时,在布局更新期间可能会出现一些问题。 以下技巧将帮助您:在布局更新中,可以将
scrollView.delegate设置为
nil 。
extension ScrollSynchronizer { private func bind() { preview.collectionView?.delegate = self thumbnails.collectionView?.delegate = self } private func unbind() { preview.collectionView?.delegate = nil thumbnails.collectionView?.delegate = nil } }
在更改方向时更新像元大小时,将如下所示:
extension PhotosViewController { override func viewWillTransition(to size: CGSize, with coordinator: UIViewControllerTransitionCoordinator) { super.viewWillTransition(to: size, with: coordinator) contentView.synchronizer.unbind() coordinator.animate(alongsideTransition: nil) { [weak self] _ in self?.contentView.synchronizer.bind() } } }
为了在更改方向时不会丢失期望的
contentOffset ,可以在
scrollView.delegate更新
scrollView.delegate 。 更改方向时,如果您覆盖了
shouldInvalidateLayout(forBoundsChange:) ,则布局将被禁用。 更改
bounds布局将要求澄清
contentOffset ,以使其澄清,您需要重新定义
targetContentOffset(forProposedContentOffset:) 。 苹果:
在布局更新期间或在布局之间转换时,集合视图将调用此方法,以使您有机会更改建议的内容偏移以在动画末尾使用。 如果动画或过渡可能导致项目以对您的设计而言并非最佳的方式放置,则可以覆盖此方法。
集合视图在调用prepare()和collectionViewContentSize方法之后调用此方法。
override func targetContentOffset(forProposedContentOffset proposedContentOffset: CGPoint) -> CGPoint { let targetOffset = super.targetContentOffset(forProposedContentOffset: proposedContentOffset) guard let layoutHandler = layoutHandler else { return targetOffset } let offset = CGFloat(layoutHandler.targetIndex) / CGFloat(itemsCount) return CGPoint( x: collectionViewContentSize.width * offset - farInset, y: targetOffset.y) }
感谢您的阅读!所有代码都可以在github.com/YetAnotherRzmn/PhotosApp中找到