如果您每次在响应中创建一个新组件时都执行Ctrl+C ,那么本文适合您!

该响应没有自己的CLI,很清楚为什么。 对于组件的结构,没有特定的规则,文档中仅包含一般性建议。 所有开发人员都使用已扎根于团队中的结构。 有时您必须支持不同风格的项目。
结构本身也取决于所使用的堆栈:
- 样式-样式化,scss模块,css;
- TypeScript或JavaScript;
- 测验
创建新组件时,有几种方法可以使您的生活更轻松。 例如,您可以在开发环境中(例如,在WebStorm中)创建模板。 但是今天,我们将研究如何从命令行创建完整的组件结构。 在本文的结尾,我们将能够使用单个命令来创建组件。 例如,例如:
npm run create components/Home/ComponentName
准备工作
我们将使用Create React App创建项目。
创建一个项目:
npx create-react-app react-cli
我们所有的代码将存储在一个文件中。 我们在项目的根目录中创建cli文件夹,并在其内部创建create.js文件。
要工作,我们需要3个模块,然后将它们导入到我们的文件中。
fs-用于处理文件系统的模块。
path-用于处理文件路径的模块。
minimist-用于从命令行转换参数的模块。
处理参数
为了创建一个组件,我们需要将组件的路径和名称传递给命令行。 我们将在一行中传输此信息( 例如, components/folder1/folder2/Menu ),然后将其解析为路径和名称。
可以从process对象中检索所有参数。 假设我们在控制台中输入以下行:
node cli/create.js --path components/folder/Menu
结果,我们得到:
console.log(process.argv);
使用minimist模块,我们可以将参数转换为对象:
太好了,您已经可以使用它了。
创建目录
首先,准备必要的变量。 我们需要项目的src文件夹的完整路径,作为数组的参数的路径以及组件的名称。
假设我们指出了一条不存在的路径。 如果没有这些子文件夹,我们必须以一种很好的方式来创建它们。 因此,让我们开始吧。
在这里,我们遍历路径的所有元素,并在必要时使用mkdirSync方法创建目录。 在此之前,我们使用resolve方法在一行中标准化了组件的路径。 执行完这些操作后,我们将创建必要的目录结构。
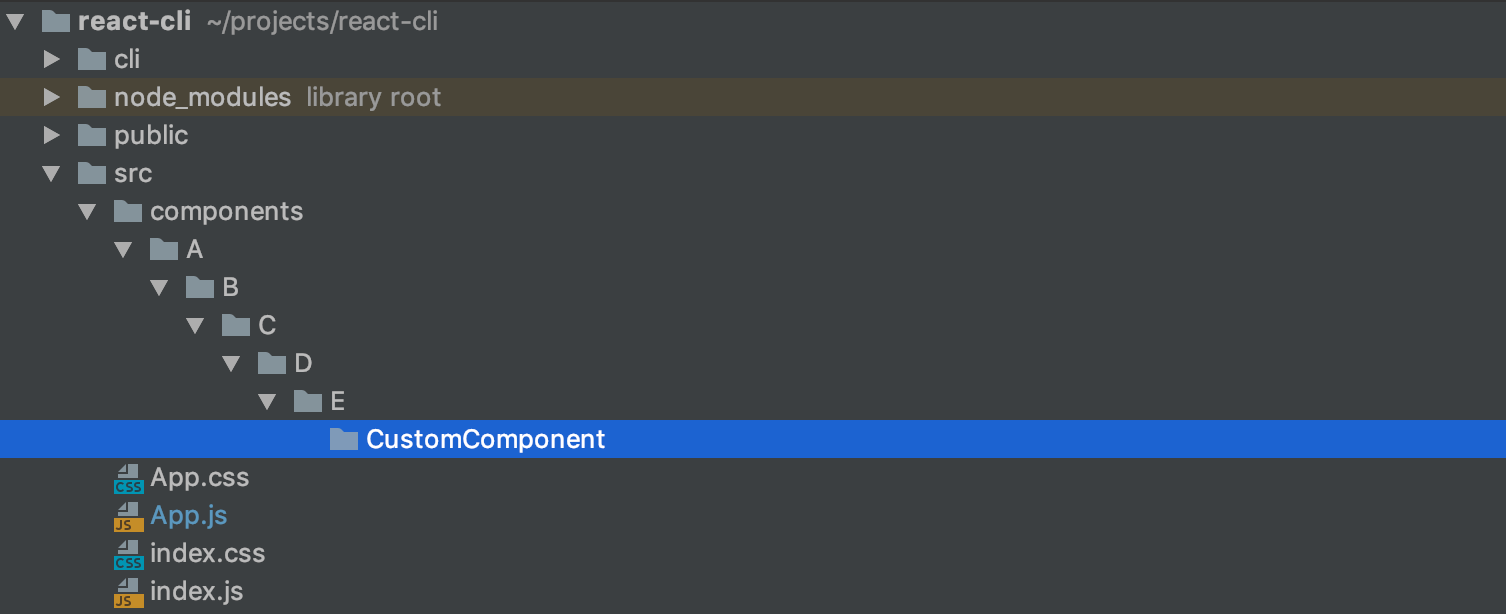
测试笔试。 我们在命令行中输入以下命令(同时, src文件夹中还没有任何目录):
node cli/create.js --path components/A/B/C/D/E/CustomComponent
我们得到以下结果:
创建组件文件
干得好,干了,剩下的就是创建组件文件了。
我们将使用最简单的组件结构:
原来,我们需要创建3个文件。
1.组件模板
import React from 'react'; import './CustomComponent.css'; const CustomComponent = () => { return ( <div className="wrapper"> </div> ); }; export default CustomComponent;
2.索引文件模板
export { default } from './CustomComponent';
3.样式文件模板
.wrapper {}
首先,让我们在一个变量中获取组件的完整路径(包括组件的个人文件夹):
使用writeFileSync创建新文件,该writeFileSync采用文件路径和内容。
创建组件文件:
创建索引文件:
创建样式表:
做完了!
现在让我们看看发生了什么。
考虑到评论,结果只有43行,对于这样有用的东西还不错!
现在让我们尝试创建一个组件:
node cli/create.js --path components/folder1/folder2/Button
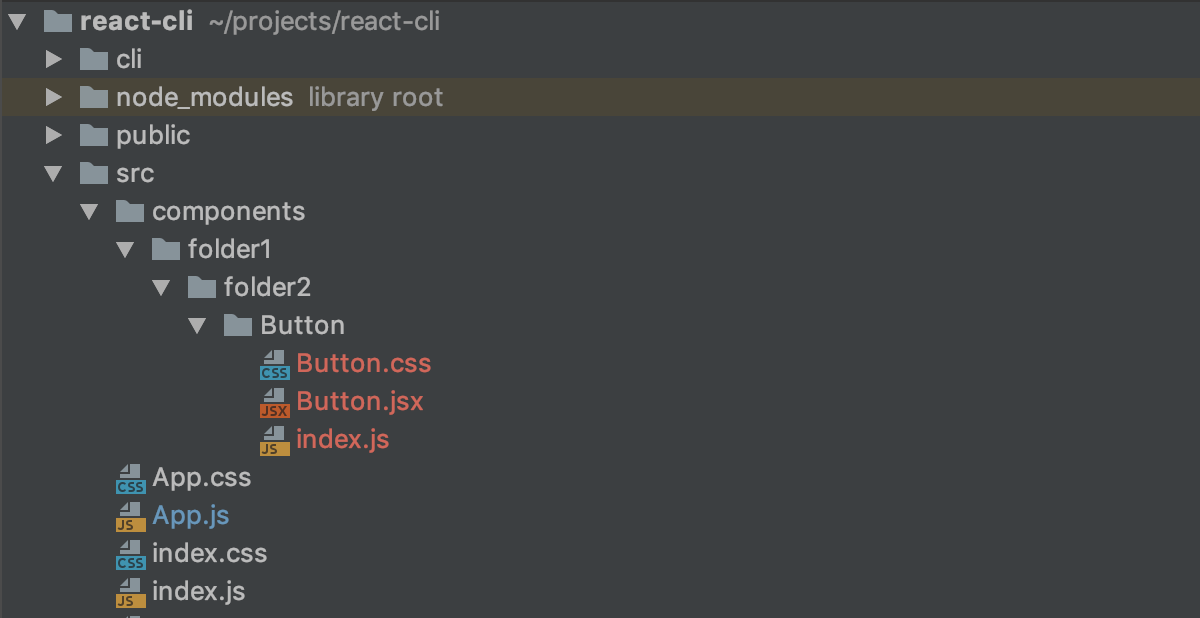
一切顺利! 最后的接触...
向package.json添加命令
将命令添加到package.json文件中,以便每次我们都不写脚本路径时
{ "name": "react-cli", "version": "0.1.0", "private": true, "dependencies": { "react": "^16.12.0", "react-dom": "^16.12.0", "react-scripts": "3.2.0" }, "scripts": { "start": "react-scripts start", "build": "react-scripts build", "test": "react-scripts test", "eject": "react-scripts eject", "create": "node cli/create.js --path" }, "eslintConfig": { "extends": "react-app" }, "browserslist": { "production": [ ">0.2%", "not dead", "not op_mini all" ], "development": [ "last 1 chrome version", "last 1 firefox version", "last 1 safari version" ] } }
现在代替:
node cli/create.js --path components/folder1/folder2/Button
我们可以写
npm run create components/folder1/folder2/Button
该项目的源代码可以在github上查看