我们将制作一个程序,从状态栏启动应用程序。
您将需要终端,Swift 3.1或更高版本以及任何文本编辑器。
我在macOS Sierra 10.12.6和macOS Catalina 10.15上进行了测试。
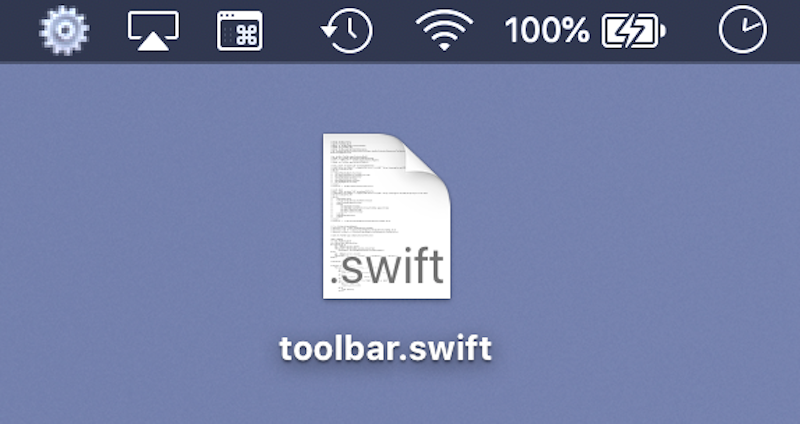
打开终端/应用程序/实用程序/终端并创建一个文件。
touch toolbar.swift
打开toolbar.swift文件并编写以下代码:
import AppKit var app: NSApplication var statusItem: NSStatusItem #if swift(>=5.1) app = NSApplication.shared statusItem = NSStatusBar.system.statusItem( withLength: CGFloat(NSStatusItem.variableLength)) #else app = NSApplication.shared() statusItem = NSStatusBar.system().statusItem(withLength: CGFloat(32)) #endif if #available(macOS 10.10, *) { statusItem.button?.title = "\u{2699}\u{FE0F}" }
需要部分代码来维护与该语言的旧版本的兼容性。
需要行app.setActivationPolicy(.prohibited),以便活动应用程序的图标不会出现在Dock中。
保存文件并使用以下命令运行程序:
swift toolbar.swift
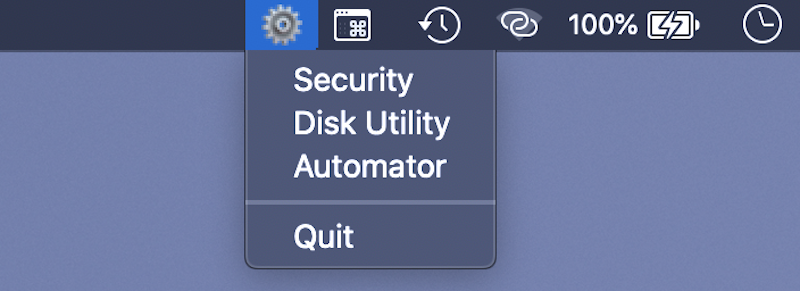
如果没有错误,状态面板上将出现一个“无用”按钮。 我使用了UTF齿轮符号“ \ u {2699} \ u {FE0F}”,但是您可以使用statusItem.button?.Image属性添加所需的图片。
通过单击终端ctrl-c退出程序。
我决定不为如此小的应用程序创建AppDelegate类,而是扩展了NSApplication类。 在//扩展名后面添加以下行:
extension NSApplication { func runTask(_ appName: String, _ arg: String = "") { let task = Process() #if swift(>=5.1) task.executableURL = URL(fileURLWithPath: "/usr/bin/open") #else task.launchPath = "/usr/bin/open" #endif task.arguments = arg.isEmpty ?[appName] : [arg, appName] #if swift(>=5.1) do {try task.run()} catch {print(error)} #else task.launch() #endif } @objc func securityRun () { self.runTask("/System/Library/PreferencePanes/Security.prefPane") } @objc func diskRun () { self.runTask( "disk utility", "-a") } @objc func automatorRun () { self.runTask( "automator", "-a") } }
请注意,这样不仅可以更快地运行应用程序,而且可以运行单独的SystemPreference页面。
方法需要一个接口。 在//菜单之后:
let menu = NSMenu() let items: [String] = ["Security", "Disk Utility", "Automator", "Quit"] var sel: [Selector] = [] let shared = NSApplication.shared #if swift(>=5.1) sel = [ #selector(shared.securityRun), #selector(shared.diskRun), #selector(shared.automatorRun), #selector(shared.terminate)] #else sel = [ #selector(shared().securityRun), #selector(shared().diskRun), #selector(shared().automatorRun), #selector(shared().terminate)] #endif for i in 0..<items.count { menu.addItem(NSMenuItem( title: items[i], action: sel[i], keyEquivalent: "")) if i==items.count-2 { menu.addItem(NSMenuItem.separator()) } } statusItem.menu = menu
对于所有方法,我们从NSApplication类的实例创建按钮并将方法附加到它们。 我们添加了“退出”按钮,因为我们需要允许用户不使用终端退出程序。
我们编译程序。 请注意,键入swiftc而不是swiftc。
swiftc toolbar.swift
工具栏文件已出现在当前目录中。 可以使用以下命令启动它:
./toolbar
如果我们双击运行工具栏文件,则终端窗口将随应用程序一起出现,但这不是很方便。
让我们尝试解决这种情况。 我们在终端中启动所有命令。
首先,为我们的应用程序创建目录树。
mkdir -p ToolBar.app/Contents/MacOS
我们更改对应用程序的访问。
chmod a+x ToolBar.app
创建图标的目录。
mkdir ToolBar.app/Contents/Resources
复制并更改标准图标之一的名称。
cp /System/Library/CoreServices/CoreTypes.bundle/Contents/Resources/ToolbarAdvanced.icns ToolBar.app/Contents/Resources/AppIcon.icns
将已编译的工具栏文件移至MacOS目录。
mv toolbar ToolBar.app/Contents/MacOS
将访问模式更改为工具栏文件。
chmod a+x ToolBar.app/Contents/MacOS/toolbar
创建一个包含有关应用程序类型信息的PkgInfo文件。 需要-n标志,以便PkgInfo文件中没有换行符。
echo -n "APPL????" > ToolBar.app/Contents/PkgInfo
将访问模式更改为PkgInfo文件。
chmod a+x ToolBar.app/Contents/PkgInfo
使用应用程序信息创建一个最小的Info.plist:
echo '<?xml version="1.0" encoding="UTF-8"?> <!DOCTYPE plist PUBLIC "-//Apple//DTD PLIST 1.0//EN" "http://www.apple.com/DTDs/PropertyList-1.0.dtd"> <plist version="1.0"> <dict> <key>CFBundleIdentifier</key> <string>example.ToolBar</string> <key>CFBundleExecutable</key> <string>toolbar</string> <key>CFBundleIconFile</key> <string>AppIcon</string> </dict> </plist>' > ToolBar.app/Contents/Info.plist
将ToolBar.app应用程序移动到/ Applications / Utilities。
终端会要求您输入管理员密码。
sudo mv ToolBar.app /Applications/Utilities
完成这些操作后,新的应用程序应出现在/ Applications / Utilities中,并且可以通过启动板启动它(由于某些原因,包含实用程序的目录称为Others)。

仍然需要添加我们的应用程序以自动运行。
为此,请创建文件〜/ Library / LaunchAgents / example.ToolBar.plist。 让我们执行以下命令:
echo '<?xml version="1.0" encoding="UTF-8"?> <!DOCTYPE plist PUBLIC "-//Apple//DTD PLIST 1.0//EN" "http://www.apple.com/DTDs/PropertyList-1.0.dtd"> <plist version="1.0"> <dict> <key>Label</key> <string>example.ToolBar</string> <key>ProgramArguments</key> <array> <string>open</string> <string>/Applications/Utilities/ToolBar.app</string> <string>--args</string> <string>-silent</string> </array> <key>RunAtLoad</key> <true/> </dict> </plist>' > ~/Library/LaunchAgents/example.ToolBar.plist
检查是否出现所需的文件。
ls ~/Library/LaunchAgents
要在不重新启动的情况下检查自动运行,请退出应用程序并在终端中运行命令:
launchctl load -w ~/Library/LaunchAgents/example.ToolBar.plist
应用程序图标应出现在状态栏中。
退出应用程序并卸载命令:
launchctl unload -w ~/Library/LaunchAgents/example.ToolBar.plist
现在,应用程序将在系统重新引导时启动,并且可以从Dock中删除其他图标。
最有可能的是,您可以通过这种方式制作iTunes的迷你播放器,简单的待办事项列表或在桌面上对齐窗口的界面。