
本文总结了Priti Desai撰写的OpenWhisk翻译说明系列。 今天,我们将研究在Kubernetes上部署带有正确命令的OpenWhisk的过程,该命令用于处理当前版本的应用程序。 它还将描述如何使用Nodejs运行时在Kubernetes中使用Knative和TektonCD启动OpenWhisk函数。
在Kubernetes上部署OpenWhisk
在几天的过程中,我尝试了在Kubernetes中部署OpenWhisk的过程,以创建一个快速便捷的培训场地。 而且由于我是Kubernetes的新手,所以我相信成功部署花了一天半的时间。 该存储库非常清楚地说明了如何将OpenWhisk部署到Kubernetes。 这是针对Mac的部署说明( 我也将在Linux上进行所有操作,因为我更喜欢Linux。-译者注)。
- 我们安装了
asdf软件包管理器,然后我们自动修复~/.bash_profile或类似的代码:
$ brew install asdf $ [ -s "/usr/local/opt/asdf/asdf.sh" ] && . /usr/local/opt/asdf/asdf.sh $ source ~/.bash_profile
[ 在Linux上,尽管有一些准备工作,但无需执行此步骤。 -大约 译者]
- 添加
minikube和kubelet :
$ asdf plugin-add kubectl $ asdf plugin-add minikube
[ 再次在Linux上跳过此步骤。 -大约 译者]
- 我们放入minikube和kubelet:
$ asdf install kubectl 1.9.0 $ asdf global kubectl 1.9.0 $ asdf install minikube 0.25.2 $ asdf global minikube 0.25.2
[ 已安装特定版本,但是我检查了Linux最新可用版本上的所有内容; 我怀疑您可以放心地使用最新的。 -大约 译者]
在Linux上,此步骤是这样完成的(所有内容都放在〜/ bin中,我在PATH中有翻译说明):
$ curl -L0 minikube https://storage.googleapis.com/minikube/releases/latest/minikube-linux-amd64 && chmod +x minikube && mv minikube ~/bin/ $ curl -L0 https://storage.googleapis.com/kubernetes-release/release/$(curl -s https://storage.googleapis.com/kubernetes-release/release/stable.txt)/bin/linux/amd64/kubectl && chmod +x kubectl && mv kubectl ~/bin/
- 我们创建了minikube虚拟机(必须预先安装VirtualBox):
$ minikube start --cpus 2 --memory 4096 --kubernetes-version=v1.9.0 --extra-config=apiserver.Authorization.Mode=RBAC
[ 一切对我来说都可以使用 minikube start 命令执行 ,没有任何参数且具有默认值。 -大约 译者]
$ minikube start minikube v1.5.2 on Debian 8.11 Automatically selected the 'virtualbox' driver Downloading VM boot image ... > minikube-v1.5.1.iso.sha256: 65 B / 65 B [--------------] 100.00% ? p/s 0s > minikube-v1.5.1.iso: 143.76 MiB / 143.76 MiB [-] 100.00% 5.63 MiB p/s 26s Creating virtualbox VM (CPUs=2, Memory=4096MB, Disk=20000MB) ... Preparing Kubernetes v1.16.2 on Docker '18.09.9' ... Downloading kubelet v1.16.2 Downloading kubeadm v1.16.2 Pulling images ... Launching Kubernetes ... Waiting for: apiserver Done! kubectl is now configured to use "minikube"
- 将Docker中的网络切换为混杂模式:
$ minikube ssh -- sudo ip link set docker0 promisc on
- 创建一个名称空间并标记工作节点:
$ kubectl create namespace openwhisk $ kubectl label nodes --all openwhisk-role=invoker
- 我们获取存储库的内容,并在mycluster.yaml文件中重新定义入口的类型:
$ git clone https://github.com/apache/incubator-openwhisk-deploy-kube.git $ cd incubator-openwhisk-deploy-kube/ $ cat << "EOF" > mycluster.yaml whisk: ingress: type: NodePort api_host_name: 192.168.99.100 api_host_port: 31001 nginx: httpsNodePort: 31001 EOF
- 安装Helm并使用它进行部署:
$ brew install kubernetes-helm $ helm init # init Helm Tiller, Helm v3+ $ kubectl get pods -n kube-system # verify that tiller-deploy is in the running state, helm v3+ $ kubectl create clusterrolebinding tiller-cluster-admin --clusterrole=cluster-admin --serviceaccount=kube-system:default $ helm install ./openwhisk/helm/ --namespace=openwhisk -f mycluster.yaml
[ 在具有最新版本(可使用v3.0.1的Linux)上,这会有所不同。 -大约 译者]
$ curl -L0 https://get.helm.sh/helm-v3.0.1-linux-amd64.tar.gz | tar -xzvf - linux-amd64/helm --strip-components=1; sudo mv helm /usr/local/bin $ kubectl create clusterrolebinding tiller-cluster-admin --clusterrole=cluster-admin --serviceaccount=kube-system:default $ helm install ./openwhisk/helm/ --namespace=openwhisk --generate-name -f mycluster.yaml
- 检查一切是否都上升了(状态=运行或已完成):
$ kubectl get pods -n openwhisk NAME READY STATUS RESTARTS AGE openwhisk-1576070780-alarmprovider-6868dc694-plvpf 1/1 Running 1 1d5h openwhisk-1576070780-apigateway-8d56f4979-825hf 1/1 Running 1 1d5h openwhisk-1576070780-cloudantprovider-544bb46596-9scph 1/1 Running 1 1d5h openwhisk-1576070780-controller-0 1/1 Running 2 1d5h openwhisk-1576070780-couchdb-7fd7f6c7cc-42tw6 1/1 Running 1 1d5h openwhisk-1576070780-gen-certs-z9nsb 0/1 Completed 0 1d5h openwhisk-1576070780-init-couchdb-r2vmt 0/1 Completed 0 1d5h openwhisk-1576070780-install-packages-27dtr 0/1 Completed 0 1d4h openwhisk-1576070780-invoker-0 1/1 Running 1 1d5h openwhisk-1576070780-kafka-0 1/1 Running 1 1d5h openwhisk-1576070780-kafkaprovider-f8b4cf4fc-7z4gt 1/1 Running 1 1d5h openwhisk-1576070780-nginx-6dbdbf69bc-5x76n 1/1 Running 1 1d5h openwhisk-1576070780-redis-cfd8756f4-hkrt6 1/1 Running 1 1d5h openwhisk-1576070780-wskadmin 1/1 Running 1 1d5h openwhisk-1576070780-zookeeper-0 1/1 Running 1 1d5h wskopenwhisk-1576070780-invoker-00-1-prewarm-nodejs10 1/1 Running 0 61s wskopenwhisk-1576070780-invoker-00-2-prewarm-nodejs10 1/1 Running 0 61s wskopenwhisk-1576070780-invoker-00-3-whisksystem-invokerhealtht 1/1 Running 0 59s
- 我们为工作配置wsk:
$ wsk property set --apihost 192.168.99.100:31001 $ wsk property set --auth 23bc46b1-71f6-4ed5-8c54-816aa4f8c502:123zO3xZCLrMN6v2BKK1dXYFpXlPkccOFqm12CdAsMgRU4VrNZ9lyGVCGuMDGIwP
我们检查:
$ wsk -i list Entities in namespace: default packages actions triggers rules
问题与解决方案
getsockopt:连接被拒绝
$ wsk -i list error: Unable to obtain the list of entities for namespace 'default': Get http://192.168.99.100:31001/api/v1/namespaces/_/actions?limit=0&skip=0: dial tcp 192.168.99.100:31001: getsockopt: connection refused
我们检查命名空间openwhisk的容器openwhisk处于“ Running状态,因为 有时会因CreateContainerConfigError错误而崩溃。
调用方仍在初始化-初始化:1/2
下载各种运行时的过程可能会花费很多时间。 为了提高速度,您可以在mycluster.yaml文件中指定一个缩短的最小列表:
whisk: runtimes: "runtimes-minimal-travis.json"
名为-install-packages-的容器因错误而掉线
只需增加活动测试的超时时间即可。
在Knative顶部安装OpenWhisk
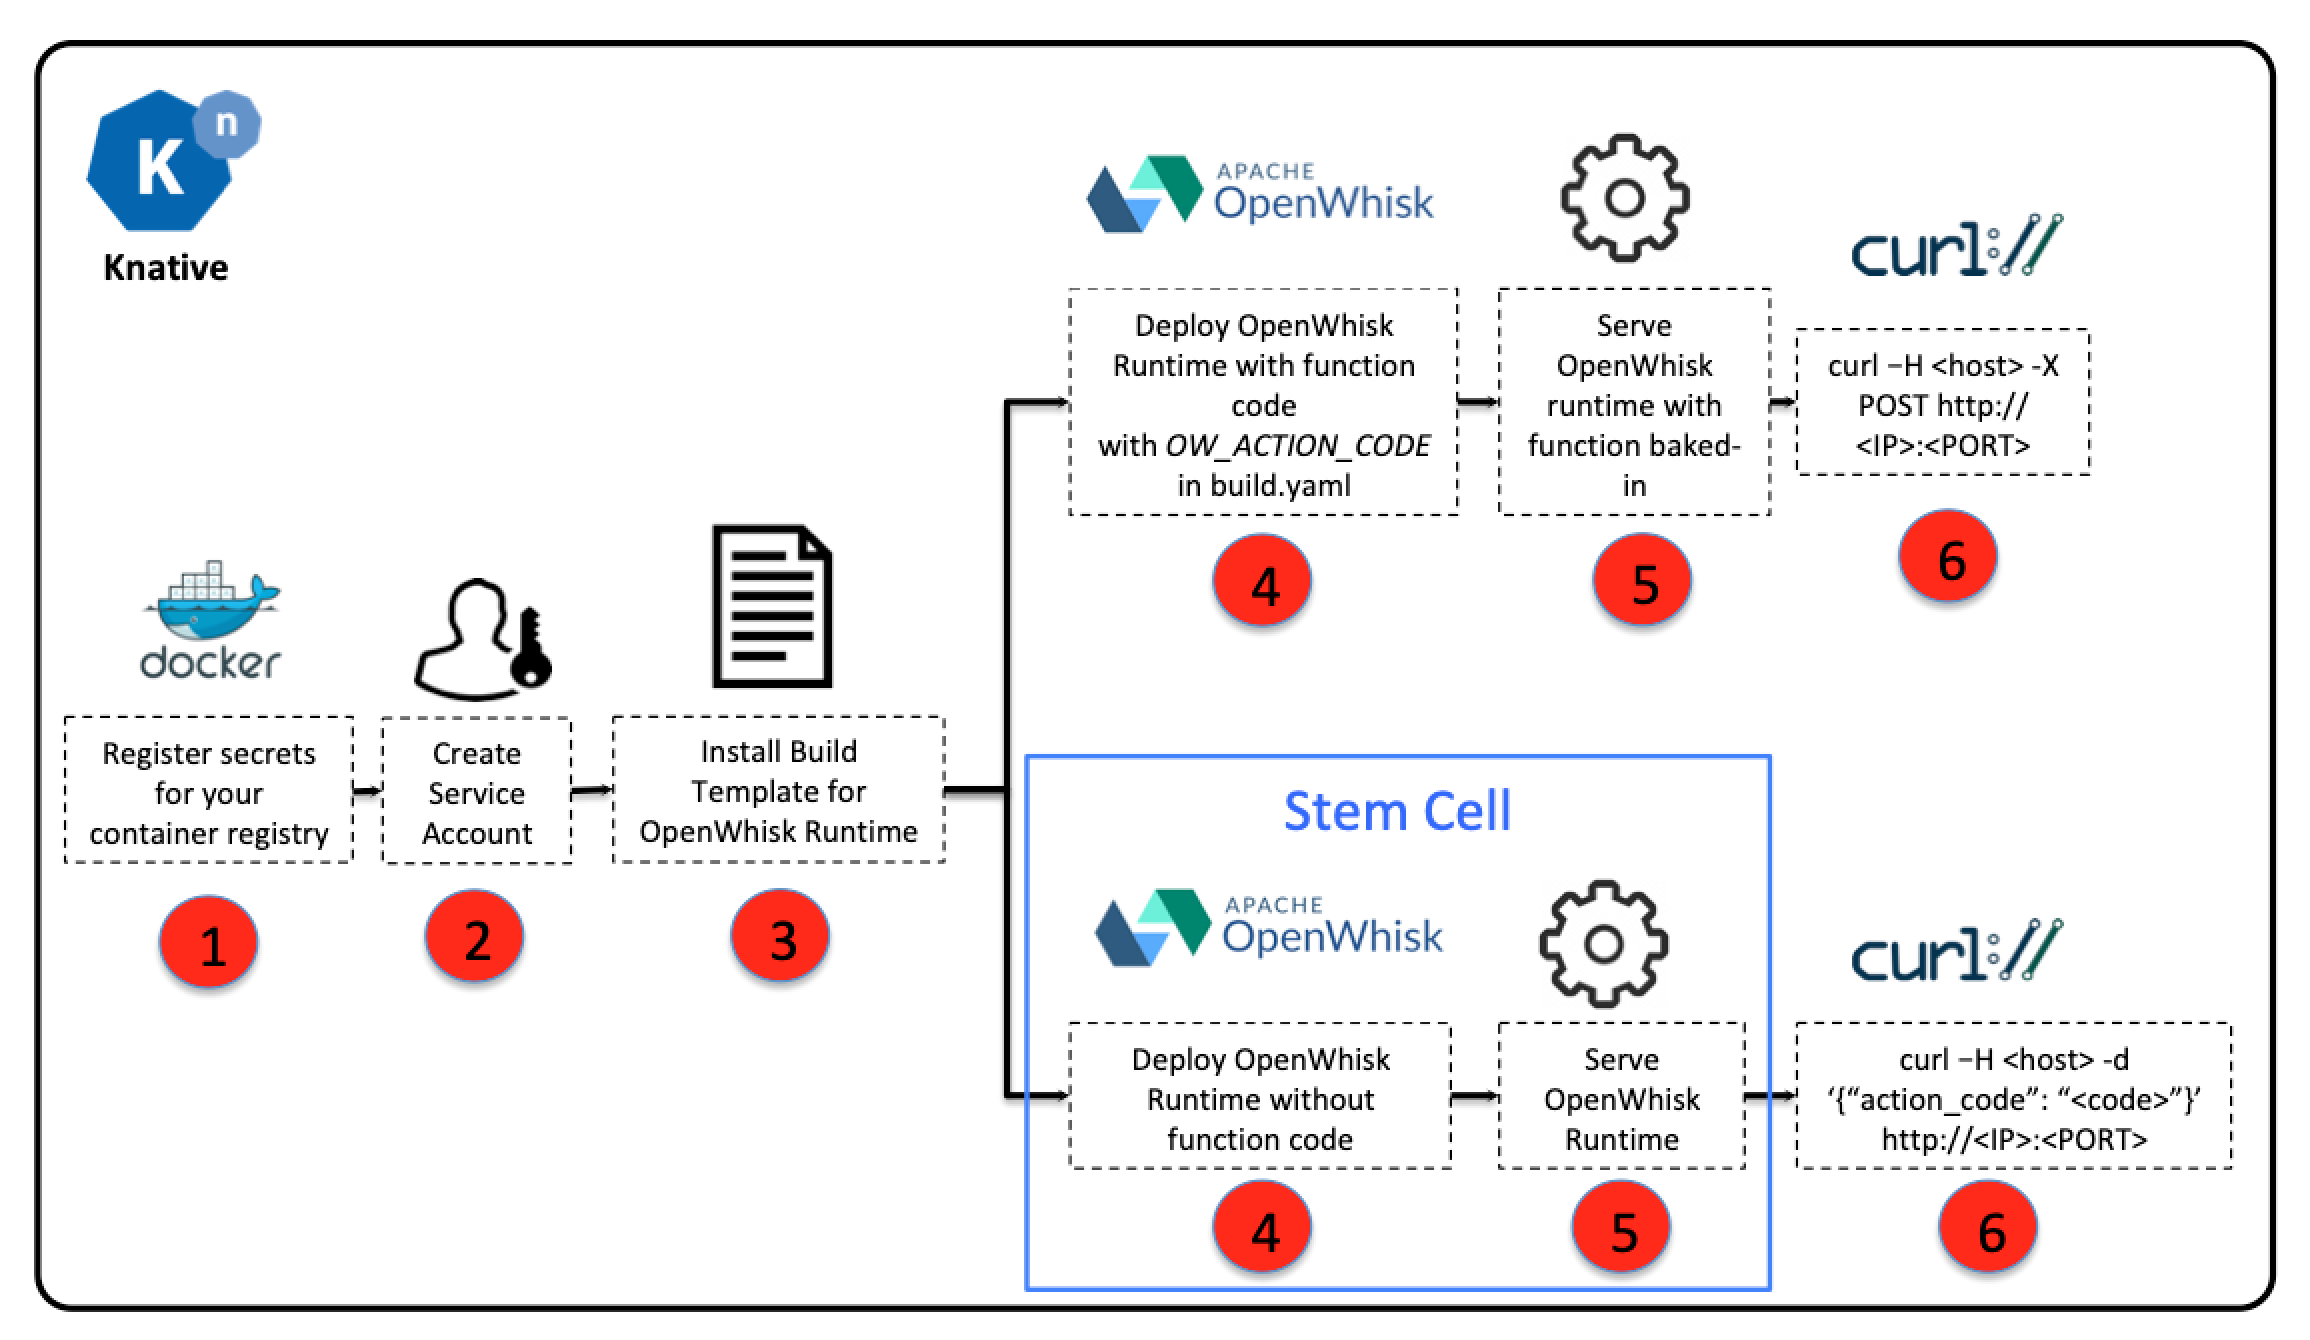
Priti Desai使用Knative Build和BuildTemplates在IBM云以及常规minikube集群的顶部进行了安装。 根据最新的软件版本,我还将根据我们先前在博客中的描述 ,将其安装在minukube的顶部。 由于Knative Build和BuildTemplates已正式弃用,因此我将以Tekton Pipelines的形式使用推荐的替代品。 本文的其余部分是在阅读Tekton Pipelines文档之后编写的,但基于Priti的思想。 要工作,您将需要访问某些Docker Registry-与原始作者一样,我将使用DockerHub。
$ curl -L0 https://github.com/solo-io/gloo/releases/download/v1.2.10/glooctl-linux-amd64; chmod +x glooctl-linux-amd64; mv glooctl-linux-amd64 ~/bin $ glooctl install knative $ kubectl get pods -n knative-serving NAME READY STATUS RESTARTS AGE activator-77fc555665-rvrst 1/1 Running 0 2m23s autoscaler-5c98b7c9b6-x8hh4 1/1 Running 0 2m21s autoscaler-hpa-5cfd4f6845-w87kq 1/1 Running 0 2m22s controller-7fd74c8f67-tprm8 1/1 Running 0 2m19s webhook-74847bb77c-txr2g 1/1 Running 0 2m17s $ kubectl get pods -n gloo-system NAME READY STATUS RESTARTS AGE discovery-859d7fbc9c-8xhvh 1/1 Running 0 51s gloo-545886d9c6-85mwt 1/1 Running 0 51s ingress-67d4996d75-lkkmw 1/1 Running 0 50s knative-external-proxy-767dfd656c-wwv2z 1/1 Running 0 50s knative-internal-proxy-6fdddcc6b5-7vqd8 1/1 Running 0 51s
在Knative之上构建并运行OpenWhisk
- 我们得到该存储库的内容:
$ git clone https://github.com/tektoncd/catalog/ $ cd catalog/openwhisk
- 我们以环境变量的形式设置用于访问注册表的数据,并将其另存为Kubernetes机密:
$ export DOCKER_USERNAME=<your docker hub username> $ export DOCKER_PASSWORD=<your docker hub password> $ sed -e 's/${DOCKER_USERNAME}/'"$DOCKER_USERNAME"'/' -e 's/${DOCKER_PASSWORD}/'"$DOCKER_PASSWORD"'/' docker-secret.yaml.tmpl > docker-secret.yaml $ kubectl apply -f docker-secret.yaml
我们检查:
$ kubectl get secret NAME TYPE DATA AGE dockerhub-user-pass kubernetes.io/basic-auth 2 21s
- 创建一个帐户来构建环境:
$ kubectl apply -f service-account.yaml
我们检查:
$ kubectl get serviceaccount/openwhisk-runtime-builder NAME SECRETS AGE openwhisk-runtime-builder 2 31m
- 创建一个任务来为OpenWhisk构建图像
$ kubectl apply -f openwhisk.yaml task.tekton.dev/openwhisk created
- 运行任务以构建映像(以NodeJS为例):
创建具有内容的taskrun.yaml文件:
# Git Pipeline Resource for OpenWhisk NodeJS Runtime apiVersion: tekton.dev/v1alpha1 kind: PipelineResource metadata: name: openwhisk-nodejs-runtime-git spec: type: git params: - name: revision value: master - name: url value: https://github.com/apache/openwhisk-runtime-nodejs.git --- # Image Pipeline Resource for OpenWhisk NodeJS Sample Application apiVersion: tekton.dev/v1alpha1 kind: PipelineResource metadata: name: openwhisk-nodejs-helloworld-image spec: type: image params: - name: url value: docker.io/${DOCKER_USERNAME}/openwhisk-nodejs-helloworld --- # Task Run to build NodeJS image with the action source apiVersion: tekton.dev/v1alpha1 kind: TaskRun metadata: name: openwhisk-nodejs-helloworld spec: serviceAccountName: openwhisk-runtime-builder taskRef: name: openwhisk inputs: resources: - name: runtime-git resourceRef: name: openwhisk-nodejs-runtime-git params: - name: DOCKERFILE value: "./runtime-git/core/nodejs10Action/knative/Dockerfile" - name: OW_ACTION_NAME value: "nodejs-helloworld" - name: OW_ACTION_CODE value: "function main() {return {payload: 'Hello World!'};}" - name: OW_PROJECT_URL value: "" outputs: resources: - name: runtime-image resourceRef: name: openwhisk-nodejs-helloworld-image ---
我们应用此文件的当前数据:
$ sed 's/${DOCKER_USERNAME}/'"$DOCKER_USERNAME"'/' -i taskrun.yaml
我们适用:
$ kubectl apply -f taskrun.yaml pipelineresource.tekton.dev/openwhisk-nodejs-runtime-git created pipelineresource.tekton.dev/openwhisk-nodejs-helloworld-image created taskrun.tekton.dev/openwhisk-nodejs-helloworld created
检查工作包括获取窗格的名称,查看其状态。 您还可以查看每个步骤的日志,例如:
$ kubectl get taskrun NAME SUCCEEDED REASON STARTTIME COMPLETIONTIME openwhisk-nodejs-helloworld True Succeeded 5m15s 44s $ kubectl get pod openwhisk-nodejs-helloworld-pod-4640d3 NAME READY STATUS RESTARTS AGE openwhisk-nodejs-helloworld-pod-4640d3 0/6 Completed 0 5m20s $ kubectl logs openwhisk-nodejs-helloworld-pod-4640d3 -c step-git-source-openwhisk-nodejs-runtime-git-r8vhr {"level":"info","ts":1576532931.5880227,"logger":"fallback-logger","caller":"logging/config.go:69","msg":"Fetch GitHub commit ID from kodata failed: open /var/run/ko/refs/heads/master: no such file or directory"} {"level":"info","ts":1576532936.538926,"logger":"fallback-logger","caller":"git/git.go:81","msg":"Successfully cloned https://github.com/apache/openwhisk-runtime-nodejs.git @ master in path /workspace/runtime-git"} {"level":"warn","ts":1576532936.5395331,"logger":"fallback-logger","caller":"git/git.go:128","msg":"Unexpected error: creating symlink: symlink /tekton/home/.ssh /root/.ssh: file exists"} {"level":"info","ts":1576532936.8202565,"logger":"fallback-logger","caller":"git/git.go:109","msg":"Successfully initialized and updated submodules in path /workspace/runtime-git"}
执行后,映像将出现在我们的注册表中,可以使用旨在与Knative服务一起使用的kn实用程序进行部署,例如:
kn service create nodejs-helloworld --image docker.io/${DOCKER_USERNAME}/openwhisk-nodejs-helloworld Service 'nodejs-helloworld' successfully created in namespace 'default'. Waiting for service 'nodejs-helloworld' to become ready ... OK Service URL: http://nodejs-helloworld.default.example.com
在使用Gloo的情况下,您可以通过以下方式检查功能:
$ curl -H "Host: nodejs-helloworld.default.example.com" -X POST $(glooctl proxy url --name knative-external-proxy) {"OK":true} $ curl -H "Host: nodejs-helloworld.default.example.com" -X POST $(glooctl proxy url --name knative-external-proxy) {"payload":"Hello World!"}
其他自行车文章
基于OpenWhisk的无服务器计算,第1部分
基于OpenWhisk的无服务器计算,第2部分
基于OpenWhisk的无服务器计算,第3部分
基于OpenWhisk的无服务器计算,第4部分